Introduction to WebTTY and WebRTC in Go
In the ever-evolving landscape of software development, remote collaboration and real-time communication have become essential components. Among the various tools and technologies available, WebTTY and WebRTC stand out for their ability to facilitate remote terminal sessions seamlessly. This article delves into the integration of WebTTY with WebRTC, particularly within the Go programming language, to create a robust solution for sharing terminal sessions.
What is WebTTY?
WebTTY is an innovative tool that allows developers to share their terminal sessions over the web. This tool bridges the gap between local terminal environments and remote participants, making it possible to share command-line interactions in real-time. WebTTY leverages WebSockets to enable this communication, ensuring a smooth and responsive experience for users.
Overview of WebRTC Technology
WebRTC (Web Real-Time Communication) is a powerful technology that supports real-time audio, video, and data sharing directly between browsers and devices. It eliminates the need for additional plugins or external software, making it a highly efficient solution for real-time communication. WebRTC’s peer-to-peer architecture ensures low latency and high performance, which are crucial for interactive applications like terminal sharing.
Why Use WebTTY with WebRTC in Go?
Integrating WebTTY with WebRTC in Go combines the strengths of these technologies to create an optimal solution for terminal sharing. Go, known for its concurrency model and performance, is an ideal choice for handling the real-time nature of WebRTC and the interactive demands of terminal sessions. By using Go, developers can build a scalable and efficient terminal sharing application that leverages WebTTY’s capabilities and WebRTC’s robust communication framework.
In the following sections, we will guide you through setting up your WebTTY app, configuring WebRTC connections, and implementing various components to create a fully functional terminal sharing application in Go.
Getting Started with the Code
Setting Up Your WebTTY App
Creating a robust terminal sharing application using WebTTY and WebRTC in Go involves several steps. This section will guide you through setting up the basic structure of your WebTTY app, installing necessary dependencies, and understanding the project architecture.
[a] Create a New WebTTY App in Go
To get started, you'll need to set up a new Go project for your WebTTY application. If you haven't already, install Go from the
official Go website
. Once Go is installed, create a new directory for your project and initialize a new Go module:bash
1mkdir webtty-app
2cd webtty-app
3go mod init github.com/yourusername/webtty-app
[b] Install Necessary Dependencies
Next, you'll need to install the WebTTY package and other necessary dependencies. WebTTY can be integrated into your Go project via the
go get command. Run the following commands to install WebTTY and other required packages:bash
1go get github.com/maxmcd/webtty
2go get github.com/gorilla/websocket
Structure of the Project
A well-structured project is essential for maintainability and scalability. Your project directory should be organized in a way that separates different concerns. Here's a basic structure for your WebTTY app:
GO
1webtty-app/
2├── main.go
3├── handler/
4│   └── websocket.go
5├── terminal/
6│   └── terminal.go
7└── web/
8    └── index.html
Overview of the App Architecture
Main Application (main.go)
This is the entry point of your application. It initializes the server, sets up routes, and handles overall application configuration.
WebSocket Handler (handler/websocket.go)
This component manages WebSocket connections between the client and server. It handles the bidirectional communication required for terminal sharing.
Terminal Interface (terminal/terminal.go)
This module interacts with the local terminal and streams input/output through the WebSocket connections.
Web Interface (web/index.html)
The front-end component that users interact with. It includes the user interface for connecting to and viewing terminal sessions.
In the following sections, we will go into detail on setting up and implementing each of these components, starting with the
main.go file and moving through the WebSocket handler, terminal interface, and front-end integration. By the end of this guide, you will have a fully functional WebTTY application that leverages the power of WebRTC for real-time terminal sharing.Step 1: Get Started with main.go
Initializing Your WebTTY Project
The
main.go file serves as the backbone of your WebTTY application. It is the entry point where you will set up your server, configure routes, and handle initial configurations. Let's dive into the process of setting up main.go for your WebTTY project.Setting Up main.go
First, create the
main.go file in your project directory. This file will contain the code necessary to start your web server and manage the overall application flow.GO
1package main
2
3import (
4    "log"
5    "net/http"
6    "github.com/gorilla/mux"
7    "github.com/yourusername/webtty-app/handler"
8)
9
10func main() {
11    // Initialize a new router
12    r := mux.NewRouter()
13
14    // Define routes
15    r.HandleFunc("/ws", handler.WebSocketHandler)
16
17    // Serve static files
18    r.PathPrefix("/").Handler(http.FileServer(http.Dir("./web/")))
19
20    // Start the server
21    log.Println("Starting server on :8080")
22    if err := http.ListenAndServe(":8080", r); err != nil {
23        log.Fatalf("Failed to start server: %v", err)
24    }
25}
Importing Necessary Packages
In the code above, we import several packages that are essential for our WebTTY application:
log: For logging server activities and errors.net/http: For setting up the HTTP server.github.com/gorilla/mux: For routing HTTP requests.github.com/yourusername/webtty-app/handler: For handling WebSocket connections, which we will implement next.
Basic Configuration and Setup
In the
main function, we initialize a new router using mux.NewRouter(). This router will manage our HTTP routes. We then define two routes:/ws: This route handles WebSocket connections using theWebSocketHandlerfunction from our handler package.- Static file server: This serves the front-end files located in the
webdirectory, allowing users to load the web interface.
Finally, we start the HTTP server on port 8080 using
http.ListenAndServe(":8080", r). If the server fails to start, it logs the error and exits.WebSocket Handler (
handler/websocket.go)Next, we need to implement the
WebSocketHandler function in a new file handler/websocket.go. This function will manage WebSocket connections, enabling real-time communication between the client and server.Create the
handler directory and add the websocket.go file:GO
1package handler
2
3import (
4    "log"
5    "net/http"
6    "github.com/gorilla/websocket"
7)
8
9// WebSocketHandler handles WebSocket requests from clients
10func WebSocketHandler(w http.ResponseWriter, r *http.Request) {
11    upgrader := websocket.Upgrader{
12        CheckOrigin: func(r *http.Request) bool {
13            return true
14        },
15    }
16
17    conn, err := upgrader.Upgrade(w, r, nil)
18    if err != nil {
19        log.Printf("Failed to upgrade to WebSocket: %v", err)
20        return
21    }
22    defer conn.Close()
23
24    for {
25        messageType, p, err := conn.ReadMessage()
26        if err != nil {
27            log.Printf("Error reading message: %v", err)
28            return
29        }
30
31        if err := conn.WriteMessage(messageType, p); err != nil {
32            log.Printf("Error writing message: %v", err)
33            return
34        }
35    }
36}
Explanation of the WebSocket Handler
- Upgrader: The
websocket.Upgraderupgrades the HTTP connection to a WebSocket connection. TheCheckOriginfunction allows connections from any origin. - Connection Handling: The
connobject represents the WebSocket connection. We defer theconn.Close()method to ensure the connection is closed when the function exits. - Message Loop: The
forloop reads messages from the WebSocket connection and writes them back. This simple echo mechanism will be expanded to handle terminal data.
With the
main.go and WebSocket handler set up, you have the foundation for your WebTTY application. In the next section, we will wireframe all the components and build the rest of the application's structure.Step 2: Wireframe All the Components
Wireframing WebTTY Components
Creating a wireframe for your WebTTY application involves designing the core components and outlining how they interact. This step is crucial for ensuring that the application is well-structured and efficient. In this section, we will design the terminal interface, structure the WebRTC connection logic, and map out the data flow.
Designing the Terminal Interface
The terminal interface is the primary user-facing component of your WebTTY application. It allows users to interact with the terminal in real-time. Here’s a basic HTML and JavaScript setup for the terminal interface:
[a] Create an index.html file in the web directory
HTML
1<!DOCTYPE html>
2<html lang="en">
3<head>
4    <meta charset="UTF-8">
5    <meta name="viewport" content="width=device-width, initial-scale=1.0">
6    <title>WebTTY</title>
7    <style>
8        body { font-family: monospace; }
9        #terminal { width: 100%; height: 90vh; background: black; color: white; padding: 10px; }
10    </style>
11</head>
12<body>
13    <div id="terminal"></div>
14    <script src="main.js"></script>
15</body>
16</html>
[b] Create a main.js file in the web directory
JavaScript
1const terminal = document.getElementById('terminal');
2const ws = new WebSocket('ws://localhost:8080/ws');
3
4ws.onopen = () => {
5    terminal.innerHTML += 'Connected to WebTTY\n';
6};
7
8ws.onmessage = (event) => {
9    terminal.innerHTML += event.data;
10};
11
12ws.onclose = () => {
13    terminal.innerHTML += '\nConnection closed';
14};
15
16document.addEventListener('keydown', (event) => {
17    ws.send(event.key);
18});
This basic setup creates a simple terminal interface that connects to the WebSocket server, displays incoming messages, and sends keyboard inputs to the server.
Structuring the WebRTC Connection Logic
While the current setup uses WebSockets for simplicity, integrating WebRTC for terminal sharing involves a few additional steps. The WebRTC logic will handle the peer-to-peer connection required for real-time communication.
Update main.js to include WebRTC setup
JavaScript
1let peerConnection;
2const config = { 'iceServers': [{ 'urls': 'stun:stun.l.google.com:19302' }] };
3
4async function startWebRTC() {
5    peerConnection = new RTCPeerConnection(config);
6
7    peerConnection.onicecandidate = (event) => {
8        if (event.candidate) {
9            // Send the ICE candidate to the server
10        }
11    };
12
13    peerConnection.ondatachannel = (event) => {
14        const dataChannel = event.channel;
15        dataChannel.onmessage = (event) => {
16            terminal.innerHTML += event.data;
17        };
18    };
19
20    const dataChannel = peerConnection.createDataChannel('terminal');
21    dataChannel.onopen = () => {
22        terminal.innerHTML += 'WebRTC DataChannel open\n';
23    };
24
25    document.addEventListener('keydown', (event) => {
26        dataChannel.send(event.key);
27    });
28
29    const offer = await peerConnection.createOffer();
30    await peerConnection.setLocalDescription(offer);
31    // Send the offer to the server
32}
33
34startWebRTC();
Mapping Out the Data Flow
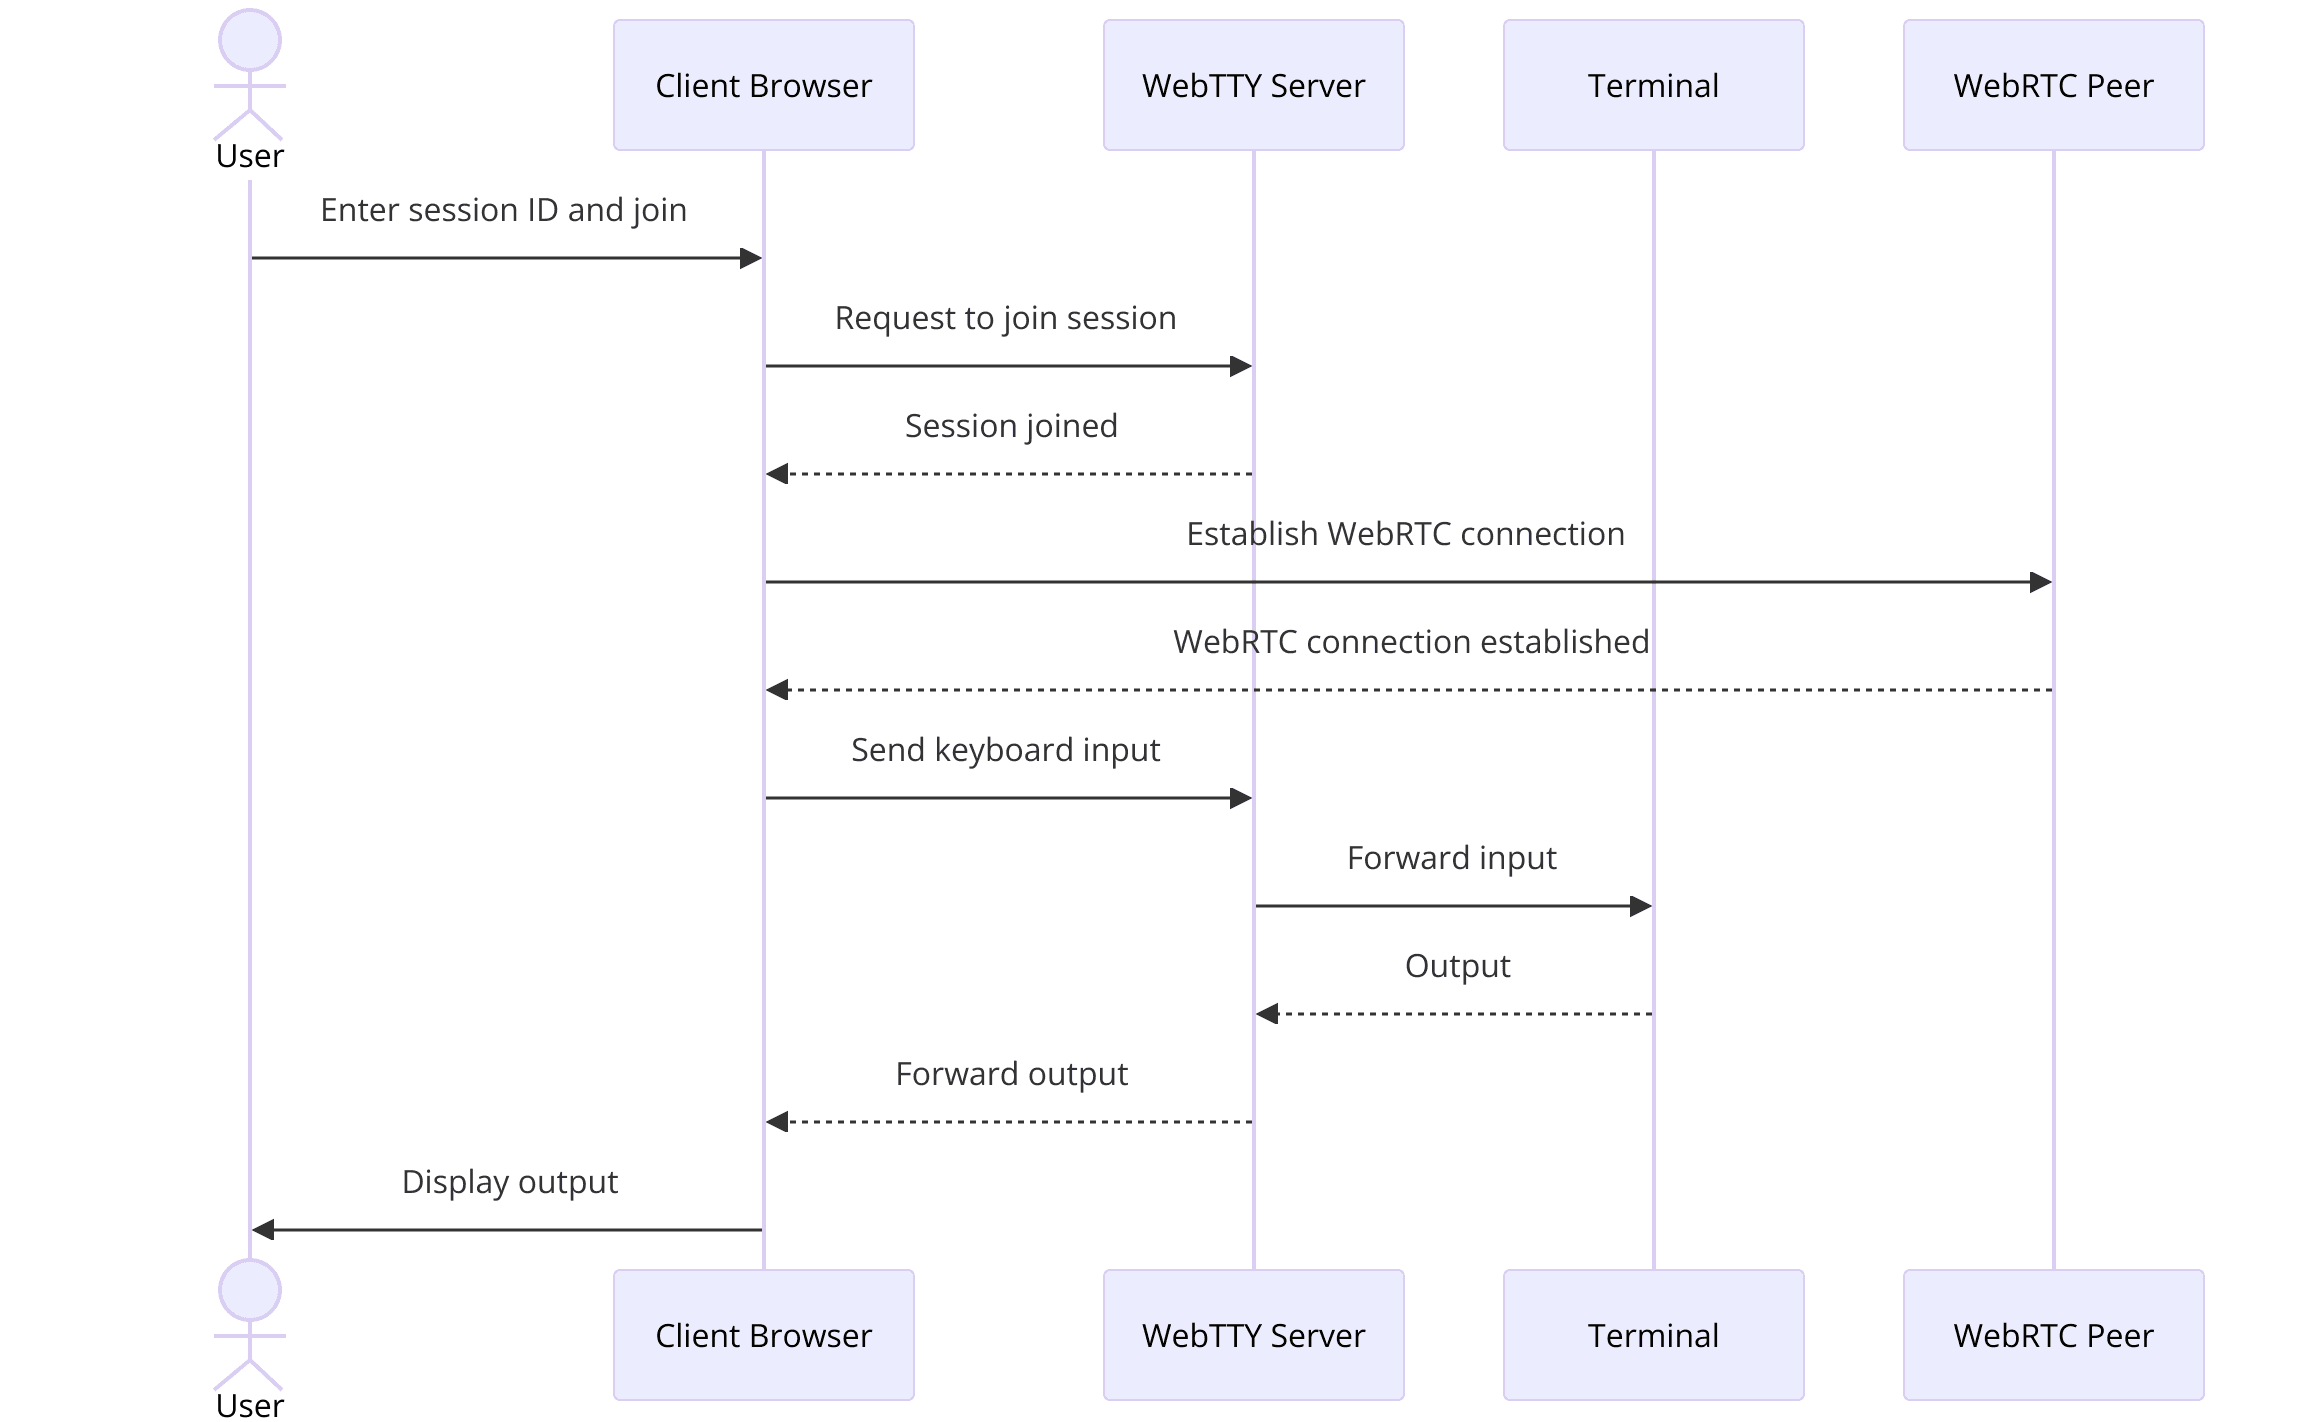
Mapping out the data flow helps ensure that data moves efficiently between the client and server. Here’s an outline of the data flow in your WebTTY application:
- User Input: Keyboard inputs are captured and sent to the server via WebSocket or WebRTC DataChannel.
- Server Processing: The server processes the input, interacts with the local terminal, and sends the output back to the client.
- Display Output: The client receives the output and updates the terminal interface in real-time.
Detailed Explanation of Data Flow Components:
Client-Side (JavaScript)
- Captures keyboard events and sends them to the server.
- Displays received terminal output in the
terminaldiv.
Server-Side (Go)
- Handles incoming WebSocket or WebRTC DataChannel connections.
- Processes terminal input and generates corresponding output.
- Sends terminal output back to the client.
By wireframing these components and understanding the data flow, you can ensure that your WebTTY application is well-structured and efficient. In the next section, we will implement the join screen, allowing users to connect to terminal sessions interactively.
Step 3: Implement Join Screen
Creating the Join Screen
The join screen is a crucial part of your WebTTY application. It serves as the interface where users can enter details to join a terminal session. In this section, we will build a simple yet functional join screen, handle user inputs, and establish initial WebRTC connections.
Building the User Interface for Joining Sessions
To start, we need to update the
index.html file to include a form where users can enter session details. This will include fields for entering a session ID and a button to join the session.Update index.html to include the join screen
HTML
1<!DOCTYPE html>
2<html lang="en">
3<head>
4    <meta charset="UTF-8">
5    <meta name="viewport" content="width=device-width, initial-scale=1.0">
6    <title>WebTTY</title>
7    <style>
8        body { font-family: monospace; }
9        #terminal { display: none; width: 100%; height: 90vh; background: black; color: white; padding: 10px; }
10        #join-screen { text-align: center; margin-top: 20%; }
11    </style>
12</head>
13<body>
14    <div id="join-screen">
15        <h1>Join WebTTY Session</h1>
16        <input type="text" id="sessionId" placeholder="Enter Session ID">
17        <button id="joinButton">Join</button>
18    </div>
19    <div id="terminal"></div>
20    <script src="main.js"></script>
21</body>
22</html>
In this updated HTML file, we added a
join-screen div containing an input field for the session ID and a join button. The terminal div is hidden initially and will be displayed once a user joins a session.Handling User Inputs
Next, we need to add JavaScript code to handle user interactions with the join screen. When the user clicks the join button, we will capture the session ID and use it to establish a WebRTC connection.
Update main.js to handle the join screen logic
JavaScript
1const terminal = document.getElementById('terminal');
2const joinScreen = document.getElementById('join-screen');
3const joinButton = document.getElementById('joinButton');
4const sessionIdInput = document.getElementById('sessionId');
5
6joinButton.addEventListener('click', () => {
7    const sessionId = sessionIdInput.value;
8    if (sessionId) {
9        joinSession(sessionId);
10    }
11});
12
13function joinSession(sessionId) {
14    joinScreen.style.display = 'none';
15    terminal.style.display = 'block';
16
17    // Start WebRTC connection
18    startWebRTC(sessionId);
19}
20
21let peerConnection;
22const config = { 'iceServers': [{ 'urls': 'stun:stun.l.google.com:19302' }] };
23
24async function startWebRTC(sessionId) {
25    peerConnection = new RTCPeerConnection(config);
26
27    peerConnection.onicecandidate = (event) => {
28        if (event.candidate) {
29            // Send the ICE candidate to the server
30            sendMessageToServer({ type: 'candidate', candidate: event.candidate, sessionId });
31        }
32    };
33
34    peerConnection.ondatachannel = (event) => {
35        const dataChannel = event.channel;
36        dataChannel.onmessage = (event) => {
37            terminal.innerHTML += event.data;
38        };
39    };
40
41    const dataChannel = peerConnection.createDataChannel('terminal');
42    dataChannel.onopen = () => {
43        terminal.innerHTML += 'WebRTC DataChannel open\n';
44    };
45
46    document.addEventListener('keydown', (event) => {
47        dataChannel.send(event.key);
48    });
49
50    const offer = await peerConnection.createOffer();
51    await peerConnection.setLocalDescription(offer);
52    // Send the offer to the server
53    sendMessageToServer({ type: 'offer', offer: peerConnection.localDescription, sessionId });
54}
55
56function sendMessageToServer(message) {
57    // Implement the logic to send messages to the server
58}
In this script, we added a click event listener to the join button. When the button is clicked, the
joinSession function is called with the entered session ID. This function hides the join screen, shows the terminal, and initiates the WebRTC connection.Establishing Initial WebRTC Connections
The
startWebRTC function handles the creation of the WebRTC peer connection, sets up ICE candidate handling, and manages the data channel for terminal communication. It also sends the session offer to the server, which will be used to establish the peer connection.To complete the WebRTC setup, you need to implement server-side handling of WebRTC signaling messages (offer, answer, and ICE candidates). This is typically done using WebSockets. Here’s a basic example of how you might handle these messages on the server:
Update websocket.go to handle WebRTC signaling
GO
1package handler
2
3import (
4    "encoding/json"
5    "log"
6    "net/http"
7    "github.com/gorilla/websocket"
8)
9
10var upgrader = websocket.Upgrader{
11    CheckOrigin: func(r *http.Request) bool {
12        return true
13    },
14}
15
16type Message struct {
17    Type      string          `json:"type"`
18    Offer     json.RawMessage `json:"offer,omitempty"`
19    Answer    json.RawMessage `json:"answer,omitempty"`
20    Candidate json.RawMessage `json:"candidate,omitempty"`
21    SessionID string          `json:"sessionId"`
22}
23
24func WebSocketHandler(w http.ResponseWriter, r *http.Request) {
25    conn, err := upgrader.Upgrade(w, r, nil)
26    if err != nil {
27        log.Printf("Failed to upgrade to WebSocket: %v", err)
28        return
29    }
30    defer conn.Close()
31
32    for {
33        var msg Message
34        err := conn.ReadJSON(&msg)
35        if err != nil {
36            log.Printf("Error reading JSON: %v", err)
37            return
38        }
39
40        // Handle WebRTC signaling messages here
41        handleWebRTCSignaling(conn, msg)
42    }
43}
44
45func handleWebRTCSignaling(conn *websocket.Conn, msg Message) {
46    // Implement signaling logic for offer, answer, and ICE candidates
47}
In this updated WebSocket handler, we read JSON messages from the client and pass them to a
handleWebRTCSignaling function, which you will implement to handle the various WebRTC signaling messages.By implementing the join screen, handling user inputs, and establishing initial WebRTC connections, you have built a key component of your WebTTY application. In the next section, we will implement terminal controls, allowing users to interact with the shared terminal session effectively.
Step 4: Implement Controls
Adding Controls to Your WebTTY App
Implementing controls in your WebTTY application is essential for providing users with an interactive and responsive terminal experience. In this section, we will cover how to implement terminal controls, manage WebRTC session controls, and ensure secure and stable connections.
Implementing Terminal Controls
To enable users to interact with the terminal, we need to handle keyboard inputs and send them to the server. The server processes these inputs and returns the output to be displayed in the terminal. We have already set up basic input handling in the previous steps. Now, let's refine and enhance this functionality.
Update main.js for enhanced terminal controls
JavaScript
1const terminal = document.getElementById('terminal');
2const joinScreen = document.getElementById('join-screen');
3const joinButton = document.getElementById('joinButton');
4const sessionIdInput = document.getElementById('sessionId');
5
6joinButton.addEventListener('click', () => {
7    const sessionId = sessionIdInput.value;
8    if (sessionId) {
9        joinSession(sessionId);
10    }
11});
12
13function joinSession(sessionId) {
14    joinScreen.style.display = 'none';
15    terminal.style.display = 'block';
16
17    // Start WebRTC connection
18    startWebRTC(sessionId);
19}
20
21let peerConnection;
22const config = { 'iceServers': [{ 'urls': 'stun:stun.l.google.com:19302' }] };
23
24async function startWebRTC(sessionId) {
25    peerConnection = new RTCPeerConnection(config);
26
27    peerConnection.onicecandidate = (event) => {
28        if (event.candidate) {
29            // Send the ICE candidate to the server
30            sendMessageToServer({ type: 'candidate', candidate: event.candidate, sessionId });
31        }
32    };
33
34    peerConnection.ondatachannel = (event) => {
35        const dataChannel = event.channel;
36        dataChannel.onmessage = (event) => {
37            terminal.innerHTML += event.data;
38        };
39    };
40
41    const dataChannel = peerConnection.createDataChannel('terminal');
42    dataChannel.onopen = () => {
43        terminal.innerHTML += 'WebRTC DataChannel open\n';
44    };
45
46    document.addEventListener('keydown', (event) => {
47        if (dataChannel.readyState === 'open') {
48            dataChannel.send(event.key);
49        }
50    });
51
52    const offer = await peerConnection.createOffer();
53    await peerConnection.setLocalDescription(offer);
54    // Send the offer to the server
55    sendMessageToServer({ type: 'offer', offer: peerConnection.localDescription, sessionId });
56}
57
58function sendMessageToServer(message) {
59    // Implement the logic to send messages to the server
60}
Explanation of Enhanced Terminal Controls
- Event Listener for Keydown Events: The
keydownevent listener captures user inputs and sends them through the WebRTC data channel if it's open. This ensures that all keystrokes are transmitted to the server in real-time. - Data Channel Ready State: Before sending a message, we check if the data channel is open to avoid errors.
Managing WebRTC Session Controls
Handling the WebRTC session involves managing connection states, handling ICE candidates, and ensuring reliable data transmission. Let's implement server-side logic to manage these aspects.
Update websocket.go for signaling and session control
GO
1package handler
2
3import (
4    "encoding/json"
5    "log"
6    "net/http"
7    "github.com/gorilla/websocket"
8)
9
10var upgrader = websocket.Upgrader{
11    CheckOrigin: func(r *http.Request) bool {
12        return true
13    },
14}
15
16type Message struct {
17    Type      string          `json:"type"`
18    Offer     json.RawMessage `json:"offer,omitempty"`
19    Answer    json.RawMessage `json:"answer,omitempty"`
20    Candidate json.RawMessage `json:"candidate,omitempty"`
21    SessionID string          `json:"sessionId"`
22}
23
24var sessions = make(map[string]*websocket.Conn)
25
26func WebSocketHandler(w http.ResponseWriter, r *http.Request) {
27    conn, err := upgrader.Upgrade(w, r, nil)
28    if err != nil {
29        log.Printf("Failed to upgrade to WebSocket: %v", err)
30        return
31    }
32    defer conn.Close()
33
34    for {
35        var msg Message
36        err := conn.ReadJSON(&msg)
37        if err != nil {
38            log.Printf("Error reading JSON: %v", err)
39            return
40        }
41
42        // Handle WebRTC signaling messages here
43        handleWebRTCSignaling(conn, msg)
44    }
45}
46
47func handleWebRTCSignaling(conn *websocket.Conn, msg Message) {
48    switch msg.Type {
49    case "offer":
50        // Store the connection and send the offer to the appropriate session
51        sessions[msg.SessionID] = conn
52        sendMessageToClient(conn, msg)
53    case "answer":
54        // Send the answer to the appropriate session
55        if peerConn, ok = sessions[msg.SessionID]; ok {
56            sendMessageToClient(peerConn, msg)
57        }
58    case "candidate":
59        // Send the ICE candidate to the appropriate session
60        if peerConn, ok = sessions[msg.SessionID]; ok {
61            sendMessageToClient(peerConn, msg)
62        }
63    }
64}
65
66func sendMessageToClient(conn *websocket.Conn, msg Message) {
67    err := conn.WriteJSON(msg)
68    if err != nil {
69        log.Printf("Error writing JSON to client: %v", err)
70    }
71}
Explanation of WebRTC Signaling and Session Control
- Sessions Map: We use a map to store WebSocket connections associated with session IDs. This helps in routing signaling messages to the correct session.
- Handle WebRTC Signaling: The
handleWebRTCSignalingfunction processes different types of WebRTC signaling messages (offer, answer, candidate) and routes them to the appropriate client connection. - Send Message to Client: The
sendMessageToClientfunction sends JSON messages back to the client.
Ensuring Secure and Stable Connections
Ensuring the security and stability of WebRTC connections involves handling network conditions and potential disruptions gracefully. Here are some additional tips:
- Handle Network Changes: Implement logic to handle network changes and reconnections. WebRTC handles ICE candidate changes automatically, but you can enhance this by monitoring connection states and re-establishing connections if needed.
- Secure WebSocket Connections: Use secure WebSocket (wss) to protect data in transit. This requires setting up an HTTPS server with a valid SSL certificate.
- Validate User Inputs: Always validate user inputs to prevent malicious data from being processed by the server.
By implementing these controls, you enhance the interactivity and reliability of your WebTTY application. In the next section, we will develop the participant view, allowing multiple users to join and view terminal sessions simultaneously.
Step 5: Implement Participant View
Developing the Participant View
Creating a participant view allows multiple users to join and interact with terminal sessions simultaneously. In this section, we will enhance the client-side and server-side logic to support multiple participants and ensure a synchronized terminal experience.
Displaying Terminal Sessions to Participants
Participants should be able to join an existing terminal session using a session ID. We will update the client-side code to allow this and handle multiple connections on the server side.
Update main.js to handle participant view
JavaScript
1const terminal = document.getElementById('terminal');
2const joinScreen = document.getElementById('join-screen');
3const joinButton = document.getElementById('joinButton');
4const sessionIdInput = document.getElementById('sessionId');
5
6joinButton.addEventListener('click', () => {
7    const sessionId = sessionIdInput.value;
8    if (sessionId) {
9        joinSession(sessionId);
10    }
11});
12
13function joinSession(sessionId) {
14    joinScreen.style.display = 'none';
15    terminal.style.display = 'block';
16
17    // Start WebRTC connection
18    startWebRTC(sessionId);
19}
20
21let peerConnection;
22const config = { 'iceServers': [{ 'urls': 'stun:stun.l.google.com:19302' }] };
23
24async function startWebRTC(sessionId) {
25    peerConnection = new RTCPeerConnection(config);
26
27    peerConnection.onicecandidate = (event) => {
28        if (event.candidate) {
29            // Send the ICE candidate to the server
30            sendMessageToServer({ type: 'candidate', candidate: event.candidate, sessionId });
31        }
32    };
33
34    peerConnection.ondatachannel = (event) => {
35        const dataChannel = event.channel;
36        dataChannel.onmessage = (event) => {
37            terminal.innerHTML += event.data;
38        };
39    };
40
41    const dataChannel = peerConnection.createDataChannel('terminal');
42    dataChannel.onopen = () => {
43        terminal.innerHTML += 'WebRTC DataChannel open\n';
44    };
45
46    document.addEventListener('keydown', (event) => {
47        if (dataChannel.readyState === 'open') {
48            dataChannel.send(event.key);
49        }
50    });
51
52    const offer = await peerConnection.createOffer();
53    await peerConnection.setLocalDescription(offer);
54    // Send the offer to the server
55    sendMessageToServer({ type: 'offer', offer: peerConnection.localDescription, sessionId });
56}
57
58function sendMessageToServer(message) {
59    // Implement the logic to send messages to the server
60    fetch('/signaling', {
61        method: 'POST',
62        headers: { 'Content-Type': 'application/json' },
63        body: JSON.stringify(message)
64    });
65}
In this script, we handle user input to join a session using the session ID. The
sendMessageToServer function sends signaling messages to a new /signaling endpoint on the server.Synchronizing Terminal Input/Output
To ensure that all participants see synchronized terminal input/output, we need to broadcast messages from the server to all connected clients.
Update websocket.go to handle broadcasting
GO
1package handler
2
3import (
4    "encoding/json"
5    "log"
6    "net/http"
7    "github.com/gorilla/websocket"
8)
9
10var upgrader = websocket.Upgrader{
11    CheckOrigin: func(r *http.Request) bool {
12        return true
13    },
14}
15
16type Message struct {
17    Type      string          `json:"type"`
18    Offer     json.RawMessage `json:"offer,omitempty"`
19    Answer    json.RawMessage `json:"answer,omitempty"`
20    Candidate json.RawMessage `json:"candidate,omitempty"`
21    SessionID string          `json:"sessionId"`
22}
23
24var sessions = make(map[string][]*websocket.Conn)
25
26func WebSocketHandler(w http.ResponseWriter, r *http.Request) {
27    conn, err := upgrader.Upgrade(w, r, nil)
28    if err != nil {
29        log.Printf("Failed to upgrade to WebSocket: %v", err)
30        return
31    }
32    defer conn.Close()
33
34    for {
35        var msg Message
36        err := conn.ReadJSON(&msg)
37        if err != nil {
38            log.Printf("Error reading JSON: %v", err)
39            return
40        }
41
42        // Handle WebRTC signaling messages here
43        handleWebRTCSignaling(conn, msg)
44    }
45}
46
47func handleWebRTCSignaling(conn *websocket.Conn, msg Message) {
48    switch msg.Type {
49    case "offer":
50        // Store the connection and send the offer to the appropriate session
51        if _, ok := sessions[msg.SessionID]; !ok {
52            sessions[msg.SessionID] = []*websocket.Conn{}
53        }
54        sessions[msg.SessionID] = append(sessions[msg.SessionID], conn)
55        broadcastMessage(msg.SessionID, msg)
56    case "answer":
57        // Broadcast the answer to the appropriate session
58        broadcastMessage(msg.SessionID, msg)
59    case "candidate":
60        // Broadcast the ICE candidate to the appropriate session
61        broadcastMessage(msg.SessionID, msg)
62    }
63}
64
65func broadcastMessage(sessionID string, msg Message) {
66    for _, conn := range sessions[sessionID] {
67        if err := conn.WriteJSON(msg); err != nil {
68            log.Printf("Error writing JSON to client: %v", err)
69        }
70    }
71}
Explanation of Broadcasting Logic
- Sessions Map: The
sessionsmap now holds slices of WebSocket connections, allowing multiple participants to join a session. - Handle WebRTC Signaling: The
handleWebRTCSignalingfunction manages incoming signaling messages and broadcasts them to all connections in the session. - Broadcast Message: The
broadcastMessagefunction sends messages to all WebSocket connections associated with a session ID, ensuring all participants receive the same data.
Optimizing Performance for Multiple Participants
When handling multiple participants, performance optimization is crucial. Here are some tips:
- Efficient Data Handling: Minimize data transfer and handle data efficiently to reduce latency.
- Load Balancing: Use load balancers to distribute the load across multiple servers if you expect a high number of participants.
- Connection Management: Implement logic to manage and clean up inactive connections to free up resources.
By implementing the participant view and ensuring synchronized terminal sessions, you enhance the collaborative capabilities of your WebTTY application. In the next section, we will finalize the implementation by running and testing the code, ensuring everything works as expected.
Step 6: Run Your Code Now
Running and Testing Your WebTTY App
With all the components of your WebTTY application in place, the final step is to run and test the code. This section will guide you through running your application and performing essential tests to ensure everything functions correctly.
Start the Go Server
Make sure you are in the root directory of your project, then run the following command to start your Go server:
bash
1go run main.goYou should see a message indicating that the server is running:
1Starting server on :8080Open Your Browser
Open a web browser and navigate to
http://localhost:8080. You should see the join screen where you can enter a session ID and join a session.Testing WebRTC Connections
Open Multiple Browser Tabs
Open multiple tabs in your browser and navigate to
http://localhost:8080 in each tab. Use the same session ID in each tab to join the same session.Test Terminal Input and Output
- In one tab, type some commands into the terminal. Ensure that the input appears in all tabs.
- Verify that the output is synchronized across all tabs. For example, if you type
lsand press Enter, the directory listing should appear in all tabs.
Debugging Common Issues
If you encounter issues while running your application, here are some common problems and their solutions:
WebSocket Connection Fails
- Ensure that your WebSocket URL is correct and matches the server address.
- Check for any errors in the browser console and server logs. Common issues include network problems or incorrect WebSocket handling.
WebRTC Connection Issues
- Ensure that your ICE servers are configured correctly. Use a publicly available STUN server like
stun:stun.l.google.com:19302for testing. - Check for errors in the browser console related to WebRTC. Common issues include ICE candidate exchange problems or incorrect SDP handling.
Synchronization Issues
- Ensure that messages are being broadcasted correctly to all participants. Check the server logs to see if messages are being sent to all connected clients.
- Verify that the data channel is open and ready before sending messages.
Conclusion
With your WebTTY application now running, you have a powerful tool for sharing terminal sessions using WebRTC and Go. This solution enables real-time collaboration and interaction through a web interface, leveraging the strengths of WebTTY and WebRTC.
Want to level-up your learning? Subscribe now
Subscribe to our newsletter for more tech based insights
FAQ