Introduction to WebRTC Camera Technology
What is WebRTC?
WebRTC (Web Real-Time Communication) is an innovative technology that facilitates real-time communication directly between web browsers without the need for intermediary servers. This open-source project, initially developed by Google, supports audio, video, and data sharing, enabling seamless peer-to-peer connections. WebRTC’s low latency and high-quality media streaming capabilities make it ideal for applications like video conferencing, file transfer, and live streaming.
What is Home Assistant?
Home Assistant is an open-source home automation platform designed to prioritize privacy and local control. It allows users to automate and control various smart home devices from a single, unified interface. Home Assistant supports a wide range of devices and integrations, providing flexibility and customization options for users to tailor their smart home setups to their specific needs.
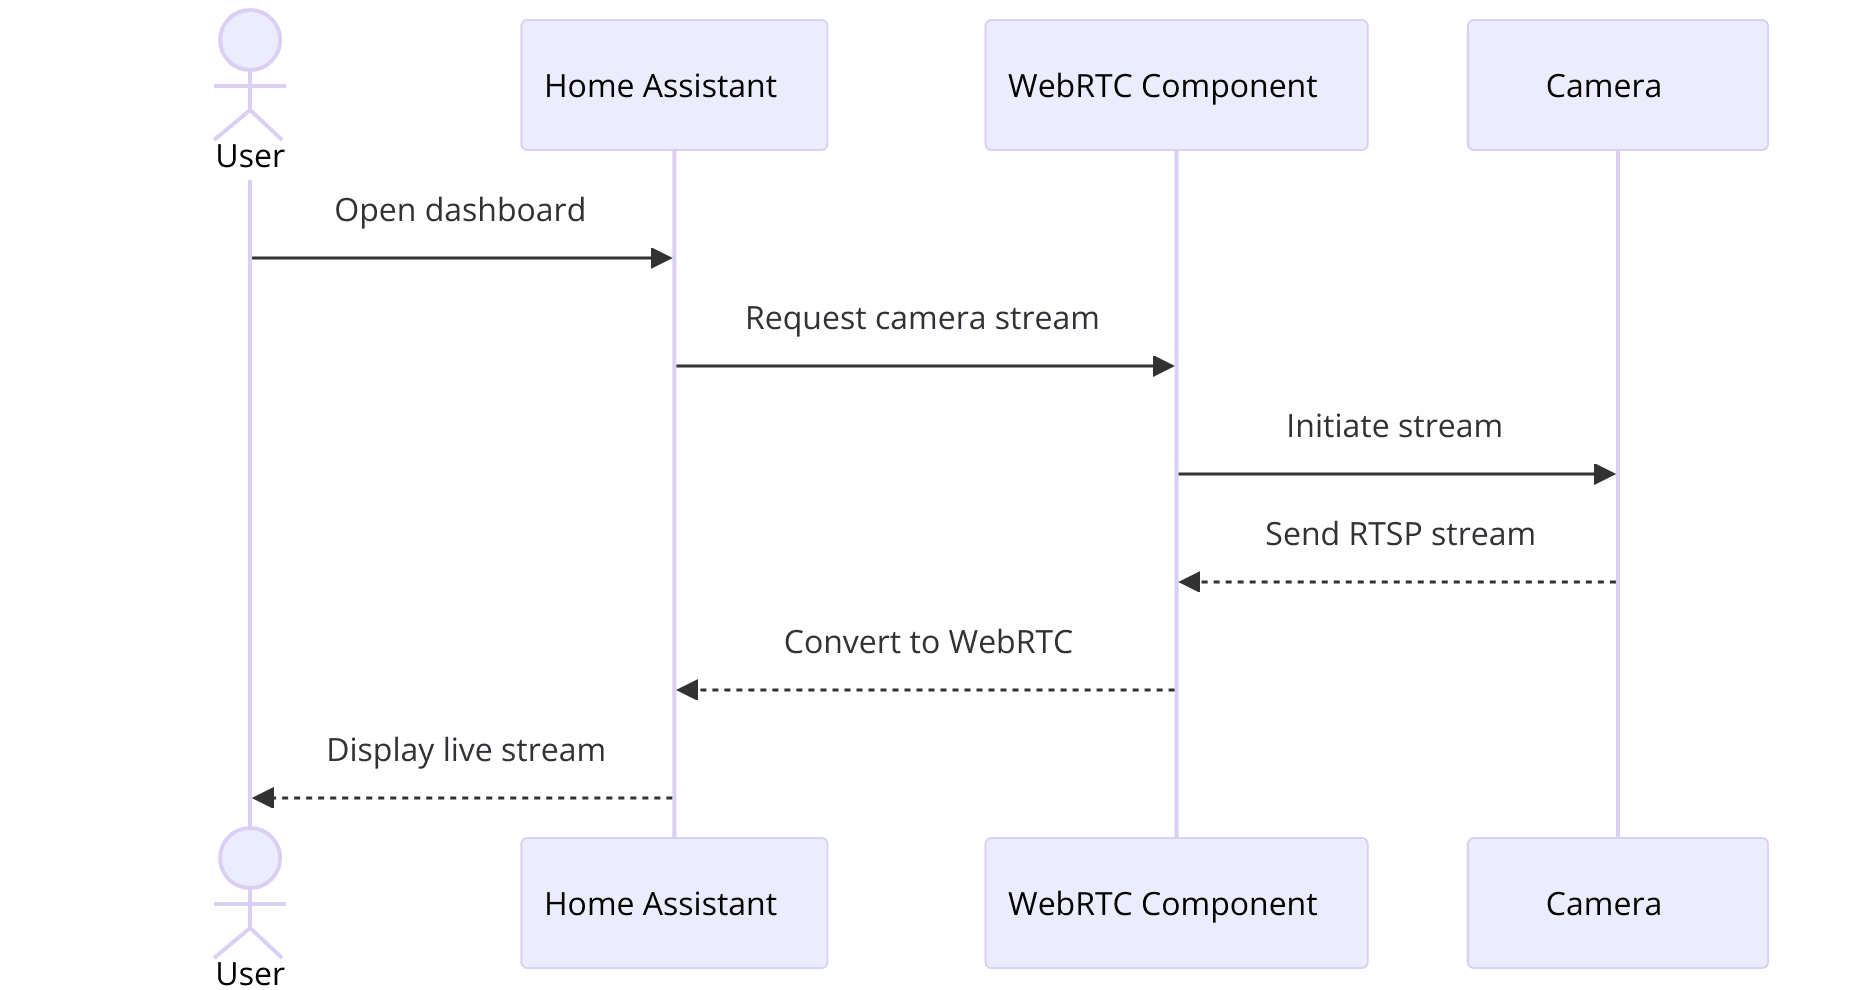
WebRTC and Home Assistant Integration
Integrating WebRTC with Home Assistant revolutionizes how real-time camera streams are viewed and managed within a smart home environment. This powerful combination allows users to view live camera feeds directly from their Home Assistant dashboard, enhancing security and monitoring capabilities. The WebRTC integration for Home Assistant, available as a custom component, simplifies the process of streaming almost any camera feed in real-time, offering a user-friendly and efficient solution for home automation enthusiasts.
With the WebRTC integration, users can achieve high-quality, low-latency video streams, ensuring timely and reliable access to camera feeds. This is particularly beneficial for security cameras, baby monitors, and other surveillance applications where real-time video is crucial. By leveraging the strengths of WebRTC and Home Assistant, users can create a robust and efficient home monitoring system that enhances the overall smart home experience.
Getting Started with the Code
Install the WebRTC Integration
To get started with integrating WebRTC Camera with Home Assistant, you'll first need to install the WebRTC custom component. This component allows you to stream almost any camera feed in real-time using WebRTC technology. Follow these steps to install the integration:
Prerequisites
- Ensure you have Home Assistant installed and running.
- Make sure your camera is compatible with WebRTC.
Installation Steps
- Open your Home Assistant configuration directory (usually
~/.homeassistant/). - Download the WebRTC custom component files from the
GitHub repository
. - Place the downloaded files into the
custom_components/webrtcdirectory. - Restart Home Assistant to apply the changes.
Structure of the Project
Understanding the structure of your WebRTC camera integration project is crucial for efficient setup and troubleshooting. Here’s an overview of the key directories and files:
custom_components/webrtc: Contains the WebRTC integration files.__init__.py: Initializes the component.manifest.json: Defines the component's metadata and dependencies.camera.py: Contains the main logic for the WebRTC camera.
configuration.yaml: The main configuration file for Home Assistant where you’ll add the WebRTC camera settings.App Architecture
- Home Assistant Core: Manages the overall operation and integration of various components.
- WebRTC Component: Handles the WebRTC protocol and manages peer-to-peer connections.
- Camera Component: Interfaces with the camera hardware or software to capture and stream video.
Each component interacts with Home Assistant's core to provide a seamless streaming experience. Here’s a breakdown of these interactions:
- Configuration: The
configuration.yamlfile specifies the settings and parameters for the WebRTC camera integration. - Initialization: The
__init__.pyfile initializes the WebRTC component, setting up necessary services and dependencies. - Streaming: The
camera.pyfile handles the actual streaming process, ensuring that the video feed is transmitted in real-time to the Home Assistant dashboard.
By understanding the structure and architecture of your WebRTC camera project, you can effectively manage and customize your Home Assistant setup to suit your specific needs.
With the WebRTC integration installed and the project structure in place, you’re ready to start configuring your camera and exploring the full potential of real-time video streaming within Home Assistant. The following sections will guide you through the detailed steps of setting up and customizing your WebRTC camera integration.
Step 1: Get Started with Configuration
Installation Steps
Prerequisites
Before you start configuring the WebRTC camera with Home Assistant, ensure you have met the following prerequisites:
Home Assistant Installation
Make sure Home Assistant is properly installed and running on your system. You can follow the official
Home Assistant installation guide
if you need assistance.Camera Compatibility
Verify that your camera is compatible with WebRTC. Most modern IP cameras should work, but checking the compatibility will save time later.
Configuration
To configure the WebRTC camera in Home Assistant, you will need to edit the
configuration.yaml file. This file is the main configuration file for Home Assistant, where you will add the necessary settings for the WebRTC integration.[a] Access Configuration.yaml
- Locate your Home Assistant configuration directory. By default, it is usually located at
~/.homeassistant/on Linux systems or within the Home Assistant configuration folder on other platforms. - Open the
configuration.yamlfile using a text editor of your choice.
[b] Add WebRTC Camera Configuration
You need to add a new section for the WebRTC camera configuration. Below is a sample configuration snippet that you can use as a reference:
YAML
1     webrtc:
2       cameras:
3         - name: Living Room Camera
4           url: rtsp://username:password@camera-ip-address:554/stream
5           audio: true
6         - name: Front Door Camera
7           url: rtsp://username:password@camera-ip-address:554/stream
8           audio: false
In this example:
1 - Replace `Living Room Camera` and `Front Door Camera` with descriptive names for your cameras.
2 - Replace `rtsp://username:password@camera-ip-address:554/stream` with the actual RTSP URL of your camera stream.
3 - Set `audio` to `true` if you want to include audio in the stream, otherwise set it to `false`.
[c] Restart Home Assistant
After making the necessary changes to your
configuration.yaml file, save the file and restart Home Assistant to apply the changes. You can restart Home Assistant from the web interface or by using the command line.YAML
1# Sample configuration.yaml entry
2webrtc:
3  cameras:
4    - name: Living Room Camera
5      url: rtsp://username:password@camera-ip-address:554/stream
6      audio: true
7    - name: Front Door Camera
8      url: rtsp://username:password@camera-ip-address:554/stream
9      audio: false
Verify Configuration
Once Home Assistant has restarted, you can verify that the WebRTC camera integration is working correctly:
Access Home Assistant Dashboard
Open your Home Assistant web interface and navigate to the Dashboard.
Check Camera Feeds
Look for the newly added cameras on your dashboard. You should see live video feeds from the cameras you configured in the
configuration.yaml file.Troubleshoot if Necessary
- If you do not see the camera feeds, double-check your
configuration.yamlfile for any syntax errors. - Ensure that the RTSP URL is correct and that your cameras are accessible on the network.
- Check the Home Assistant logs for any error messages related to the WebRTC integration.
By following these steps, you will have successfully configured the WebRTC camera integration with Home Assistant. This setup allows you to view real-time video streams from your cameras directly within the Home Assistant interface, providing a powerful and flexible solution for home security and monitoring. In the next sections, we will cover how to wireframe components and implement various functionalities to enhance your WebRTC camera integration further.
Step 2: Wireframe All the Components
Wireframing Components
User Interface Design
Designing the user interface (UI) for your WebRTC camera integration within Home Assistant is an essential step to ensure a seamless user experience. The UI should be intuitive, providing easy access to camera feeds and controls. Here’s a basic wireframe outline for your WebRTC camera UI:
- Dashboard Layout: A clean and organized layout where users can quickly access live camera feeds.
- Camera Feed Display: A dedicated section for each camera feed with options for expanding to full-screen view.
- Control Panel: Controls for starting/stopping the stream, audio control, and other relevant functionalities.
- Status Indicators: Visual indicators for the camera status (e.g., online, offline).
This wireframe ensures that the UI remains simple and user-friendly, allowing users to manage and view their camera feeds efficiently.
Component Integration
Linking UI to Functionality
To bring the wireframe to life, you need to integrate the UI components with the underlying functionality of the WebRTC integration. This involves connecting the UI elements with the appropriate actions and ensuring smooth interaction between the components.
Detailed Steps
[a] Create Camera Feed Entities
Define camera entities in the
configuration.yaml file to represent each camera feed. These entities will be used to display the camera streams on the dashboard.YAML
1   camera:
2     - platform: generic
3       name: Living Room Camera
4       still_image_url: http://camera-ip-address/image.jpg
5       stream_source: rtsp://username:password@camera-ip-address:554/stream
6     - platform: generic
7       name: Front Door Camera
8       still_image_url: http://camera-ip-address/image.jpg
9       stream_source: rtsp://username:password@camera-ip-address:554/stream
[b] Dashboard Customization
Customize the Home Assistant dashboard to include the camera feeds. You can use the Lovelace UI editor to add cards for each camera.
YAML
1   views:
2     - title: Home
3       cards:
4         - type: picture-entity
5           entity: camera.living_room_camera
6           camera_image: camera.living_room_camera
7           show_name: false
8           show_state: false
9         - type: picture-entity
10           entity: camera.front_door_camera
11           camera_image: camera.front_door_camera
12           show_name: false
13           show_state: false
[c] Implement Control Panel
Add a control panel with buttons for starting/stopping streams, toggling audio, and accessing settings. These buttons should be linked to corresponding Home Assistant services or scripts.
YAML
1   type: entities
2   entities:
3     - type: call-service
4       service: webrtc.start
5       name: Start Stream
6       icon: mdi:play
7     - type: call-service
8       service: webrtc.stop
9       name: Stop Stream
10       icon: mdi:stop
11     - type: call-service
12       service: webrtc.toggle_audio
13       name: Toggle Audio
14       icon: mdi:volume-high
[d] Status Indicators
Add visual indicators to show the status of each camera. This can be done using sensor entities that monitor the connection status of each camera.
YAML
1   sensor:
2     - platform: template
3       sensors:
4         living_room_camera_status:
5           value_template: "{{ states('camera.living_room_camera') }}"
6           icon_template: >-
7             {% if is_state('camera.living_room_camera', 'idle') %}
8               mdi:camera-off
9             {% else %}
10               mdi:camera
11             {% endif %}
By following these steps, you’ll have a functional and user-friendly interface for your WebRTC camera integration within Home Assistant. The dashboard will display live camera feeds, provide controls for managing the streams, and show status indicators for each camera, ensuring a comprehensive and interactive user experience.
The next sections will guide you through implementing the join screen and other advanced functionalities to further enhance your WebRTC camera setup.
Step 3: Implement Join Screen
Designing the Join Screen
The join screen is a critical component for initiating the WebRTC connection. It serves as the entry point for users to connect to the camera stream. The design should be simple and intuitive, providing all necessary options for the user to start the streaming process.
Key Elements for the Join Screen
- Title/Header: A clear title indicating the purpose of the screen.
- Camera Selection: Dropdown or selection box to choose the desired camera.
- Connect Button: A button to initiate the WebRTC connection.
- Optional Settings: Additional settings like audio enable/disable, video quality, etc.
Coding the Join Screen
To implement the join screen, you will need to create a custom Lovelace card in Home Assistant that allows users to select a camera and initiate the WebRTC connection. Below is a step-by-step guide to creating this functionality.
Step-by-Step Implementation:
[a] Define the Custom Card
Create a new file named
webrtc-join-screen.js in the www directory of your Home Assistant configuration.JavaScript
1   class WebRTCJoinScreen extends HTMLElement {
2     setConfig(config) {
3       this.config = config;
4       this.render();
5     }
6
7     render() {
8       this.innerHTML = `
9         <style>
10           .container {
11             padding: 16px;
12           }
13           .title {
14             font-size: 24px;
15             font-weight: bold;
16           }
17           .dropdown {
18             margin: 8px 0;
19           }
20           .button {
21             background-color: #007bff;
22             color: white;
23             padding: 10px;
24             border: none;
25             border-radius: 5px;
26             cursor: pointer;
27           }
28           .settings {
29             margin-top: 16px;
30           }
31         </style>
32         <div class="container">
33           <div class="title">Join Screen</div>
34           <div class="dropdown">
35             <label for="camera-select">Select Camera:</label>
36             <select id="camera-select">
37               ${this.config.cameras.map(camera => `<option value="${camera}">${camera}</option>`).join('')}
38             </select>
39           </div>
40           <button class="button" id="connect-btn">Connect</button>
41           <div class="settings">
42             <label for="audio-toggle">Audio:</label>
43             <input type="checkbox" id="audio-toggle" checked>
44             <label for="quality-select">Quality:</label>
45             <select id="quality-select">
46               <option value="hd">HD</option>
47               <option value="sd">SD</option>
48             </select>
49           </div>
50         </div>
51       `;
52
53       this.querySelector('#connect-btn').addEventListener('click', () => {
54         this.startStream();
55       });
56     }
57
58     startStream() {
59       const camera = this.querySelector('#camera-select').value;
60       const audio = this.querySelector('#audio-toggle').checked;
61       const quality = this.querySelector('#quality-select').value;
62
63       // Call Home Assistant service to start WebRTC stream
64       this.callService('webrtc', 'start', {
65         camera: camera,
66         audio: audio,
67         quality: quality,
68       });
69     }
70
71     callService(domain, service, serviceData) {
72       const event = new Event('hass-call-service', {
73         bubbles: true,
74         composed: true,
75       });
76       event.detail = { domain, service, serviceData };
77       this.dispatchEvent(event);
78     }
79   }
80
81   customElements.define('webrtc-join-screen', WebRTCJoinScreen);
[b] Add the Custom Card to Lovelace
Edit your Lovelace dashboard configuration to include the new custom card. Add the following to your
ui-lovelace.yaml or through the Lovelace UI editor:YAML
1   resources:
2     - url: /local/webrtc-join-screen.js
3       type: module
4
5   views:
6     - title: WebRTC
7       cards:
8         - type: custom:webrtc-join-screen
9           cameras:
10             - Living Room Camera
11             - Front Door Camera
[c] Service Implementation
Ensure that the Home Assistant services for starting the WebRTC stream are correctly configured. You might need to adjust the configuration to match your setup:
YAML
1   script:
2     webrtc_start:
3       sequence:
4         - service: webrtc.start
5           data_template:
6             camera: "{{ camera }}"
7             audio: "{{ audio }}"
8             quality: "{{ quality }}"
[d] Verify Functionality
After adding the custom card, restart Home Assistant. Navigate to your dashboard and test the join screen by selecting a camera and clicking the "Connect" button. The WebRTC stream should start, and the camera feed should appear.
By following these steps, you will have implemented a functional join screen that allows users to select a camera and start streaming with WebRTC. This screen provides an intuitive interface for managing camera connections, enhancing the overall user experience within Home Assistant.
In the next sections, we will cover how to implement controls and participant views to further enhance your WebRTC camera integration.
Step 4: Implement Controls
Control Elements
To fully leverage the capabilities of the WebRTC camera integration with Home Assistant, implementing a control panel with essential functionalities is crucial. The control elements should provide users with the ability to start and stop the stream, toggle audio, and adjust other settings as needed. Here are the key control elements to include:
- Start Stream: Button to initiate the WebRTC camera stream.
- Stop Stream: Button to stop the WebRTC camera stream.
- Toggle Audio: Switch to enable or disable audio in the stream.
- Quality Settings: Dropdown to select the video quality (e.g., HD, SD).
Coding Controls
To implement these control elements, you will need to extend the custom Lovelace card to include the controls and connect them to Home Assistant services. Below is a step-by-step guide to adding these controls to your WebRTC camera integration.
Step-by-Step Implementation:
[a] Extend the Custom Card
Update the
webrtc-join-screen.js file to include the control elements. Add buttons for starting and stopping the stream, a toggle switch for audio, and a dropdown for quality settings.JavaScript
1   class WebRTCJoinScreen extends HTMLElement {
2     setConfig(config) {
3       this.config = config;
4       this.render();
5     }
6
7     render() {
8       this.innerHTML = `
9         <style>
10           .container {
11             padding: 16px;
12           }
13           .title {
14             font-size: 24px;
15             font-weight: bold;
16           }
17           .dropdown {
18             margin: 8px 0;
19           }
20           .button {
21             background-color: #007bff;
22             color: white;
23             padding: 10px;
24             border: none;
25             border-radius: 5px;
26             cursor: pointer;
27             margin: 4px;
28           }
29           .settings {
30             margin-top: 16px;
31           }
32         </style>
33         <div class="container">
34           <div class="title">Join Screen</div>
35           <div class="dropdown">
36             <label for="camera-select">Select Camera:</label>
37             <select id="camera-select">
38               ${this.config.cameras.map(camera => `<option value="${camera}">${camera}</option>`).join('')}
39             </select>
40           </div>
41           <button class="button" id="start-btn">Start Stream</button>
42           <button class="button" id="stop-btn">Stop Stream</button>
43           <div class="settings">
44             <label for="audio-toggle">Audio:</label>
45             <input type="checkbox" id="audio-toggle" checked>
46             <label for="quality-select">Quality:</label>
47             <select id="quality-select">
48               <option value="hd">HD</option>
49               <option value="sd">SD</option>
50             </select>
51           </div>
52         </div>
53       `;
54
55       this.querySelector('#start-btn').addEventListener('click', () => {
56         this.startStream();
57       });
58       this.querySelector('#stop-btn').addEventListener('click', () => {
59         this.stopStream();
60       });
61     }
62
63     startStream() {
64       const camera = this.querySelector('#camera-select').value;
65       const audio = this.querySelector('#audio-toggle').checked;
66       const quality = this.querySelector('#quality-select').value;
67
68       // Call Home Assistant service to start WebRTC stream
69       this.callService('webrtc', 'start', {
70         camera: camera,
71         audio: audio,
72         quality: quality,
73       });
74     }
75
76     stopStream() {
77       // Call Home Assistant service to stop WebRTC stream
78       this.callService('webrtc', 'stop', {});
79     }
80
81     callService(domain, service, serviceData) {
82       const event = new Event('hass-call-service', {
83         bubbles: true,
84         composed: true,
85       });
86       event.detail = { domain, service, serviceData };
87       this.dispatchEvent(event);
88     }
89   }
90
91   customElements.define('webrtc-join-screen', WebRTCJoinScreen);
[b] Update Lovelace Configuration
Ensure your Lovelace configuration is updated to include the modified custom card. Edit your
ui-lovelace.yaml or use the Lovelace UI editor:YAML
1   resources:
2     - url: /local/webrtc-join-screen.js
3       type: module
4
5   views:
6     - title: WebRTC
7       cards:
8         - type: custom:webrtc-join-screen
9           cameras:
10             - Living Room Camera
11             - Front Door Camera
[c] Implement Home Assistant Services
Define the necessary Home Assistant services for starting and stopping the WebRTC stream. Ensure these services are configured in your
configuration.yaml:YAML
1   script:
2     webrtc_start:
3       sequence:
4         - service: webrtc.start
5           data_template:
6             camera: "{{ camera }}"
7             audio: "{{ audio }}"
8             quality: "{{ quality }}"
9
10     webrtc_stop:
11       sequence:
12         - service: webrtc.stop
[d] Test the Controls
After implementing the controls, restart Home Assistant. Navigate to your dashboard and test the functionality of the start and stop buttons, audio toggle, and quality settings. Ensure that the camera feed starts and stops as expected, and audio settings are applied correctly.
By following these steps, you will have implemented a control panel that provides users with essential functionalities to manage their WebRTC camera streams within Home Assistant. This control panel enhances user interaction, making it easier to start, stop, and adjust settings for the camera feeds.
In the next sections, we will cover how to implement the participant view and finalize your WebRTC camera integration setup.
Step 5: Implement Participant View
Participant View Overview
The participant view is essential for displaying multiple camera streams within Home Assistant, allowing users to monitor various areas simultaneously. This view should be designed to show each camera feed clearly, with options to expand individual streams to full-screen mode if necessary.
Key Elements for Participant View:
- Grid Layout: A layout that organizes multiple camera feeds in a grid format.
- Camera Feed Display: Each feed should include the camera name and a live stream.
- Full-Screen Option: Allow users to expand a specific feed to full-screen.
- Status Indicators: Display camera status indicators for easy monitoring.
Coding the Participant View
To implement the participant view, you will need to create a custom Lovelace card that arranges multiple camera streams in a grid format. This card will fetch and display the live feeds from the configured cameras and provide options for full-screen viewing.
Step-by-Step Implementation:
[a] Define the Custom Card
Create a new file named
webrtc-participant-view.js in the www directory of your Home Assistant configuration.JavaScript
1   class WebRTCParticipantView extends HTMLElement {
2     setConfig(config) {
3       this.config = config;
4       this.render();
5     }
6
7     render() {
8       this.innerHTML = `
9         <style>
10           .container {
11             display: grid;
12             grid-template-columns: repeat(auto-fit, minmax(300px, 1fr));
13             gap: 16px;
14             padding: 16px;
15           }
16           .camera-card {
17             position: relative;
18             border: 1px solid #ccc;
19             border-radius: 8px;
20             overflow: hidden;
21           }
22           .camera-title {
23             background: rgba(0, 0, 0, 0.5);
24             color: white;
25             padding: 8px;
26             position: absolute;
27             top: 0;
28             width: 100%;
29           }
30           .camera-status {
31             background: rgba(0, 0, 0, 0.5);
32             color: white;
33             padding: 8px;
34             position: absolute;
35             bottom: 0;
36             width: 100%;
37             text-align: right;
38           }
39           .camera-feed {
40             width: 100%;
41             height: 200px;
42             object-fit: cover;
43           }
44           .full-screen {
45             background-color: #007bff;
46             color: white;
47             padding: 10px;
48             border: none;
49             border-radius: 5px;
50             cursor: pointer;
51             position: absolute;
52             bottom: 8px;
53             right: 8px;
54           }
55         </style>
56         <div class="container">
57           ${this.config.cameras.map(camera => `
58             <div class="camera-card">
59               <div class="camera-title">${camera.name}</div>
60               <img src="${camera.stream_source}" class="camera-feed">
61               <div class="camera-status">${camera.status ? 'Online' : 'Offline'}</div>
62               <button class="full-screen" onclick="toggleFullScreen(this)">Full Screen</button>
63             </div>
64           `).join('')}
65         </div>
66       `;
67
68       function toggleFullScreen(button) {
69         const card = button.parentElement;
70         if (!document.fullscreenElement) {
71           card.requestFullscreen().catch(err => {
72             alert(`Error attempting to enable full-screen mode: ${err.message} (${err.name})`);
73           });
74         } else {
75           document.exitFullscreen();
76         }
77       }
78     }
79   }
80
81   customElements.define('webrtc-participant-view', WebRTCParticipantView);
[b] Add the Custom Card to Lovelace
Edit your Lovelace dashboard configuration to include the new custom card. Add the following to your
ui-lovelace.yaml or through the Lovelace UI editor:YAML
1   resources:
2     - url: /local/webrtc-participant-view.js
3       type: module
4
5   views:
6     - title: WebRTC
7       cards:
8         - type: custom:webrtc-participant-view
9           cameras:
10             - name: Living Room Camera
11               stream_source: http://camera-ip-address:port/stream
12               status: true
13             - name: Front Door Camera
14               stream_source: http://camera-ip-address:port/stream
15               status: true
[c] Ensure Camera Status is Configured
Make sure that the camera status is being monitored and updated correctly in Home Assistant. You may need to configure additional sensors or scripts to keep track of the camera status:
YAML
1   sensor:
2     - platform: template
3       sensors:
4         living_room_camera_status:
5           value_template: "{{ states('camera.living_room_camera') }}"
6           icon_template: >-
7             {% if is_state('camera.living_room_camera', 'idle') %}
8               mdi:camera-off
9             {% else %}
10               mdi:camera
11             {% endif %}
[d] Test the Participant View
After adding the custom card, restart Home Assistant. Navigate to your dashboard and verify that the participant view is displaying multiple camera streams in a grid format. Test the full-screen functionality to ensure it works as expected.
By following these steps, you will have implemented a participant view that allows users to monitor multiple camera feeds simultaneously within Home Assistant. This view enhances the user experience by providing a comprehensive overview of all camera streams, making it easier to manage and monitor different areas of your home.
In the next section, we will cover the final steps to run your code and verify the entire WebRTC camera integration setup.
Step 6: Run Your Code Now
Testing the Integration
With all components of the WebRTC camera integration in place, it’s time to run your code and verify that everything works as expected. Follow these steps to test the integration:
Restart Home Assistant
- Make sure you restart Home Assistant to apply all configuration changes.
- You can restart Home Assistant from the web interface by navigating to Configuration > Server Controls > Restart, or by using the command line.
Access the Dashboard
- Open your Home Assistant web interface.
- Navigate to the dashboard where you have added the WebRTC integration cards (Join Screen, Control Panel, and Participant View).
Test the Join Screen
- Use the join screen to select a camera and start the WebRTC stream.
- Ensure the camera feed appears and that the audio and video quality settings are applied correctly.
Verify the Control Panel
- Test the control buttons for starting and stopping the stream.
- Toggle the audio on and off to check if the changes are applied in real-time.
- Adjust the video quality settings and observe if the stream quality changes accordingly.
Monitor the Participant View
- Check that multiple camera feeds are displayed in the participant view.
- Test the full-screen functionality for each camera feed to ensure it works correctly.
- Verify the camera status indicators to ensure they accurately reflect the current status of each camera (e.g., online or offline).
Debugging Tips
If you encounter issues while testing the integration, here are some common troubleshooting steps to help resolve them:
Check Configuration Files
- Ensure there are no syntax errors in your
configuration.yamlfile. - Verify that all camera URLs and settings are correctly specified.
Examine Home Assistant Logs
- Review the Home Assistant logs for any error messages related to the WebRTC integration.
- Navigate to Configuration > Logs to view the logs.
Network Connectivity
- Make sure your cameras are accessible on the network and that the RTSP streams are correctly configured.
- Test the RTSP URL in a separate media player (e.g., VLC) to confirm the camera stream is available.
Clear Browser Cache
- Sometimes browser cache issues can cause the web interface to display outdated information. Clear your browser cache and reload the Home Assistant dashboard.
Component Updates
- Ensure that all custom components and Home Assistant itself are up-to-date. Update them if necessary to benefit from the latest features and bug fixes.
By following these steps, you can thoroughly test and debug your WebRTC camera integration within Home Assistant, ensuring it operates smoothly and efficiently.
Conclusion
Integrating WebRTC camera streams with Home Assistant provides a powerful and flexible solution for real-time video monitoring within your smart home. By following the detailed steps in this guide, you can set up a robust system that allows you to view and manage multiple camera feeds directly from your Home Assistant dashboard. The combination of intuitive UI elements, comprehensive control options, and reliable performance ensures an enhanced user experience and improved home security.
Want to level-up your learning? Subscribe now
Subscribe to our newsletter for more tech based insights
FAQ