FFmpeg Copy HLS to RTP: A Comprehensive Guide
Introduction to FFmpeg Copy HLS to RTP
FFmpeg is a powerful, open-source multimedia framework widely used for video and audio processing, streaming, and transcoding. With the explosive growth of video streaming in 2025, understanding and leveraging the right protocols has become crucial. HTTP
Live Streaming
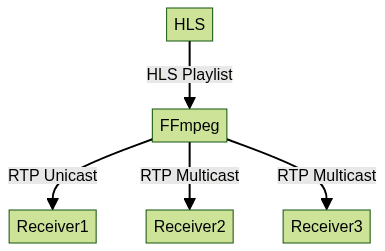
(HLS) and Real-Time Transport Protocol (RTP) are two foundational streaming protocols, each serving unique use cases.Many real-time applications—such as live broadcast, video surveillance, IPTV, and remote education—require converting from HLS to RTP. HLS is optimized for adaptive bitrate streaming over HTTP, while RTP excels at low-latency, real-time transport, making it ideal for time-critical media delivery. Using FFmpeg to copy an HLS stream to RTP enables seamless, efficient, and flexible protocol conversion, essential for modern network streaming workflows.
Understanding HLS and RTP Protocols
What is HLS?
HTTP
Live Streaming
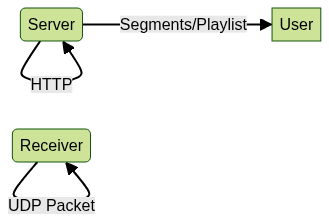
(HLS) is an adaptive bitrate streaming protocol developed by Apple. It works by segmenting media content into small files (typically MPEG-TS) and delivering them over regular HTTP servers. HLS is robust, scalable, compatible across devices, and particularly well-suited for serving large audiences over the internet.What is RTP?
The Real-time Transport Protocol (RTP) is designed for end-to-end, real-time transmission of audio, video, and data over IP networks. RTP is commonly used for video conferencing, telephony, and live broadcast, offering low-latency delivery and mechanisms for synchronization and jitter compensation. It is typically paired with UDP for transport. For developers building real-time communication solutions, integrating a
Video Calling API
can streamline the process of adding high-quality video and audio features to your applications.Key Differences and Use Cases
HLS excels in scalability and compatibility, whereas RTP is designed for real-time, low-latency communication. Choosing between them depends on requirements for latency, device compatibility, and network conditions. If you're developing mobile solutions, exploring
webrtc android
orflutter webrtc
can help you implement real-time streaming and communication features efficiently.
Why Use FFmpeg to Copy HLS to RTP?
FFmpeg’s
copy codec option enables direct packet passthrough, minimizing CPU load and preserving original stream quality. This is especially beneficial for live or real-time streaming, where latency must be minimized and transcoding overhead avoided.Copying is preferred when source and destination formats are compatible, making the process highly efficient. In contrast, transcoding is necessary when codec or bitrate changes are required, which increases processing time and latency. For those building cross-platform apps, leveraging a
react native video and audio calling sdk
can simplify the integration of real-time communication features alongside streaming workflows.Prerequisites and Setup
Installing FFmpeg
Ensure FFmpeg is installed on your system. On most Linux distributions, use:
1sudo apt-get update && sudo apt-get install ffmpeg
2
For Windows and macOS, download official builds from
FFmpeg.org
.Preparing Your HLS Stream
Obtain the HLS playlist URL (usually ending in
.m3u8). Make sure the stream is accessible and not geo-blocked or behind authentication. For custom HLS generation, use FFmpeg’s segmenter or open-source servers like nginx with the RTMP module.If you're interested in integrating real-time communication features into your web applications, consider using a
javascript video and audio calling sdk
for seamless browser-based video and audio calling.Network Considerations for RTP Streaming
RTP often uses UDP, requiring open firewall ports and sufficient bandwidth. For multicast, ensure your network supports IGMP and multicast routing. Low-latency, jitter-free delivery demands a stable, high-throughput network.
FFmpeg Command Breakdown: HLS to RTP Copy
Basic Command Structure
To copy video and audio streams from an HLS playlist to RTP with FFmpeg:
1ffmpeg -i "https://example.com/stream.m3u8" -c:v copy -c:a copy -f rtp rtp://192.168.1.100:5004
2
Explanation of Key Options
-i: Specifies the input source, in this case, the HLS.m3u8URL.-c:v copy: Copies the video stream without re-encoding (passthrough).-c:a copy: Copies the audio stream without re-encoding.-f rtp: Sets the output format to RTP.rtp://192.168.1.100:5004: Destination RTP address and port.
Other useful options:
-map: Explicitly select streams.-max_delay: Adjust buffer for network jitter.-pkt_size: Set packet size for RTP packets.-re: Read input at native frame rate for live streams.
If your use case involves integrating audio call functionality, exploring a
phone call api
can help you add reliable voice communication to your streaming or conferencing solutions.Example: Copying Video and Audio Streams
A real-world command, including stream mapping and buffer optimization:
1ffmpeg -re -i "https://example.com/stream.m3u8" -map 0:v:0 -map 0:a:0 -c:v copy -c:a copy -f rtp -max_delay 500000 rtp://239.255.42.99:5004
2
This command reads the HLS stream in real time, copies the first video and audio streams, and multicasts via RTP.
Advanced FFmpeg Copy HLS to RTP Usage
Handling Multiple Streams / Playlists
When an HLS playlist includes multiple variant streams (e.g., for adaptive bitrate), FFmpeg can select specific variants using the
-map option or by specifying the desired playlist. For multiple audio tracks or subtitles, map each stream explicitly:1ffmpeg -i "https://example.com/stream.m3u8" -map 0:v:0 -map 0:a:1 -c copy -f rtp rtp://192.168.1.101:6000
2Synchronization and Latency Optimization
Low-latency streaming requires careful buffer management. Use
-max_delay to reduce input buffering and -fflags nobuffer for ultra-low-latency scenarios. Synchronization between audio and video is managed by RTP timestamps, but monitor for drift and adjust buffer settings as needed.1ffmpeg -fflags nobuffer -flags low_delay -i "https://example.com/stream.m3u8" -c copy -f rtp rtp://192.168.1.102:5004
2RTP over UDP, Multicast, and Unicast
RTP can be sent over unicast (single receiver) or multicast (multiple receivers on the same network). Multicast addresses typically range from
224.0.0.0 to 239.255.255.255.
Troubleshooting Common Issues
- Packet Loss/Jitter: Increase buffer with
-max_delay, monitor network stats. - Codec Incompatibility: Ensure codecs are supported by receiver; use
-c:vand-c:aoptions. - Firewall/Network: Open necessary UDP ports, check multicast routing.
- Desynchronization: Adjust clock sources, use RTP synchronization tools.
Best Practices for FFmpeg Copy HLS to RTP
- Efficiency: Always use
-c copywhen formats match to minimize CPU load. - Error Handling: Add
-err_detect ignore_errto skip minor errors in input. - Monitoring: Use tools like Wireshark or FFmpeg logs for packet and stream monitoring.
- Security: Secure HLS sources (HTTPS), restrict RTP destinations, and apply firewall rules to limit access.
- Bandwidth Planning: Calculate per-stream bitrate and network capacity to avoid congestion.
If you want to experiment with these workflows or APIs,
Try it for free
and see how easy it is to get started with professional-grade streaming and communication solutions.Real-World Use Cases and Examples
- Broadcast: Forwarding live HLS feeds to professional broadcast systems via RTP for playout.
- Remote Monitoring: Delivering security camera feeds from HLS sources to control rooms over RTP.
- Education: Streaming live lectures from HLS servers to classroom endpoints in real time.
For developers seeking to add robust video and audio features to their projects, integrating a
Video Calling API
can enhance interactivity and real-time collaboration across platforms.Example command for multicast broadcast:
1ffmpeg -i "https://university.edu/live/lecture.m3u8" -c copy -f rtp rtp://239.0.0.1:5004
2
Conclusion
Converting HLS to RTP streams with FFmpeg in 2025 is essential for many real-time and professional streaming applications. The
copy method ensures maximum efficiency and minimal latency, making it the tool of choice for broadcasters, educators, and surveillance engineers. By mastering the command-line options and best practices, you can optimize your streaming workflows for any scenario.Want to level-up your learning? Subscribe now
Subscribe to our newsletter for more tech based insights
FAQ