


Converting RTMP to HLS repackages a live RTMP feed into HTTP-based HLS segments, enabling universal playback on browsers, iOS, Android, and CDNs. Choose transmuxing for same-codec streams or transcoding when codec changes are needed, then deliver the playlist via any HTTP server or CDN. VideoSDK's Interactive Live Streaming handles this pipeline as a managed service if you'd rather not run your own media server.
Introduction
Every serious live-streaming pipeline built in the last decade starts with the same asymmetry: RTMP on one side, HLS on the other. RTMP, born in the Flash era, remains the protocol that virtually every encoder speaks. OBS, hardware encoders from Teradek and Blackmagic, and cloud contribution tools all push RTMP because it is simple, well-understood, and firewall-friendly over a single TCP connection.
The problem is on the playback side. No modern browser plays RTMP natively. Flash is long dead, and no amount of wishing will bring it back. Meanwhile, HLS, Apple's HTTP-based delivery format, is supported everywhere: Safari, Chrome, Firefox, Edge, every iOS device, every Android player worth using, and every major CDN. If you want your stream to actually reach an audience in 2026, you need to convert RTMP to HLS somewhere in your pipeline.
This guide walks through the full conversion workflow: what each protocol does, why the conversion matters, the critical choice between transmuxing and transcoding, the main implementation approaches, and how to build a pipeline that stays low-latency and reliable at scale.
What Is RTMP to HLS Conversion?
RTMP to HLS conversion is defined as the process of receiving a live stream over the Real-Time Messaging Protocol and repackaging it into HTTP Live Streaming segments and playlists for delivery over standard web infrastructure. It is a bridge between two protocols that serve entirely different roles in a streaming pipeline.
RTMP is an ingest protocol. It runs over TCP, maintains a persistent connection between encoder and server, and carries audio, video, and metadata in a compact binary format. Its strength is contribution: getting a stream from an encoder to a server with low overhead and reliable delivery. Its weakness is playback, since no browser or mainstream mobile platform supports it directly.
HLS is a delivery protocol. It works by splitting content into short media segments (traditionally a few seconds each) and publishing an index playlist that lists those segments. The player fetches the playlist over plain HTTP, downloads segments sequentially, and stitches them into continuous playback. Because everything is plain HTTP, any web server, any CDN, and any firewall that allows web traffic can deliver HLS without special infrastructure.
RTMP to HLS conversion works by terminating the RTMP connection at a media server, extracting the underlying audio and video streams, cutting them into timed segments, generating the playlist, and publishing those files to an HTTP origin. The conversion layer is the heart of any modern live-streaming workflow, and everything else in this article is about doing it well.
Why Convert RTMP to HLS?
The conversion from RTMP to HLS is driven by five practical requirements that almost every streaming project hits within its first month.
Browser compatibility. HLS plays natively in Safari and via a lightweight player library in every other browser. RTMP plays nowhere. If your audience includes anyone watching on a laptop or phone browser, HLS is not optional.
Mobile support. iOS has supported HLS since the first iPhone; Android's media framework handles it across the ecosystem. A single HLS output covers effectively the entire mobile market, which RTMP cannot touch.
CDN caching. HLS segments are ordinary files. That means CDNs like CloudFront, Fastly, and Akamai can cache them at the edge exactly like images or scripts, giving you global scale without a dedicated streaming network. RTMP requires point-to-point connections that CDNs cannot cache efficiently.
Adaptive bitrate streaming. HLS supports multiple renditions of the same stream at different bitrates and resolutions, with the player switching between them as network conditions change. A viewer on fiber gets 1080p while a viewer on a train gets 480p, from the same URL. RTMP has no equivalent mechanism.
Firewall and proxy traversal. HLS rides on ports 80 and 443 like ordinary web traffic. Corporate networks, hotel Wi-Fi, and mobile carriers that block unusual ports will still pass HLS through cleanly.
The one thing you give up is latency. RTMP's persistent connection can deliver sub-second round trips, while standard HLS adds seconds of buffering. That trade-off is manageable, and later sections cover how to shrink it.
Core Concepts: Transmuxing vs Transcoding
Every RTMP to HLS pipeline makes one fundamental decision at the processing layer: whether to transmux or transcode. Getting this wrong either wastes CPU or breaks playback, so it is worth understanding precisely.
Transmuxing
Transmuxing is defined as repackaging a stream from one container format to another without changing the underlying audio or video codecs. The server receives the RTMP stream, extracts the H.264 video and AAC audio payloads, and writes them into HLS segments unchanged.
Transmuxing is dramatically cheaper than transcoding. There is no decode or encode step, so CPU usage is minimal, a single modest server can transmux dozens of concurrent streams, and added latency is close to zero. It is the right choice whenever your source codecs already match what HLS requires: H.264 or H.265 video with AAC audio, which describes the default output of OBS and most hardware encoders.
The limitation is rigidity. A transmuxed stream keeps the exact bitrate and resolution the encoder sent. If a viewer's connection cannot sustain that bitrate, playback stalls. Transmuxing alone gives you no adaptive bitrate ladder, no resolution variants, and no ability to fix a misconfigured encoder on the fly.
Transcoding
Transcoding is defined as decoding the incoming stream and re-encoding it to different codecs, resolutions, or bitrates. The server fully decodes each video frame and re-encodes it, typically into multiple renditions simultaneously: for example a 1080p rendition at 4.5 Mbps, a 720p rendition at 2.5 Mbps, and a 480p rendition at 1 Mbps, all listed in a master playlist.
Transcoding is what enables true adaptive bitrate streaming. The player measures its available bandwidth and switches renditions seamlessly, which is the difference between a stream that works for everyone and one that buffers for half your audience.
The cost is real. Re-encoding video is CPU-intensive, and doing it for multiple renditions multiplies that load. A single high-quality transcode can consume an entire server core; a full ladder can consume several. Transcoding also adds a small amount of latency, typically a segment's worth, because frames must be fully processed before segments can be finalized.
The practical rule: transmux when your encoder output is already correct and your audience is small or bandwidth-homogeneous; transcode when you need an adaptive ladder, codec conversion (for instance H.265 to H.264 for older devices), or insurance against encoder misconfiguration.
Common Implementation Approaches
There are three proven ways to build the RTMP to HLS conversion layer, and the right choice depends on your team's operational appetite.
Media-Server Solutions
The classic approach is running your own media server that accepts RTMP and outputs HLS. Nginx with the RTMP module is the de facto open-source standard: it accepts RTMP ingest, writes HLS segments and playlists to disk, and you serve those files with any HTTP layer in front of it. It is free, lightweight, and transmux-only, which keeps CPU costs negligible.
Wowza Streaming Engine and Red5 Pro are commercial alternatives that add transcoding, adaptive bitrate ladders, recording, and management tooling on top of the same ingest-to-HLS flow. They cost money but remove a significant amount of operational complexity.
The self-hosted route gives you total control and predictable costs, but you own the operational burden: server capacity planning, failover, security patching, and 3 a.m. pager duty when a stream goes down mid-event.
Cloud-Based Services
Managed services eliminate the server entirely. AWS Elemental MediaLive accepts RTMP (among other ingest protocols) and outputs HLS to MediaPackage or S3, with transcoding and adaptive bitrate built in. Azure Media Services offers a comparable live-encoding workflow.
VideoSDK's Interactive Live Streaming takes this further for interactive use cases: it accepts your stream, handles the conversion and delivery, and adds features a raw RTMP-to-HLS pipeline does not give you, including sub-second interactive latency for viewers who join the stage, real-time chat and polls, recording, and RTMP output to simultaneously push the same event to YouTube or Twitch. If your use case is live shopping, webinars, or virtual events where the audience interacts rather than just watches, a managed interactive platform covers the entire workflow rather than just the conversion step.
Cloud services trade a per-minute or per-GB cost for zero server operations, elastic scaling, and built-in redundancy. For teams without a dedicated streaming infrastructure engineer, that trade is almost always correct.
DIY FFmpeg Wrapper
The third approach is a custom wrapper around FFmpeg. Conceptually, the wrapper is a small service that listens for stream-start events, launches an FFmpeg process configured to pull the RTMP stream from the ingest point and write HLS segments and a playlist to an output directory, and then supervises that process: restarting it on failure, cleaning up stale segments, and shutting it down when the stream ends.
This approach offers maximum flexibility and zero licensing cost, and FFmpeg handles both transmuxing and transcoding depending on how you configure it. But you inherit every operational problem: process supervision, disk management, segment cleanup, security, and scaling. It is an excellent learning exercise and viable for small internal deployments, but it rarely wins against a managed service for production audience-facing streams.
Building an Efficient Conversion Pipeline
A production RTMP to HLS pipeline has three layers, and each one has decisions that quietly determine whether your stream is reliable.
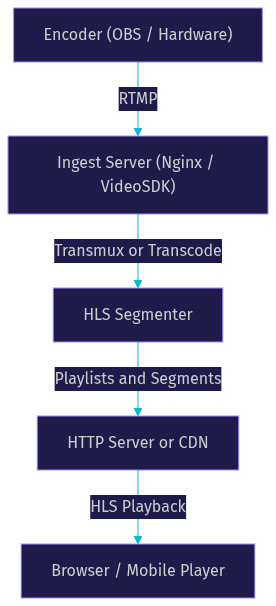
Ingest Layer
The ingest layer terminates RTMP connections from encoders. Its first job is authentication: every publish endpoint needs a stream key or token check so that strangers cannot push streams to your server. Without it, your first security incident is a matter of when, not if.
Its second job is health monitoring. RTMP connections drop silently: an encoder on flaky hotel Wi-Fi can disconnect and reconnect without the server noticing for several seconds. A good ingest layer detects connection loss quickly, rejects duplicate stream keys so a reconnected encoder does not fight itself, and exposes per-stream metrics like incoming bitrate and dropped frames so you can alert before viewers notice.
Processing Layer
The processing layer is where the transmux-versus-transcode decision from earlier gets executed. If you transcode, this layer builds your bitrate ladder: the set of renditions that will appear in your master playlist. A typical ladder for a talking-head stream is 1080p, 720p, and 480p; a sports or high-motion stream may need higher top bitrates to avoid blocky artifacts.
Segment duration is the other key tuning knob. Traditional HLS uses segments of around six seconds; shorter segments of two to four seconds reduce latency at the cost of more playlist requests and slightly higher overhead. Segment boundaries must align with keyframe intervals in the source, so your encoder's keyframe interval and your segment duration need to be set consistently, ideally with a keyframe every two seconds if you target low latency.
Output and CDN Delivery
The output layer serves the playlists and segments. Because HLS is plain files, any HTTP server works, but production delivery should go through a CDN. Configure cache-control headers so playlists are cached briefly (a few seconds, matching your segment duration) while segments can be cached longer. Getting this wrong is the most common CDN misconfiguration: caching a playlist for a minute means players fetch stale segment lists and playback stalls.
The full pipeline looks like this:
Latency and Quality Considerations
Standard HLS latency lands between roughly 6 and 30 seconds depending on segment duration, player buffering, and CDN behavior. For most one-to-many broadcasting, that is acceptable. For interactive formats like live shopping, auctions, or Q&A, it is not: a host answering a chat message half a minute after it was sent feels broken.
Low-Latency HLS, the extension Apple introduced to the protocol, brings end-to-end latency down to roughly 2 to 5 seconds. It works by publishing partial segments as they are generated and letting players fetch them before the full segment is finalized, plus tighter playlist refresh cadence. Most modern player libraries support it, and major CDNs can deliver it, though it requires correct configuration at every layer.
Three levers dominate latency tuning. First, segment duration: shorter segments mean the player waits less at each boundary, at the cost of more requests. Second, keyframe alignment: keyframes must land exactly on segment boundaries, or the segmenter must hold frames until the next keyframe, inflating latency. Third, player buffer depth: a player configured to buffer three segments behind live adds three segment durations of latency by definition.
Quality-wise, the adaptive bitrate ladder is your main protection. If you transcode, verify each rendition on a real throttled connection before the event, not after. If you transmux only, make sure your encoder's bitrate is set for your worst realistic viewer, because there is no fallback rendition.
Monitoring and Scaling
A conversion pipeline that works on Tuesday can fail on Saturday when your audience triples. Monitoring needs to cover four metrics: incoming RTMP bitrate per stream (a drop signals encoder trouble before anything else), segment generation time (if segments are being written slower than real time, the processing layer is saturated), HTTP error rates on the output (player-visible failures), and playlist staleness (how far behind real time the newest playlist entry is).
Scaling differs by layer. Ingest and processing scale horizontally: run multiple ingest servers behind a load balancer, route each stream key to one server, and add servers as concurrent stream count grows. Transcoding capacity is the expensive axis, so in the cloud, put processing instances in an auto-scaling group driven by concurrent-stream metrics.
Output scales through the CDN, which is the entire point of HLS delivery: a million viewers hitting cached segments costs your origin almost nothing. The one scaling trap is origin shield configuration: without it, a cache miss storm at the start of a popular event can overwhelm your origin with duplicate segment requests.
Choosing the Right Solution
The decision framework comes down to four questions.
What is your budget? Self-hosted Nginx is nearly free in software cost but costs engineering time. Managed services bill per usage but require no operations staff.
How large is your audience? Under a few hundred concurrent viewers, almost any approach works. Tens of thousands of concurrent viewers demands CDN delivery and probably a managed pipeline.
What latency do you need? If viewers only watch, standard HLS is fine. If they interact, you need Low-Latency HLS or an interactive platform like VideoSDK's ILS, which is built for sub-second audience participation.
Who is on call? If your team has no one comfortable debugging a media server at 2 a.m., choose a managed service. Operational expertise is the honest deciding factor more often than budget.
As a rule of thumb: internal tools and learning projects suit self-hosted Nginx or an FFmpeg wrapper; audience-facing broadcasts suit cloud services; interactive formats suit a platform that handles both delivery and participation.
Definitions Glossary
RTMP: Real-Time Messaging Protocol, a TCP-based ingest protocol used by encoders to push live streams to a media server.
HLS: HTTP Live Streaming, an HTTP-based delivery protocol that splits video into short segments described by an index playlist, playable on virtually every browser and mobile device.
Transmuxing: Repackaging a stream from one container format to another without changing the underlying codecs, keeping CPU cost and added latency near zero.
Transcoding: Decoding and re-encoding a stream to a different codec, resolution, or bitrate, enabling adaptive bitrate ladders at the cost of significant CPU.
Low-Latency HLS: An extension of HLS that publishes partial segments and refreshes playlists faster, reducing end-to-end latency to roughly 2 to 5 seconds.
Adaptive Bitrate Streaming: Serving multiple renditions of a stream at different bitrates so the player can switch quality as network conditions change.
Key Takeaways
- RTMP remains the industry-standard ingest protocol for encoders, while HLS is the universal delivery format, so every modern live pipeline needs a conversion layer between them.
- Use transmuxing when your source codecs already match HLS requirements; choose transcoding when you need codec conversion or an adaptive bitrate ladder.
- Low-Latency HLS, short segments, and keyframe alignment can bring end-to-end latency under 5 seconds for interactive use cases.
- Managed services like VideoSDK Interactive Live Streaming simplify the entire pipeline, while self-hosted media servers give you full control at the cost of operational burden.
- Monitoring incoming bitrate, segment generation time, and error rates is essential for catching failures before your viewers do.
Conclusion
RTMP to HLS conversion is the quiet bridge that makes every modern live stream possible: RTMP gets your feed from the encoder to a server, and HLS gets it from that server to every browser, phone, and CDN on the planet. The core decisions are transmux versus transcode, self-hosted versus managed, and standard versus low-latency delivery. If you want the conversion handled for you, with interactive features like real-time chat, polls, and viewer promotion built in, explore VideoSDK's Interactive Live Streaming quick-start guide and get a working stream running in minutes. What are you building with RTMP to HLS? Drop a comment, I'd love to hear what kind of live streaming workflow you're working on.
Free $20 Balance for AI Voice Agents & Video Calls
FAQ