


The nginx rtmp module is an open-source extension for the Nginx web server that turns it into a full RTMP streaming server, accepting live video from encoders like OBS and delivering it to viewers as RTMP, HLS, or MPEG-DASH. It supports recording, stream relay, and multi-worker scaling, all configured through Nginx's familiar configuration syntax. For teams that need interactive, sub-second live experiences rather than one-to-many broadcast, pairing it with a real-time SDK such as VideoSDK is often the better path.
Most developers who set up their first streaming server reach for the nginx rtmp module for one reason: it is free, lightweight, and runs comfortably on a small virtual machine. A single modest server can ingest an RTMP feed from OBS Studio and serve hundreds of concurrent HLS viewers, which is enough for many internal broadcasts, church services, school events, and hobby projects. But the module is also a serious piece of infrastructure, with relay, recording, and adaptive delivery features that production platforms rely on.
This guide walks through the whole surface: what the module is, how to install and verify it, how to configure a basic live stream, how to enable HLS and MPEG-DASH output, how to record and serve video on demand, and how to scale and secure the setup. By the end, you will understand the full architecture of an Nginx-based streaming stack and know exactly which configuration path fits your use case.
Understanding the nginx rtmp module
The nginx rtmp module is defined as a third-party Nginx extension, originally written by Roman Arutyunyan, that implements the Real-Time Messaging Protocol on top of Nginx's event-driven architecture. It was first released around 2012 and quickly became the default choice for self-hosted live streaming because it inherited Nginx's legendary efficiency: a few worker processes can handle thousands of concurrent connections without the memory overhead of a dedicated media server.
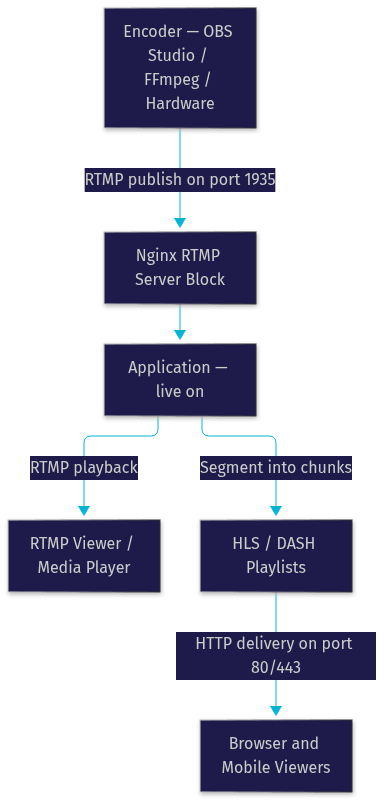
The module works by opening a dedicated listening port for RTMP traffic, typically 1935, and routing incoming streams into named applications that you define in your Nginx configuration. An encoder such as OBS Studio, FFmpeg, or a hardware encoder pushes a stream to that port, and the module then either serves it directly to RTMP viewers or repackages it into HTTP-based formats like HLS and DASH for playback in browsers and mobile apps.
Developers choose it for three main reasons. First, it is free and open source, with no per-viewer or per-minute licensing. Second, it integrates with the rest of Nginx, so the same server can serve your website, your stream, and your recorded video files. Third, it is extremely stable in production, with a decade of hardening behind it.
Core capabilities
The module's feature set covers the full lifecycle of a live stream. It accepts RTMP ingest from publishers and serves RTMP playback to Flash-era clients or media players that still speak the protocol. It generates HLS and MPEG-DASH output on the fly, segmenting the incoming stream into small chunks with playlists that browsers and mobile devices can consume. It records incoming streams to disk in FLV or MP4 format, turning live events into on-demand assets. It relays streams between servers using push and pull models, enabling multi-region distribution. It can invoke FFmpeg for transcoding, letting you produce multiple quality levels for adaptive bitrate streaming. And it exposes an XML statistics endpoint for monitoring every connected client and stream.
Platform support and limitations
The module runs well on Linux, FreeBSD, and macOS, which is where nearly all production deployments live. Linux is the recommended platform, with the best documentation, package availability, and community support. Windows is the weak spot: the module has historically had poor or no Windows support, and most maintainers do not test on it. If you are on Windows, the standard advice is to run the module inside a Linux virtual machine or a Docker container, or use the Windows Subsystem for Linux environment. Trying to compile and run the module natively on Windows in 2026 remains an exercise in frustration.
Installing the nginx rtmp module
Installation follows one of three paths, and the right choice depends on how much control you need. The module is not bundled with the official Nginx source, so every installation method involves getting the module code alongside Nginx itself.
The first path is compiling from source. You download the Nginx source tarball and the module source, then build Nginx with the module statically linked in. This gives you full control over the Nginx version, compiler flags, and any other third-party modules you want to include. It is the method most production guides recommend because it guarantees a known-good combination of Nginx and module versions.
The second path is your distribution's package manager. Ubuntu and Debian users can install a variant of Nginx that includes the RTMP module through the libnginx-mod-rtmp package, which slots into the standard Nginx installation. This is the fastest route to a working server and is ideal for learning and internal use.
The third path is a bundled distribution such as the Nginx Extras packages or community-maintained all-in-one builds, which ship Nginx with a collection of third-party modules including RTMP. These suit teams that want a curated set of extensions without managing their own build pipeline.
Choosing the right installation method
Compile from source when you need a specific Nginx version, want to pin the module version for reproducibility, or plan to add other compiled modules later. Use distro packages when you are prototyping, running an internal stream, or want automatic security updates from your operating system vendor. Use bundled distributions when you want a middle ground: more features than stock Nginx but less maintenance than a custom build. A practical rule many teams follow is to prototype with packages, then move to a source build once the streaming setup is stable and heading to production.
Verifying the module is loaded
After installation, confirm the module is active before debugging anything else. Ask Nginx to list its compiled-in modules from the command line; the RTMP module should appear in the output. Then check that Nginx starts cleanly with a minimal RTMP configuration in place, and that the server is listening on port 1935. If Nginx starts but rejects your RTMP configuration block, the module is not loaded; if it accepts the block, you are ready to stream.
Configuring a basic live stream
A minimal live streaming setup needs three logical pieces: an RTMP server block that listens for incoming connections, an application that groups streams under a name, and a URL that your encoder and viewers can use. The configuration lives in your main Nginx configuration file, in a block that sits alongside your HTTP server configuration.
The flow is simple once you see it: the encoder publishes to the application, the module holds the stream in memory, and viewers connect to the same application and stream name to watch. The diagram below shows the complete path from publisher to viewer through a single-worker Nginx instance.
Defining the RTMP server block
The top-level RTMP block is the container for all streaming configuration, parallel to the familiar HTTP block used for websites. Inside it you declare one or more server blocks, each listening on a port for RTMP traffic. The default and conventional port is 1935. A single Nginx instance can run multiple RTMP servers on different ports if you need to separate, say, a public ingest from an internal relay. The server block is also where you set global limits such as the maximum number of connections and the chunk size used for stream packaging.
Setting up an application for live publishing
Inside each RTMP server you define applications, which are named endpoints that group related streams. The most common application is a live one, enabled by turning on the live directive, which tells the module to accept publisher connections and relay the stream to any number of viewers in real time. Applications are where most of your policy lives: you can enable or disable recording, allow or deny specific publisher addresses, control who can play a stream, and attach exec hooks that run FFmpeg for transcoding. Think of an application as a folder of streams with its own rules.
Understanding the RTMP URL structure
Every stream is addressed by a URL that begins with the RTMP scheme, followed by your domain, then the application name, and finally the stream key. The scheme and host identify your server. The application segment is the name you defined in the configuration. The final segment is the stream key, chosen freely by the publisher. Your encoder publishes to the full URL, and viewers play the same URL. Because the stream key is effectively a password for publishing, treat it as a secret: anyone who knows it can broadcast to your server unless you add authentication.
Enabling HLS and MPEG-DASH output
RTMP playback is largely obsolete in browsers, so the module's most-used feature is repackaging the incoming RTMP stream into HTTP-based formats. HLS and DASH both work by cutting the stream into short segments and publishing a playlist file that players refresh continuously. The module writes these segments to a directory on disk, and your regular Nginx HTTP server serves them like any static files.
HLS configuration basics
To enable HLS, you add a small set of directives inside your application: turn HLS on, specify a path where segments and playlists are written, set the fragment length (typically a few seconds), and set the playlist length, which controls how much of a live window viewers can scrub back through. Shorter fragments mean lower latency but more requests per viewer; longer fragments are gentler on the server but add delay. A common starting point is two to three second fragments with a playlist window of around ten seconds, giving roughly ten to fifteen seconds of end-to-end latency. You then expose the playlist directory through an HTTP location block so players can fetch it.
MPEG-DASH considerations
DASH works on the same segment-and-playlist principle as HLS but uses different manifest formats and is the dominant standard outside Apple's ecosystem. The module can generate DASH output alongside HLS from the same application, writing its own manifest and segments to a separate directory. Prefer DASH when your audience skews toward Android devices, smart TVs, or set-top boxes, or when you want a single format that works broadly without HLS-specific handling. In practice, most public-facing setups enable both HLS and DASH and let the player choose, since the incremental server cost of the second format is small.
Recording streams and VOD support
The module can record every incoming stream to disk as it arrives, which turns your live server into a video-on-demand platform with almost no extra work. Recording is enabled per application with a single directive, and you control the output format, the directory layout, and whether each recording is one continuous file or split into timed chunks.
Recording to FLV or MP4
The module records natively to FLV, the container RTMP itself uses, which requires no post-processing but is poorly supported by modern players and editing tools. MP4 is the better archival format, but RTMP streams arrive with metadata that makes MP4 files unplayable until they are fixed, so the module supports an automatic post-processing step, typically an FFmpeg invocation, that remuxes the finished recording into a clean MP4. The practical guidance is simple: record to FLV if you only need short-term archives, and record to MP4 with post-processing if recordings become long-lived on-demand assets. Watch disk space carefully, since a single high-bitrate stream can consume gigabytes per hour.
Serving recorded files via HTTP
Once recordings exist on disk, serving them is ordinary Nginx work. You add an HTTP location block that maps a URL path to the recordings directory, and viewers can play the files directly in any browser or player that supports the format. For MP4 files, enabling Nginx's MP4 streaming module lets viewers seek within a file without downloading it entirely. Many teams also add basic access control at this layer, such as requiring a signed link or restricting the location to specific IP ranges, since recordings often contain content you do not want publicly browsable.
Stream relay and multi-worker scaling
Relay is how a single-origin Nginx RTMP server grows into a distributed streaming platform. The module supports two relay models, push and pull, both configured per application. Push sends an incoming stream onward to another server the moment it is published. Pull has a downstream server fetch a stream from an upstream origin on demand, typically when the first viewer requests it.
Push vs pull relay
Use push when you know in advance where a stream must go, such as mirroring your ingest to backup servers or pushing into a CDN entry point or a platform like YouTube via its RTMP ingest. Push is proactive and keeps every destination warm. Use pull when destinations should only consume bandwidth when someone is actually watching, such as regional edge servers that fetch from the origin only when a local viewer appears. Pull is more efficient for large fan-out topologies; push is simpler and more predictable for small fixed topologies. Many real deployments combine both: push to two or three known mirrors, and let dozens of edge nodes pull as needed.
Multi-worker architecture
Nginx runs multiple worker processes, and by default an RTMP connection lands on whichever worker accepts it, which would mean publishers and viewers on different workers could never meet. The module solves this with the auto-push directive, which automatically relays published streams between workers over local Unix sockets so every worker can serve every stream. The diagram below shows how a single published stream is fanned out across workers and then out to viewers.
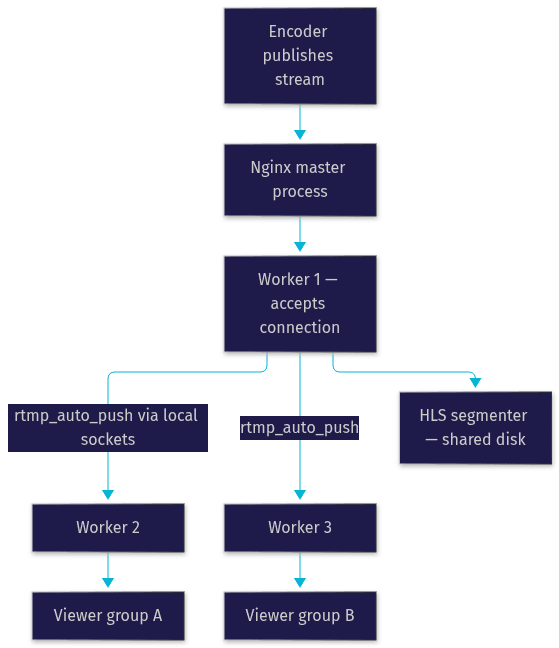
With auto-push enabled, each worker holds a copy of the stream and serves its own set of viewers, so total capacity scales roughly with the number of workers and CPU cores. For scaling beyond one machine, layer push or pull relay on top, sending streams from this origin to additional servers.
Security and access control
An open RTMP server on the public internet will be found and abused, usually within days. Security for an Nginx RTMP setup has three layers: protecting the publish endpoint, restricting playback, and encrypting the HTTP delivery side.
Token authentication overview
The most robust approach to protecting publishing is token-based authentication. The module supports an on-publish callback: when a publisher connects, Nginx makes an HTTP request to your own application, passing the stream name and any query parameters from the publish URL. Your application validates the parameters, for example checking a signed token or a JWT with an expiry, and returns success or failure, and the module accepts or rejects the publisher accordingly. This lets you issue short-lived publish credentials from your backend, the same pattern used by commercial streaming platforms. The VideoSDK docs on authentication and tokens describe the same server-side token philosophy for real-time applications.
Restricting publish and play access
For simpler setups, address-based control is often enough. The module supports allow and deny rules at both the application and server level, so you can restrict publishing to the IP range of your studio or encoder machines while leaving playback open to everyone, or restrict playback to your office network for internal broadcasts. On the HTTP side, put your HLS and DASH delivery behind HTTPS with a standard certificate from Let's Encrypt, and consider signed URLs for the playlist directory if the content itself must be protected. Also close what you do not use: if you only need HLS output, consider firewalling port 1935 to your encoder IPs so nobody else can publish or play raw RTMP.
Monitoring, statistics, and troubleshooting
The module ships with a built-in statistics endpoint that answers the question every operator eventually asks: who is connected, and to what?
Accessing RTMP statistics
You enable the stats feature by adding a special location to your HTTP server that serves an XML document describing every application, stream, client, and connection, with byte counts, timestamps, and connection durations. The module includes an XSL stylesheet, so pointing a browser at the stats URL renders a readable HTML table rather than raw XML. From this page you can see at a glance how many publishers and viewers are active, which stream keys are in use, and how much bandwidth each client is consuming. Because the data is XML, it is straightforward to scrape with a monitoring agent and feed into Prometheus or Grafana for dashboards and alerting.
Performance tuning tips
Three knobs matter most. Chunk size controls how the module packages stream data; larger chunks mean less CPU and protocol overhead but slightly more latency, and a value in the few-thousand-byte range is the common compromise. Worker connections should be raised so each worker can hold your expected viewer count, and the number of workers should match your CPU cores since each worker is single-threaded. Buffer sizes on the HLS side affect how smoothly players handle network jitter; larger buffers absorb more variance but add latency. Beyond configuration, the biggest performance factor is usually your output strategy: serving HLS over HTTP lets Nginx's static file serving and kernel-level sendfile do the heavy lifting, which is why HTTP-based delivery scales far beyond raw RTMP fan-out.
Choosing the right setup for your use case
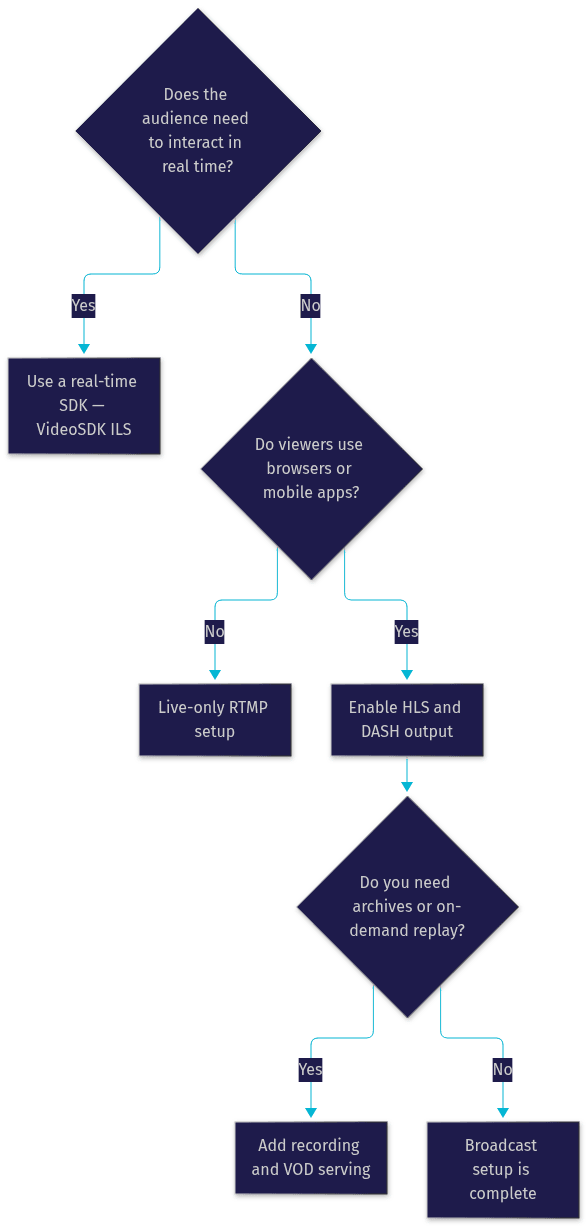
The right configuration depends on what you are actually building. A live-only setup, one application with live mode enabled and RTMP playback, suits internal monitoring and cases where viewers use desktop players. A broadcast setup adds HLS and DASH output and serves segments over HTTPS, which is the correct choice for anything watched in a browser or mobile app. A hybrid setup adds recording and VOD serving, turning each live event into a permanent asset. And if your use case is interactive, where viewers must speak, react, or join the stream with sub-second latency, an RTMP-to-HLS pipeline is the wrong tool entirely; a real-time communication SDK like VideoSDK's interactive live streaming is built for exactly that audience-participation model.
The flowchart below helps you pick a path based on your answers to three questions: does the audience need to interact, do viewers use browsers, and do you need archives?
Final checklist
Before going live, verify each of these items:
- The module is compiled in or loaded, and Nginx accepts the RTMP configuration block
- Port 1935 is open to your encoders and, if needed, to viewers
- Your encoder successfully publishes and the stats endpoint shows the stream
- HLS and DASH playlists are generated and playable in a real browser
- Recording works and post-processed MP4s play correctly
- Publish access is protected by tokens or IP restrictions
- HTTPS is active on the HTTP delivery side
- Worker connections and auto-push are configured for your expected load
- Monitoring is scraping the stats endpoint with alerting on publisher disconnects
Definitions Glossary
RTMP: Real-Time Messaging Protocol, the TCP-based protocol encoders use to publish live video to a server. The nginx rtmp module implements both the ingest and playback sides of this protocol.
HLS: HTTP Live Streaming, a format that cuts video into short segments and serves them with a playlist over ordinary HTTP. The nginx rtmp module generates HLS segments from an incoming RTMP stream for browser and mobile playback.
MPEG-DASH: Dynamic Adaptive Streaming over HTTP, an international standard alternative to HLS built on the same segment-and-playlist model, widely used on Android devices, smart TVs, and set-top boxes.
Stream relay: The module's mechanism for forwarding streams between servers, using push (proactively sending onward) or pull (downstream servers fetching on demand) to build multi-server and multi-region topologies.
Auto-push: A directive that automatically relays published streams between Nginx worker processes over local sockets, so every worker can serve every stream in multi-worker deployments.
Stream key: The final path segment of an RTMP URL, chosen by the publisher, that uniquely identifies a stream. It functions as a credential for publishing and should be kept secret.
Key Takeaways
- The nginx rtmp module turns Nginx into a complete streaming server, handling RTMP ingest, HLS and DASH output, recording, relay, and monitoring in one lightweight package.
- Installation has three paths: source compilation for production control, distro packages for quick prototyping, and bundled distributions for a middle ground.
- HLS and DASH output are what make streams watchable in browsers, with fragment length being the main trade-off between latency and server load.
- Multi-worker scaling requires the auto-push directive, and multi-machine scaling builds on push and pull relay models.
- Security rests on three layers: token-authenticated publishing, address-based access rules, and HTTPS on the HTTP delivery side.
- For interactive streams where the audience joins, speaks, or reacts in real time, a real-time SDK such as VideoSDK's interactive live streaming is the better fit than an RTMP-to-HLS pipeline.
Conclusion
The nginx rtmp module remains one of the most practical ways to run your own streaming infrastructure in 2026: free, efficient, and flexible enough to cover live broadcast, adaptive HTTP delivery, recording, and multi-server relay. Start with a minimal live application, add HLS once your encoder is publishing cleanly, then layer on recording, security, and relay as your needs grow. The official module documentation and the VideoSDK blog both carry deeper material on each stage, and the VideoSDK quickstart is worth exploring if your project crosses from broadcast into real-time interaction. What are you building with the nginx rtmp module? Drop a comment, I'd love to hear what kind of streaming use case you're working on.
Free $20 Balance for AI Voice Agents & Video Calls
FAQ