Introduction to AI Voice Agents in Contextual Interruptions
In today's fast-paced world, managing interruptions effectively can significantly enhance productivity. AI Voice Agents are emerging as powerful tools to assist individuals in navigating these disruptions, especially in contexts where focus is paramount. In this tutorial, we'll explore how to build an AI
Voice Agent
specifically designed to handle contextual interruptions.What is an AI Voice Agent
?
An AI
Voice Agent
is a software application that uses artificial intelligence to interact with users through voice commands. These agents process spoken language, understand context, and provide responses or actions based on the input. They are widely used in various applications, from personal assistants like Siri and Alexa to specialized industry solutions.Why are they important for the contextual interruptions industry?
AI Voice Agents can play a crucial role in managing contextual interruptions by identifying and addressing disruptions in workflows. For instance, they can remind users of pending tasks, suggest time management strategies, or even provide calming techniques to regain focus. This capability is particularly useful in environments where maintaining concentration is critical, such as in creative workspaces or during complex problem-solving tasks.
Core Components of a Voice Agent
To build an effective AI
Voice Agent
, we need to integrate several core components:- Speech-to-Text (STT): Converts spoken language into text.
- Language Learning Model (LLM): Processes the text to understand and generate appropriate responses.
- Text-to-Speech (TTS): Converts the generated text back into spoken language.
What You'll Build in This Tutorial
In this tutorial, we will guide you through the process of building a contextual interruptions AI Voice Agent using the VideoSDK framework. You'll learn how to set up the development environment, create a custom agent, and test it in a playground environment.
Architecture and Core Concepts
Understanding the architecture of an AI Voice Agent is crucial for effective implementation. Let's delve into the high-level architecture and core concepts involved in building our agent.
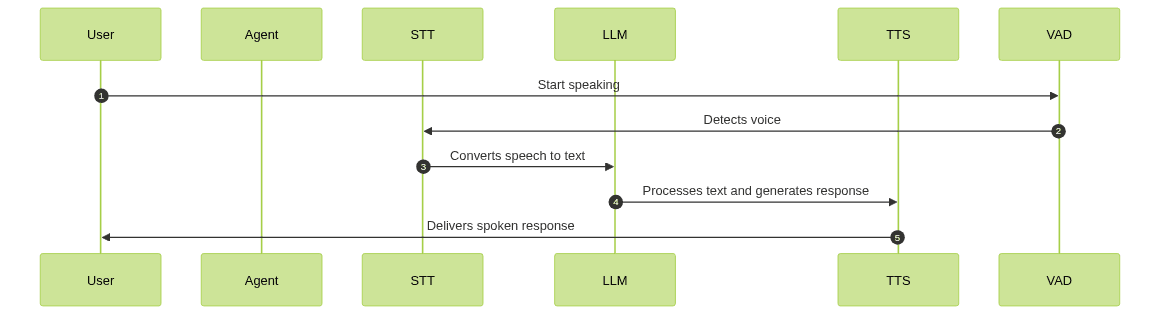
High-Level Architecture Overview
The AI Voice Agent operates by capturing user speech, processing it through a series of components, and delivering a contextual response. Here's a simplified overview of the data flow:
Understanding Key Concepts in the VideoSDK Framework
- Agent: The core class representing your bot. It defines how the agent interacts with users and processes information. The
Agent Component in AI voice Agents
is essential for defining these interactions. - CascadingPipeline: Manages the flow of audio processing, ensuring smooth transitions from STT to LLM and TTS. The
Cascading pipeline in AI voice Agents
is crucial for this seamless integration. - VAD & TurnDetector: These components help the agent determine when to listen and when to respond, ensuring seamless interaction. The
Turn detector for AI voice Agents
plays a vital role in managing these interactions effectively.
Setting Up the Development Environment
Before diving into code, we need to set up our development environment. This involves installing necessary packages and configuring API keys.
Prerequisites
- Python 3.11+
- VideoSDK Account: Sign up at app.videosdk.live to access necessary API keys.
Step 1: Create a Virtual Environment
To keep dependencies organized, it's recommended to create a virtual environment:
1python3 -m venv venv
2source venv/bin/activate  # On Windows use `venv\Scripts\activate`
3
Step 2: Install Required Packages
Install the required packages using pip:
1pip install videosdk-agents videosdk-plugins
2
Step 3: Configure API Keys in a .env file
Create a
.env file in your project directory and add your VideoSDK API key:1VIDEOSDK_API_KEY=your_api_key_here
2Building the AI Voice Agent: A Step-by-Step Guide
Now that our environment is set up, let's build our AI Voice Agent. Below is the complete code block for the agent, which we will break down step-by-step.
1import asyncio, os
2from videosdk.agents import Agent, AgentSession, CascadingPipeline, JobContext, RoomOptions, WorkerJob, ConversationFlow
3from videosdk.plugins.silero import SileroVAD
4from videosdk.plugins.turn_detector import TurnDetector, pre_download_model
5from videosdk.plugins.deepgram import DeepgramSTT
6from videosdk.plugins.openai import OpenAILLM
7from videosdk.plugins.elevenlabs import ElevenLabsTTS
8from typing import AsyncIterator
9
10# Pre-downloading the Turn Detector model
11pre_download_model()
12
13agent_instructions = "You are a 'contextual interruptions' AI Voice Agent designed to assist users in managing and understanding interruptions in various contexts. Your persona is that of a 'mindful productivity coach'. Your primary capabilities include: 1) Identifying and explaining different types of contextual interruptions in a user's workflow or daily routine. 2) Providing strategies and tips to manage and minimize these interruptions effectively. 3) Offering reminders and suggestions to help users stay focused and maintain productivity. Constraints and limitations: You are not a licensed therapist or productivity expert, and you must include a disclaimer advising users to consult with a professional for personalized advice. You should not provide medical or psychological advice. Always prioritize user privacy and data security in your interactions."
14
15class MyVoiceAgent(Agent):
16    def __init__(self):
17        super().__init__(instructions=agent_instructions)
18    async def on_enter(self): await self.session.say("Hello! How can I help?")
19    async def on_exit(self): await self.session.say("Goodbye!")
20
21async def start_session(context: JobContext):
22    # Create agent and conversation flow
23    agent = MyVoiceAgent()
24    conversation_flow = ConversationFlow(agent)
25
26    # Create pipeline
27    pipeline = CascadingPipeline(
28        stt=DeepgramSTT(model="nova-2", language="en"),
29        llm=OpenAILLM(model="gpt-4o"),
30        tts=ElevenLabsTTS(model="eleven_flash_v2_5"),
31        vad=SileroVAD(threshold=0.35),
32        turn_detector=TurnDetector(threshold=0.8)
33    )
34
35    session = [AgentSession](https://docs.videosdk.live/ai_agents/core-components/agent-session)(
36        agent=agent,
37        pipeline=pipeline,
38        conversation_flow=conversation_flow
39    )
40
41    try:
42        await context.connect()
43        await session.start()
44        # Keep the session running until manually terminated
45        await asyncio.Event().wait()
46    finally:
47        # Clean up resources when done
48        await session.close()
49        await context.shutdown()
50
51def make_context() -> JobContext:
52    room_options = RoomOptions(
53    #  room_id="YOUR_MEETING_ID",  # Set to join a pre-created room; omit to auto-create
54        name="VideoSDK Cascaded Agent",
55        playground=True
56    )
57
58    return JobContext(room_options=room_options)
59
60if __name__ == "__main__":
61    job = WorkerJob(entrypoint=start_session, jobctx=make_context)
62    job.start()
63
Step 4.1: Generating a VideoSDK Meeting ID
To interact with your agent, you'll need a meeting ID. You can generate one using the following
curl command:1curl -X POST \
2 https://api.videosdk.live/v1/rooms \
3 -H "Authorization: Bearer YOUR_API_KEY" \
4 -H "Content-Type: application/json" \
5 -d '{"name":"My Meeting Room"}'
6Step 4.2: Creating the Custom Agent Class
The
MyVoiceAgent class is where we define the behavior of our agent. It inherits from the Agent class and provides custom responses when entering or exiting a session.1class MyVoiceAgent(Agent):
2 def __init__(self):
3 super().__init__(instructions=agent_instructions)
4 async def on_enter(self): await self.session.say("Hello! How can I help?")
5 async def on_exit(self): await self.session.say("Goodbye!")
6Step 4.3: Defining the Core Pipeline
The
CascadingPipeline is crucial for processing audio input and generating responses. It integrates various plugins for STT, LLM, TTS, VAD, and Turn Detection.1pipeline = CascadingPipeline(
2 stt=DeepgramSTT(model="nova-2", language="en"),
3 llm=OpenAILLM(model="gpt-4o"),
4 tts=ElevenLabsTTS(model="eleven_flash_v2_5"),
5 vad=SileroVAD(threshold=0.35),
6 turn_detector=TurnDetector(threshold=0.8)
7)
8Step 4.4: Managing the Session and Startup Logic
This section involves setting up the session and defining how the agent is started. The
start_session function initializes the agent and manages the session lifecycle.1async def start_session(context: JobContext):
2 # Create agent and conversation flow
3 agent = MyVoiceAgent()
4 conversation_flow = ConversationFlow(agent)
5
6 # Create pipeline
7 pipeline = CascadingPipeline(
8 stt=DeepgramSTT(model="nova-2", language="en"),
9 llm=OpenAILLM(model="gpt-4o"),
10 tts=ElevenLabsTTS(model="eleven_flash_v2_5"),
11 vad=SileroVAD(threshold=0.35),
12 turn_detector=TurnDetector(threshold=0.8)
13 )
14
15 session = AgentSession(
16 agent=agent,
17 pipeline=pipeline,
18 conversation_flow=conversation_flow
19 )
20
21 try:
22 await context.connect()
23 await session.start()
24 # Keep the session running until manually terminated
25 await asyncio.Event().wait()
26 finally:
27 # Clean up resources when done
28 await session.close()
29 await context.shutdown()
30The
make_context function sets up the room options and returns a JobContext for the session:1def make_context() -> JobContext:
2 room_options = RoomOptions(
3 # room_id="YOUR_MEETING_ID", # Set to join a pre-created room; omit to auto-create
4 name="VideoSDK Cascaded Agent",
5 playground=True
6 )
7
8 return JobContext(room_options=room_options)
9Finally, the main block starts the job:
1if __name__ == "__main__":
2    job = WorkerJob(entrypoint=start_session, jobctx=make_context)
3    job.start()
4
Running and Testing the Agent
With the code in place, it's time to run and test your AI Voice Agent.
Step 5.1: Running the Python Script
Execute the script to start your agent:
1python main.py
2
Step 5.2: Interacting with the Agent in the Playground
Once the agent is running, you'll see a playground URL in the console. Open this URL in your browser to interact with your agent. Speak into your microphone and observe how the agent responds to contextual interruptions.
Advanced Features and Customizations
Extending Functionality with Custom Tools
The VideoSDK framework allows for extending functionality using custom tools. This enables you to integrate additional features tailored to your specific needs.
Exploring Other Plugins
While this tutorial uses specific plugins for STT, LLM, and TTS, VideoSDK offers a variety of options. Explore other plugins to enhance your agent's capabilities.
Troubleshooting Common Issues
API Key and Authentication Errors
Ensure your API key is correctly set in the
.env file. Double-check the permissions and validity of the key.Audio Input/Output Problems
Verify your microphone and speaker settings. Ensure they are correctly configured and accessible by the application.
Dependency and Version Conflicts
Use a virtual environment to manage dependencies. Check for compatibility issues between package versions.
Conclusion
Summary of What You've Built
In this tutorial, you've built an AI Voice Agent capable of managing contextual interruptions using the VideoSDK framework. You've learned about the architecture, setup, and testing of the agent.
Next Steps and Further Learning
Explore additional plugins and features offered by VideoSDK to enhance your agent. Consider experimenting with different use cases and extending the agent's capabilities to suit various applications.
Want to level-up your learning? Subscribe now
Subscribe to our newsletter for more tech based insights
FAQ