


Introduction
Real-time video communication has become a fundamental feature in modern web applications, from telehealth and edtech to remote team collaboration. Combining React with WebRTC offers a powerful way to build responsive, low-latency video call interfaces. However, managing raw WebRTC APIs can be complex. VideoSDK’s React Video Calling API provides a flagship solution, allowing developers to embed real-time video and audio calling into any application within minutes. In this guide, we'll explore how to build a React WebRTC video call app using VideoSDK.
What is WebRTC and How It Works in React
WebRTC (Web Real-Time Communication) is an open-source project that enables peer-to-peer audio, video, and data sharing directly between browsers. Core concepts include MediaStream (handling audio/video tracks), RTCPeerConnection (managing connections and NAT traversal), and RTCDataChannel (for text/data).
In a React WebRTC video call, signaling servers are required to exchange metadata before peers connect directly. STUN and TURN servers facilitate WebRTC NAT traversal, ensuring connectivity across different network environments.
React's component lifecycle and hooks like
useEffect and useRef are perfect for managing WebRTC streams. useRef holds mutable stream objects without triggering re-renders, while useEffect handles connection setup and cleanup.Setting Up the Development Environment
To build a React WebRTC video call app, ensure you have Node.js, npm/yarn, and React 18+ installed. You'll also need a VideoSDK account to get your API key and token.
Install the VideoSDK React SDK and supporting libraries using npm:
1npm install @videosdk.live/react-sdkFor non-React projects, VideoSDK also provides a javascript video and audio calling sdk that offers similar functionality.
Building a Basic React WebRTC Video Call App
Project Structure
Organize your project for scalability:
src/components/: UI components likeVideoTile,Controls.src/hooks/: Custom hooks likeuseVideoCall.src/utils/: Helper functions for token generation and API calls.
Initializing VideoSDK Client
Initialize the VideoSDK client using your token. You can generate a token from the VideoSDK dashboard or via REST APIs.
1import { MeetingProvider } from "@videosdk.live/react-sdk";
2
3const authToken = "YOUR_GENERATED_VIDEOSDK_TOKEN";
4
5function App() {
6  return (
7    <MeetingProvider
8      config={{
9        meetingId: "your-meeting-id",
10        micEnabled: true,
11        webcamEnabled: true,
12        name: "Participant Name",
13      }}
14      token={authToken}
15    >
16      <MeetingContainer />
17    </MeetingProvider>
18  );
19}
20export default App;
Joining a Room
Use the
useMeeting hook to manage room state and join the room. VideoSDK's Rooms-based architecture means participants join a room to share media streams.1import { useMeeting } from "@videosdk.live/react-sdk";
2
3function MeetingContainer() {
4 const { join, leave, toggleMic, toggleWebcam } = useMeeting();
5
6 return (
7 <div>
8 <button onClick={() => join()}>Join Room</button>
9 <button onClick={() => leave()}>Leave Room</button>
10 <button onClick={() => toggleMic()}>Toggle Mic</button>
11 <button onClick={() => toggleWebcam()}>Toggle Webcam</button>
12 </div>
13 );
14}Rendering Local and Remote Streams
Use the
useParticipant hook and useRef to render local and remote video streams. VideoSDK provides a MediaStream that can be attached to a <video> element.1import { useParticipant } from "@videosdk.live/react-sdk";
2import { useRef, useEffect } from "react";
3
4function ParticipantView({ participantId }) {
5 const { webcamStream, micStream, webcamOn, micOn } = useParticipant(participantId);
6 const videoRef = useRef(null);
7
8 useEffect(() => {
9 if (webcamOn && webcamStream) {
10 const mediaStream = new MediaStream();
11 mediaStream.addTrack(webcamStream.track);
12 videoRef.current.srcObject = mediaStream;
13 videoRef.current.play().catch((err) => console.error("Video play error:", err));
14 } else {
15 videoRef.current.srcObject = null;
16 }
17 }, [webcamStream, webcamOn]);
18
19 return (
20 <div>
21 <video ref={videoRef} autoPlay playsInline muted />
22 <p>Mic: {micOn ? "On" : "Off"}</p>
23 </div>
24 );
25}Implementing Core Features
Screen Sharing
Enable screen sharing in your React WebRTC video call using VideoSDK's
shareScreen API. This uses custom video tracks to broadcast the screen.1const { shareScreen, disableScreenShare, screenShareEnabled } = useMeeting();
2
3const toggleScreenShare = () => {
4 if (screenShareEnabled) {
5 disableScreenShare();
6 } else {
7 shareScreen();
8 }
9};In-Call Chat and Reactions
Use VideoSDK's pub/sub messaging for in-call chat and reactions, acting as a robust WebRTC data channel.
1const { publishChatMessage } = useMeeting();
2
3const sendMessage = () => {
4  publishChatMessage({ text: "Hello everyone!" });
5};
Participant Management
Detect join/leave events to update the UI dynamically. The
useMeeting hook provides participants as an object.1const { participants } = useMeeting();
2
3const participantIds = [...participants.keys()];Recording and Transcription
Activate server-side recording via VideoSDK REST APIs. You can also enable real-time transcription and post-call summary.
1const { startRecording, stopRecording } = useMeeting();
2
3const toggleRecording = () => {
4  if (isRecording) {
5    stopRecording();
6  } else {
7    startRecording();
8  }
9};
Security Best Practices
For a secure React WebRTC video call, enable E2E encryption. VideoSDK handles WebRTC STUN/TURN fallback automatically, but always validate meeting tokens on your server before joining a room. Use role-based access control to restrict participant capabilities.
Scaling to Multi-Party Calls with VideoSDK
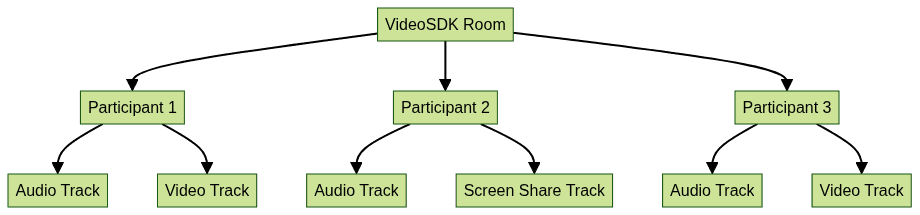
Scaling a multi-party WebRTC React app is seamless with VideoSDK's Rooms architecture. Instead of managing complex mesh networks or custom SFUs, VideoSDK handles routing, bandwidth optimization, and network-adaptive streaming.
You can easily switch between layout management modes like grid view and speaker view. VideoSDK automatically adjusts bitrate and resolution based on network conditions.
Deploying and Monitoring
Build your React app using Vite or Create React App (CRA). Host the static files on Vercel or Netlify.
Set up VideoSDK analytics webhooks to monitor call metrics like participant duration, connection quality, and latency spikes. This ensures your React video call deployment remains stable.
Troubleshooting Common Issues
- Connectivity Problems: Ensure your WebRTC STUN/TURN configuration is correct. VideoSDK provides built-in TURN fallback, but if using raw WebRTC, verify your ICE servers.
- Media Permissions: Browsers require HTTPS for camera/mic access. Ensure your local dev server and production environment use SSL.
- Latency Spikes: Check network conditions. VideoSDK's network-adaptive streaming handles this, but manual debugging can involve checking
RTCPeerConnectionstats.
Conclusion
Building a React WebRTC video call app doesn't have to be complicated. By leveraging VideoSDK's React Video Calling API, you can bypass the complexities of signaling servers, NAT traversal, and multi-party scaling. With features like screen sharing, recording, and E2E encryption, VideoSDK provides everything you need for production-ready video communication. Explore VideoSDK’s AI Voice Agents and Interactive Live Streaming (ILS) to add even more powerful capabilities to your applications.
Free $20 Balance for AI Voice Agents & Video Calls
FAQ