Developing a real-time video communication app using WebRTC and React is a powerful way to build fast, scalable, and interactive web applications. In this guide, we’ll walk through everything from understanding the technologies to implementing a fully functional video chat interface.
Understanding WebRTC
WebRTC (Web Real-Time Communication) enables browsers and mobile apps to communicate via audio, video, and data without requiring plugins or intermediaries. It's the backbone of many real-time apps, including video conferencing, live streaming, and online collaboration platforms.
Why WebRTC?
- Peer-to-peer connections reduce latency
- Eliminates the need for browser plugins
- Secure by design with built-in encryption
- Used across industries: conferencing, education, gaming, entertainment
Key Components:
- MediaStream API: Captures local media (audio/video)
- RTCPeerConnection: Establishes peer-to-peer communication
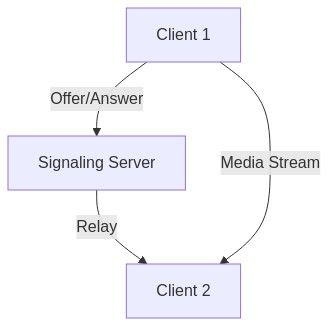
- Signaling Server: Exchanges connection metadata (not part of WebRTC itself)
WebRTC also uses STUN and TURN servers for NAT traversal:
- STUN helps discover public IPs
- TURN relays data when peer-to-peer connection is blocked

What is React?
React is a JavaScript library for building user interfaces. Its component-based architecture makes it perfect for building dynamic, real-time applications like WebRTC video chat.
Why use React with WebRTC?
- Declarative rendering syncs UI with connection state
- Reusable components simplify video stream management
- React ecosystem provides tools like hooks for stateful logic
Common components in a WebRTC React app:
VideoStream: handles incoming streamsCallControls: manages start/end/mute actions

Setting Up the Development Environment
Steps:
- Install Node.js and npm
Get the latest version fromnodejs.org
- Set Up Project
bash npx create-react-app my-webrtc-app - Install Dependencies
- WebRTC helper:
bash npm install simple-peer - For signaling:
bash
npm install socket.io
- WebRTC helper:
- Project Structure
src/– React componentspublic/– Static assetspackage.json– Dependency management
Basic Code Examples
Simple WebRTC Setup
This example initializes a basic WebRTC connection and logs the SDP offer:
1const localVideo = document.getElementById('localVideo');
2const remoteVideo = document.getElementById('remoteVideo');
3
4async function startConnection() {
5  const stream = await navigator.mediaDevices.getUserMedia({ video: true, audio: true });
6  localVideo.srcObject = stream;
7
8  const peer = new RTCPeerConnection();
9  stream.getTracks().forEach(track => peer.addTrack(track, stream));
10
11  peer.ontrack = event => {
12    remoteVideo.srcObject = event.streams[0];
13  };
14
15  const offer = await peer.createOffer();
16  await peer.setLocalDescription(offer);
17  console.log('SDP Offer:', offer);
18}
19
React Component: VideoStream.jsx
1import React, { useEffect, useRef } from 'react';
2
3function VideoStream({ peerConnection }) {
4  const videoRef = useRef(null);
5
6  useEffect(() => {
7    if (!peerConnection) return;
8    peerConnection.ontrack = e => {
9      if (videoRef.current) videoRef.current.srcObject = e.streams[0];
10    };
11  }, [peerConnection]);
12
13  return <video ref={videoRef} autoPlay playsInline style={{ width: '100%' }} />;
14}
15
16export default VideoStream;
17
Building a Video Chat App
Here’s how to integrate everything into a working chat app:
Key Features:
- Local/remote stream rendering
- Peer-to-peer connection
- Signaling server integration (not shown)
- Call control UI
1import React, { useState, useRef } from 'react';
2import VideoStream from './VideoStream';
3
4function VideoChat() {
5  const [peerConnection, setPeerConnection] = useState(null);
6  const localRef = useRef(null);
7
8  const startCall = async () => {
9    const pc = new RTCPeerConnection();
10    setPeerConnection(pc);
11
12    const stream = await navigator.mediaDevices.getUserMedia({ video: true, audio: true });
13    localRef.current.srcObject = stream;
14    stream.getTracks().forEach(track => pc.addTrack(track, stream));
15
16    const offer = await pc.createOffer();
17    await pc.setLocalDescription(offer);
18    // Send offer to remote peer via signaling server
19    console.log('Offer sent:', offer);
20  };
21
22  return (
23    <div>
24      <video ref={localRef} autoPlay muted playsInline style={{ width: '45%' }} />
25      {peerConnection && <VideoStream peerConnection={peerConnection} />}
26      <button onClick={startCall}>Start Call</button>
27    </div>
28  );
29}
30
31export default VideoChat;
32
UI Enhancement: Call Controls
UI is critical for user experience. Here’s a basic
CallControls component:1function CallControls({ onStart, onStop, onMute, onUnmute }) {
2 return (
3 <div>
4 <button onClick={onStart}>Start Call</button>
5 <button onClick={onStop}>End Call</button>
6 <button onClick={onMute}>Mute</button>
7 <button onClick={onUnmute}>Unmute</button>
8 </div>
9 );
10}
11
12export default CallControls;
13Performance Optimization Tips
Performance is key in WebRTC apps. Best practices include:
- Media Constraints
js const constraints = { video: { width: { ideal: 640 }, height: { ideal: 480 } }, audio: true }; - Use Adaptive Bitrate & Codecs
- Monitor connection stats (RTT, jitter, packet loss)
- Enable hardware acceleration when available
Deployment and Scalability
When deploying your WebRTC + React app, consider:
- Signaling Server Deployment
Use scalable cloud platforms (AWS, Azure, etc.) - Containerization
Use Docker for consistent builds - Scalability Tips
- Use SFUs (e.g.,
mediasoup
) for group calls - Secure with HTTPS + WSS
- Monitor usage and server health
- Use SFUs (e.g.,
Conclusion and the Future of WebRTC in React
WebRTC and React together empower developers to build fast, interactive, and scalable communication apps. This guide has walked you through setting up the tech stack, writing core components, optimizing performance, and preparing your app for production.
As WebRTC matures and React continues to dominate the frontend ecosystem, building real-time applications has never been more approachable.
Want to level-up your learning? Subscribe now
Subscribe to our newsletter for more tech based insights
FAQ