


SIP.js WebRTC is the combination of the SIP.js JavaScript library with WebRTC media APIs to enable browser-based SIP telephony without plugins. SIP.js handles SIP signaling over WebSocket while WebRTC manages real-time audio and video streams through standard browser APIs. Developers use this pairing to connect browsers directly to SIP servers like Asterisk and FreeSWITCH for VoIP and video calling. For a managed alternative that abstracts signaling entirely, VideoSDK's video calling SDK provides a rooms-based architecture with built-in WebRTC handling.
Connecting classic SIP telephony to modern web browsers has been one of the more persistent challenges in real-time communication engineering. SIP was designed for hardware phones and dedicated VoIP softclients, not for JavaScript running inside Chrome or Safari. WebRTC, on the other hand, was built for browsers but has no native understanding of SIP signaling. Bridging these two worlds requires a library that speaks SIP on one side and negotiates WebRTC media on the other.
SIP.js has emerged as the most widely adopted open-source JavaScript library for this bridge. It implements the SIP protocol stack over WebSocket transport and delegates all media handling to the browser's WebRTC APIs. This means a developer can register a SIP account, place and receive calls, and manage audio and video streams entirely from JavaScript, with no native plugin or desktop application required.
By the end of this guide, you will understand the SIP.js WebRTC architecture end to end, know how to set up a browser-based calling application, handle advanced call features like transfer and DTMF, troubleshoot the most common failure points, and deploy a production-ready SIP.js WebRTC solution. We will also compare SIP.js WebRTC against managed RTC platforms like VideoSDK so you can choose the right approach for your project.
What Is SIP.js and How It Enables WebRTC
SIP.js is defined as a pure JavaScript SIP library that runs in browsers and Node.js environments, implementing RFC 3261 SIP signaling over WebSocket transport. It does not handle media on its own. Instead, it integrates with the browser's WebRTC implementation to establish real-time audio and video sessions. This separation of concerns is what makes SIP.js WebRTC possible: SIP.js owns the signaling layer, and WebRTC owns the media layer.
SIP.js works by creating a UserAgent that maintains a persistent WebSocket connection to a SIP server. The UserAgent handles registration, call setup, message routing, and subscription to presence events. When a call is initiated, SIP.js generates a SIP INVITE message containing an SDP offer. The SessionDescriptionHandler, a pluggable component inside SIP.js, translates that SDP offer into a WebRTC RTCPeerConnection configuration and gathers ICE candidates for NAT traversal.
The library exposes two primary interfaces. The low-level UserAgent API gives developers full control over SIP transactions, dialogs, and session management. The SimpleUser wrapper sits on top of UserAgent and provides a streamlined interface for common operations like registering, making a call, answering, and hanging up. Most developers start with SimpleUser and drop down to UserAgent only when they need fine-grained control over SIP headers or custom session description handling.
The key benefit of using SIP.js for WebRTC is that you get SIP signaling and WebRTC media coordination in a single library. You do not need a separate signaling server or a custom WebSocket protocol. The SIP server you already run, whether Asterisk, FreeSWITCH, or Kamailio, becomes the signaling backend for your browser-based calling application.
Core Architecture: SIP.js and WebRTC Flow
Understanding the SIP.js WebRTC architecture requires tracing the path from browser to SIP server to remote media endpoint. The flow involves seven distinct stages, each with its own protocol and responsibility.
The process begins with SIP registration. The browser loads SIP.js, creates a UserAgent configured with a WebSocket URL pointing to the SIP server, and sends a REGISTER message with the user's SIP URI and credentials. The SIP server authenticates the registration and stores the contact binding, which maps the SIP URI to the WebSocket connection.
When a user initiates a call, SIP.js creates a session and generates an SDP offer describing the media capabilities of the browser, including supported audio and video codecs. This SDP offer is embedded in a SIP INVITE message and sent over the WebSocket to the SIP server. The server routes the INVITE to the destination, which may be another SIP.js client, a hardware phone, or a PSTN gateway.
Simultaneously, SIP.js creates a WebRTC RTCPeerConnection and begins ICE candidate gathering. ICE, or Interactive Connectivity Establishment, is the process by which WebRTC discovers viable network paths through STUN and TURN servers. The gathered candidates are included in the SDP answer that comes back from the remote party in a 200 OK response.
Once the SDP offer and answer are exchanged and ICE connectivity is established, media flows directly between the browser and the remote endpoint using SRTP over UDP or TCP. The SIP server handles signaling only and does not participate in the media path unless a media relay or B2BUA is configured.
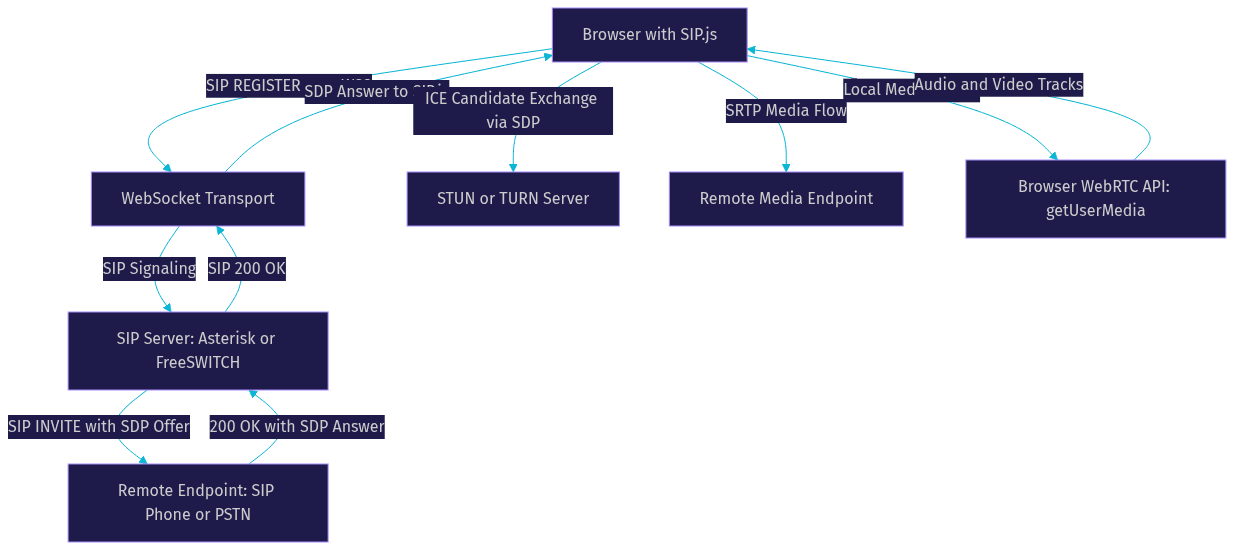
This architecture means the SIP server is critical for call routing and registration but the actual media travels peer to peer or through a TURN relay if direct connectivity fails. Developers building SIP.js WebRTC applications must ensure their SIP server supports WebSocket transport and is configured to accept WebRTC SDP offers, which differ from traditional SIP SDP in their use of ICE and DTLS-SRTP.
Setting Up a Browser-Based SIP.js WebRTC Application
Building a SIP.js WebRTC application involves a sequence of configuration and initialization steps that connect your browser client to a SIP infrastructure. Each step has specific requirements and common pitfalls that catch developers off guard.
Step 1: Choose a SIP Server with WebSocket Support
Your SIP server must accept WebSocket connections, ideally secure WebSocket (WSS) connections. Asterisk requires the HTTP WebSocket transport module enabled and a configured WebRTC profile. FreeSWITCH needs the Sofia SIP profile configured with a WebSocket binding on a TLS port. Kamailio can proxy WebSocket connections but typically sits in front of Asterisk or FreeSWITCH for media handling. If you are using a hosted SIP provider, confirm they expose a WebSocket endpoint specifically for WebRTC clients.
Step 2: Obtain a SIP URI and Credentials
You need a SIP account with a valid SIP URI, authentication username, and password. For testing, you can create an extension on your local Asterisk or FreeSWITCH instance. For production, your SIP provider provisions these credentials. Store them securely and never hardcode them into client-side JavaScript that is publicly accessible.
Step 3: Configure Media Constraints
Before placing a call, decide whether the session is audio-only or audio and video. Media constraints tell the browser's getUserMedia API which tracks to request from the microphone and camera. Audio-only calls request only the microphone, which reduces bandwidth and simplifies ICE negotiation. Video calls request both, and you can specify resolution and frame rate constraints to control quality.
Step 4: Initialize the SIP.js UserAgent
Create a SimpleUser or UserAgent instance configured with the WebSocket server URL, SIP URI, and authorization credentials. The WebSocket URL must use the WSS scheme in production because browsers restrict getUserMedia to secure origins. You also configure the media constraints here, telling SIP.js whether to request audio, video, or both when a call is made or received.
Step 5: Register the Client
Once the UserAgent is initialized, call the register method. SIP.js sends a REGISTER message over the WebSocket to the SIP server. If the credentials are valid, the server responds with a 200 OK and the client is registered. Listen for the registered event to confirm success and the registrationFailed event to handle errors.
Step 6: Place or Receive a Call
To place a call, call the invite or call method on SimpleUser, passing the destination SIP URI. SIP.js generates the INVITE, creates the RTCPeerConnection, requests media from getUserMedia, and sends the SDP offer. To receive a call, listen for the invite event, then call the accept method. The SDP answer is generated automatically and sent back to the caller.
Step 7: Handle Media Streams in the DOM
After the call is established, SIP.js exposes the remote media stream through the session's sessionDescriptionHandler. You attach this stream to an audio or video element in the DOM so the user can hear and see the remote party. The local stream can similarly be attached to a muted video element for self-view.
For production deployments, three considerations are critical. First, serve your application over HTTPS because browsers block getUserMedia on non-secure origins. Second, configure TURN servers to ensure media connectivity when clients are behind symmetric NATs or corporate firewalls. Third, implement token-based authentication or a backend proxy that generates SIP credentials dynamically rather than embedding them in client-side code.
Managing Media: Audio-Only vs Video Calls
SIP.js gives developers direct control over whether a WebRTC session includes audio only or both audio and video. This choice is made through media constraints passed to the SessionDescriptionHandler when a call is initiated or accepted.
Audio-only sessions are the simpler case. The browser requests access to the microphone only, the SDP offer contains audio media descriptions without video, and ICE negotiation handles a single media stream. Audio-only calls are ideal for low-bandwidth scenarios, voice-only customer support lines, and situations where video adds no value. They also avoid the complexity of camera permission prompts and video element rendering.
Video sessions require the browser to request both microphone and camera access. The SDP offer includes both audio and video media descriptions with their respective codec lists. ICE negotiation must establish connectivity for both media streams, which can increase the number of candidates gathered and the time required for connectivity checks. Video calls also demand significantly more bandwidth, typically 1 to 2 Mbps for standard definition and 2 to 5 Mbps for HD, compared to roughly 100 Kbps for a standard audio codec like Opus.
The choice between audio-only and video affects SDP negotiation directly. If the caller offers video but the callee only supports audio, the SDP answer will set the video media description to inactive or remove it entirely. SIP.js handles this mismatch gracefully, but developers should listen for track events to detect when a video track is added or removed mid-session.
For developers building production calling applications, the ability to toggle between audio-only and video modes without tearing down and re-establishing the session is valuable. SIP.js supports re-invites, which allow media constraints to change during an active call. This enables scenarios like starting a call as audio-only and upgrading to video when the user enables their camera.
Advanced Features: Call Hold, Transfer, DTMF, and Screen Sharing
SIP.js WebRTC applications can implement telephony features that go well beyond basic call setup. These features mirror what users expect from hardware SIP phones and enterprise softclients.
Call Hold and Resume
Placing a call on hold is a SIP re-invite that sets the media direction to sendonly or inactive in the SDP. SIP.js exposes this through the hold and unhold methods on the session object. When a call is held, the local media stream stops being sent to the remote party, and the remote party typically hears hold music if the SIP server is configured to provide it. Developers should listen for the state change event to update the UI accordingly.
Call Transfer
SIP.js supports both blind and attended transfers. A blind transfer sends a REFER message to the remote party, instructing them to call a new destination. An attended transfer, also called a warm transfer, places the existing call on hold, establishes a new call to the transfer target, and then sends a REFER with replaces header to bridge the two parties. The session object exposes methods for initiating transfers, and developers should handle the refer event on the receiving side to prompt the user or auto-accept.
DTMF Tone Sending
Dual-tone multi-frequency signaling is essential for interactive voice response systems and dialing extensions. SIP.js supports DTMF via SIP INFO messages, which carry the digit as a payload in a signaling message rather than as in-band audio tones. The session's sendDTMF method accepts a string of digits and a duration parameter. Some SIP servers also support RFC 4733 telephone events, which encode DTMF as RTP events in the media stream. Check your server's documentation to determine which DTMF method it expects.
Screen Sharing
Screen sharing in a SIP.js WebRTC application uses the browser's getDisplayMedia API to capture the screen as a video track. This track replaces or supplements the camera track in the RTCPeerConnection. SIP.js allows developers to customize the SessionDescriptionHandler to include the screen share track in the SDP offer. The re-invite mechanism is used to add the screen share track to an existing session without dropping the call. Developers should listen for the track ended event to detect when the user stops sharing and remove the track from the session.
For each of these features, SIP.js emits events that developers should handle. Session state changes, track additions and removals, DTMF confirmation, and transfer progress events all provide hooks for updating the UI and managing application state. Failing to listen for these events is a common source of bugs where the UI shows stale call status.
Debugging and Troubleshooting Common SIP.js WebRTC Issues
SIP.js WebRTC applications are complex because they span two protocols, multiple network layers, and browser security models. When something breaks, the failure can be difficult to isolate. Here are the most common issues and how to diagnose them.
Registration Failures
If the client fails to register, the first check is the WebSocket URL. Ensure the scheme is WSS in production, the port matches your SIP server's WebSocket binding, and the path is correct. Next, verify the SIP URI and credentials. A common mistake is using the wrong domain in the SIP URI or confusing the authentication username with the SIP URI user portion. Check the browser console for SIP.js error events and the SIP server logs for rejected REGISTER messages.
ICE Timeouts and One-Way Audio
ICE failures manifest as calls that connect but have no audio or video, or calls that never fully establish. The root cause is usually NAT traversal. Verify that your STUN and TURN servers are configured in the SIP.js UserAgent options and that the TURN server credentials are valid. Use the browser's built-in WebRTC debugging tools, available at the chrome://webrtc-internals page in Chrome, to inspect ICE candidate gathering and connectivity check results. If you see relay candidates failing, your TURN server may be unreachable or misconfigured.
Media Permission Errors
Browsers require explicit user consent for microphone and camera access. If the user denies permission or if the page is served over HTTP instead of HTTPS, getUserMedia will fail. Ensure your application is served over HTTPS in all environments, not just production. Handle the permission denied event gracefully with a user-facing message explaining how to re-enable permissions in browser settings.
Mismatched Codecs and SDP Mismatches
SIP servers configured for traditional SIP phones may not support the codecs that WebRTC browsers prefer. WebRTC mandates Opus for audio and VP8 or H.264 for video, but older SIP server configurations may default to G.711 for audio and H.263 for video. This mismatch causes call setup to fail during SDP negotiation. Check your SIP server's codec configuration and ensure Opus and VP8 or H.264 are enabled for WebRTC endpoints.
SDP Rewriting Issues
Some SIP servers rewrite SDP in ways that break WebRTC. For example, removing ICE candidates or altering the media direction attributes can cause the browser to reject the SDP answer. If you suspect SDP rewriting, compare the SDP offer sent by SIP.js with the SDP answer received from the server. The SIP.js debug logging can be enabled to show full SDP content.
For deeper troubleshooting, the SIP.js GitHub repository issue tracker is an active community resource. Many common problems have been reported and resolved there. The W3C WebRTC specification is also useful for understanding the browser-side behavior of RTCPeerConnection and ICE.
Choosing the Right SIP Server for SIP.js WebRTC
The SIP server you choose determines how well your SIP.js WebRTC application performs and scales. Three open-source servers dominate the landscape, each with different strengths.
Asterisk is the most widely deployed open-source PBX and has solid WebSocket support through its HTTP transport module. It handles WebRTC SDP well when the PJSIP channel driver is configured with ICE and DTLS-SRTP enabled. Asterisk is best for small to medium deployments where you need a full PBX with features like voicemail, queues, and conferencing alongside WebRTC.
FreeSWITCH is generally preferred for larger WebRTC deployments. Its Sofia SIP stack handles WebSocket connections efficiently, and its built-in media processing capabilities make it suitable for transcoding between WebRTC codecs and traditional SIP codecs. FreeSWITCH scales well and is a common choice for conferencing platforms and call centers that need WebRTC browser clients.
Kamailio is a SIP proxy and router, not a media server. It excels at load balancing, routing, and NAT traversal but does not handle media. Kamailio is typically deployed in front of Asterisk or FreeSWITCH to distribute WebSocket connections across multiple media servers. For high-scale SIP.js WebRTC deployments, the Kamailio plus FreeSWITCH combination is a proven architecture.
Hosted options like OnSIP (maintained by the same team behind SIP.js) and Twilio SIP offer managed SIP infrastructure with WebSocket endpoints. These eliminate the operational burden of running your own SIP server but introduce per-minute pricing and less control over codec configuration and call routing logic.
Best Practices for Production-Ready SIP.js WebRTC Deployments
Taking a SIP.js WebRTC application from a working demo to a production deployment requires attention to security, scalability, monitoring, and resilience.
Security
Always use secure WebSocket (WSS) with valid TLS certificates. Browsers enforce this for getUserMedia anyway, but it also protects SIP signaling from interception. Do not embed SIP credentials in client-side JavaScript. Instead, implement a backend service that authenticates the user and returns short-lived SIP credentials or tokens. If your SIP server supports it, use SIP digest authentication with per-session nonces.
Scalability
For concurrent calls beyond a few hundred, a single SIP server will become a bottleneck. Deploy Kamailio as a front-end proxy to load-balance WebSocket connections across multiple FreeSWITCH or Asterisk instances. Ensure your TURN servers are also scaled, as TURN relay traffic can be substantial when a significant percentage of clients require relay.
Monitoring
Instrument your SIP.js clients to report call-state events, registration status, and ICE connectivity results to a monitoring backend. Track metrics like registration success rate, call setup time, ICE failure rate, and average call duration. These metrics help you identify server-side issues before users report them.
Graceful Reconnection
WebSocket connections drop when networks change or browsers sleep. Implement automatic re-registration on WebSocket reconnect. SIP.js emits events for disconnection and reconnection that you can hook into. For active calls, WebRTC media may survive a brief signaling interruption, but you should detect the disconnection and attempt to re-establish the signaling channel promptly.
If managing all of this infrastructure feels excessive for your use case, consider a managed RTC platform. VideoSDK's Prebuilt UI Kit handles signaling, media, NAT traversal, and reconnection automatically, letting you embed video calling with a single component rather than building and maintaining SIP server infrastructure.
Definitions Glossary
SIP.js: A pure JavaScript library that implements the SIP signaling protocol over WebSocket, designed to work with WebRTC for browser-based real-time communication.
UserAgent: The core SIP.js component that manages SIP transactions, registration, and session lifecycle. It maintains the WebSocket connection to the SIP server.
SimpleUser: A high-level wrapper around UserAgent that simplifies common operations like registering, making calls, and answering incoming calls.
SessionDescriptionHandler: A pluggable SIP.js component that bridges SIP signaling and WebRTC media by translating SDP offers and answers into RTCPeerConnection operations.
ICE (Interactive Connectivity Establishment): The WebRTC framework for discovering network paths between peers using STUN and TURN servers to traverse NATs and firewalls.
SDP (Session Description Protocol): The text-based protocol used to negotiate media capabilities, codecs, and transport parameters between SIP and WebRTC endpoints.
Key Takeaways
- SIP.js bridges SIP telephony and WebRTC by handling SIP signaling over WebSocket while delegating media to the browser's native WebRTC APIs, enabling browser-based VoIP without plugins.
- The architecture flows from SIP registration through WebSocket transport to SDP offer and answer exchange, followed by ICE candidate gathering and direct SRTP media flow between endpoints.
- Audio-only and video sessions are controlled through media constraints, with audio-only calls offering lower bandwidth and simpler ICE negotiation while video calls require camera access and higher throughput.
- Advanced telephony features including call hold, blind and attended transfer, DTMF via SIP INFO, and screen sharing via getDisplayMedia are all supported by SIP.js through session methods and event listeners.
- Production deployments require WSS with valid certificates, backend-generated SIP credentials, TURN server scaling, and client-side monitoring of call-state and ICE connectivity metrics.
- For teams that want browser-based calling without managing SIP server infrastructure, VideoSDK's video calling SDK and Prebuilt UI Kit provide a managed alternative with built-in signaling, NAT traversal, and reconnection handling.
Conclusion
SIP.js WebRTC remains a powerful approach for developers who need to connect browsers to existing SIP infrastructure. The library handles the hard parts of SIP signaling while letting WebRTC manage real-time media, and its support for advanced features like transfer, DTMF, and screen sharing makes it suitable for serious telephony applications. The trade-off is operational complexity: you are responsible for SIP server configuration, TURN server scaling, certificate management, and reconnection logic. For teams that want to skip that overhead and ship calling features faster, VideoSDK offers a managed video calling API that handles signaling, media, and infrastructure automatically. Explore the SIP.js documentation to experiment with the library directly, or check the VideoSDK blog for more real-time communication guides. What are you building with SIP.js WebRTC? Drop a comment below, I would love to hear about your SIP integration use case.
Step 5: Implement Participant View
In this step, we'll implement the participant view for your SIP.js WebRTC application. This feature will display a list of active participants in the call, providing a clear overview of who is currently connected. We will update the
ParticipantView component to reflect this functionality.Displaying Call Participants
The participant view will dynamically update to show the current call participants. We need to ensure that our application listens for changes in the session state and updates the participant list accordingly.
[a] Update ParticipantView Component
First, we'll create a
ParticipantView component that lists the active participants in the call.Create
ParticipantView.js:JavaScript
1import React, { useEffect, useState } from 'react';
2
3function ParticipantView({ session }) {
4    const [participants, setParticipants] = useState([]);
5
6    useEffect(() => {
7        if (session) {
8            const updateParticipants = () => {
9                const newParticipants = [];
10                if (session.remoteIdentity.displayName) {
11                    newParticipants.push(session.remoteIdentity.displayName);
12                } else {
13                    newParticipants.push(session.remoteIdentity.uri.toString());
14                }
15                setParticipants(newParticipants);
16            };
17
18            updateParticipants();
19
20            session.on('accepted', updateParticipants);
21            session.on('bye', () => setParticipants([]));
22            session.on('terminated', () => setParticipants([]));
23
24            return () => {
25                session.off('accepted', updateParticipants);
26                session.off('bye', () => setParticipants([]));
27                session.off('terminated', () => setParticipants([]));
28            };
29        }
30    }, [session]);
31
32    return (
33        <div>
34            <h2>Participant View</h2>
35            <ul>
36                {participants.map((participant, index) => (
37                    <li key={index}>{participant}</li>
38                ))}
39            </ul>
40        </div>
41    );
42}
43
44export default ParticipantView;
Explanation:
- State Management: We use the
useStatehook to manage the list of participants. - Effect Hook: The
useEffecthook listens for changes in the session and updates the participant list accordingly. - Event Handling: The component listens for
accepted,bye, andterminatedevents to update the participant list.
[b] Integrate ParticipantView Component
Next, we'll integrate the
ParticipantView component into the main application. We need to pass the current session to the ParticipantView component.Updated
App.js:JavaScript
1import React, { useState } from 'react';
2import { UA } from 'sip.js';
3import JoinScreen from './components/JoinScreen';
4import CallControls from './components/CallControls';
5import ParticipantView from './components/ParticipantView';
6
7function App() {
8    const [userAgent, setUserAgent] = useState(null);
9    const [session, setSession] = useState(null);
10
11    const handleConnect = (username, password, server) => {
12        const ua = new UA({
13            uri: `sip:${username}@${server}`,
14            transportOptions: {
15                wsServers: [`wss://${server}/ws`],
16            },
17            authorizationUser: username,
18            password: password,
19        });
20
21        ua.start();
22        ua.on('invite', (incomingSession) => {
23            incomingSession.accept();
24            setSession(incomingSession);
25        });
26        setUserAgent(ua);
27    };
28
29    const handleStartCall = (target) => {
30        const outgoingSession = userAgent.invite(target);
31        setSession(outgoingSession);
32    };
33
34    const handleMute = () => {
35        if (session) {
36            session.mute();
37        }
38    };
39
40    const handleHold = () => {
41        if (session) {
42            session.hold();
43        }
44    };
45
46    const handleEndCall = () => {
47        if (session) {
48            session.terminate();
49            setSession(null);
50        }
51    };
52
53    return (
54        <div>
55            <h1>SIP.js WebRTC App</h1>
56            {!userAgent && <JoinScreen onConnect={handleConnect} />}
57            {userAgent && (
58                <CallControls
59                    onStartCall={handleStartCall}
60                    onMute={handleMute}
61                    onHold={handleHold}
62                    onEndCall={handleEndCall}
63                />
64            )}
65            {session && <ParticipantView session={session} />}
66        </div>
67    );
68}
69
70export default App;
Explanation:
- Session Prop: The
sessionstate is passed to theParticipantViewcomponent, allowing it to display the active participants. - Conditional Rendering: The
ParticipantViewcomponent is rendered only if there is an active session.
[c] Enhancing Participant Management
For a more comprehensive participant view, you might want to display more details or manage multiple participants if your application supports group calls. The basic implementation can be extended as needed to suit your application's requirements.
Extended
ParticipantView for Group Calls:If your application supports group calls, you might need to handle multiple participants. Here's an example extension for the
ParticipantView component:JavaScript
1import React, { useEffect, useState } from 'react';
2
3function ParticipantView({ session }) {
4    const [participants, setParticipants] = useState([]);
5
6    useEffect(() => {
7        if (session) {
8            const updateParticipants = () => {
9                const newParticipants = session.dialogs.map(dialog => dialog.remoteIdentity.displayName || dialog.remoteIdentity.uri.toString());
10                setParticipants(newParticipants);
11            };
12
13            updateParticipants();
14
15            session.on('progress', updateParticipants);
16            session.on('accepted', updateParticipants);
17            session.on('bye', updateParticipants);
18            session.on('terminated', updateParticipants);
19
20            return () => {
21                session.off('progress', updateParticipants);
22                session.off('accepted', updateParticipants);
23                session.off('bye', updateParticipants);
24                session.off('terminated', updateParticipants);
25            };
26        }
27    }, [session]);
28
29    return (
30        <div>
31            <h2>Participant View</h2>
32            <ul>
33                {participants.map((participant, index) => (
34                    <li key={index}>{participant}</li>
35                ))}
36            </ul>
37        </div>
38    );
39}
40
41export default ParticipantView;
Explanation:
- Group Calls: The updated
ParticipantViewhandles multiple participants by mapping over the session dialogs. - Event Handling: The component listens for additional events (
progress,accepted,bye,terminated) to keep the participant list updated.
In this step, we implemented the participant view for the SIP.js WebRTC application. This component dynamically displays the list of active participants in a call, providing users with clear visibility of who is connected. We ensured that the participant view updates in real-time based on session events. This enhancement improves the overall user experience by keeping them informed about the current call participants. In the next step, we will focus on running and testing the application to ensure everything works as expected.
Step 6: Run Your Code Now
In this final step, we will focus on running and testing your SIP.js WebRTC application to ensure everything works as expected. We'll cover how to start the application, test its functionality, and troubleshoot common issues. This section will also include some tips for preparing your app for production deployment.
Running the Application
To run your application, you'll need to start your development server. If you used a tool like
create-react-app to set up your project, you can use the following command:bash
1npm startThis command will start the development server and open your application in the default web browser. The application should be accessible at
http://localhost:3000.Testing the Application
Once your application is running, you can test its functionality by following these steps:
Open the Application
Navigate to
http://localhost:3000 in your web browser.Connect to SIP Server
- Enter your SIP username, password, and server address in the Join Screen.
- Click the "Connect" button.
- If the connection is successful, the call controls and participant view should appear.
Test Call Controls
- Start a Call: Click the "Start Call" button and enter the SIP address of the callee. Verify that the call is initiated.
- Mute: Click the "Mute" button to mute the call. Verify that the call is muted.
- Hold: Click the "Hold" button to put the call on hold. Verify that the call is on hold.
- End Call: Click the "End Call" button to terminate the call. Verify that the call is ended.
Check Participant View
- Ensure that the participant view displays the active call participants.
- Verify that the participant list updates dynamically based on the call status.
Troubleshooting Common Issues
If you encounter any issues while running your application, here are some common troubleshooting tips:
Connection Issues
- Ensure that your SIP server is running and accessible.
- Verify the SIP username, password, and server address are correct.
- Check for any network issues or firewall settings that might be blocking the connection.
Call Controls Not Working
- Ensure that the
sessionobject is properly initialized and available. - Check the console for any errors related to SIP.js or WebRTC.
Participant View Not Updating
- Verify that the event listeners are correctly set up in the
ParticipantViewcomponent. - Ensure that the session events (
accepted,bye,terminated) are being triggered correctly.
Preparing for Production Deployment
Once you have tested your application and ensured it works as expected, you can prepare it for production deployment. Here are some steps to consider:
Build the Application
Use the following command to create a production build of your application:
bash
1 npm run buildThis will generate optimized static files for deployment.
Configure SIP Server
- Ensure that your SIP server is properly configured and secured for production use.
- Consider using a reliable SIP provider to handle production traffic.
Deploy the Application
- Deploy the built files to a web server or a cloud service provider like AWS, Google Cloud, or Azure.
- Ensure that your deployment environment supports WebSocket connections required for SIP.js.
Monitor and Maintain
- Set up monitoring and logging to track the performance and usage of your application.
- Regularly update dependencies and security patches to keep your application secure.
Conclusion
By following this guide, you have successfully built and tested a SIP.js WebRTC application. You have learned how to create a join screen, implement call controls, and display call participants. With these features in place, your application is ready for production deployment.
Free $20 Balance for AI Voice Agents & Video Calls
FAQ