Introduction to AI Voice Agents in AI Voice Agent for Telecom
AI Voice Agents are intelligent systems designed to interact with users through voice commands. They leverage advanced technologies such as Speech-to-Text (STT), Language Learning Models (LLM), and Text-to-Speech (TTS) to understand and respond to human speech. In the telecom industry, these agents play a crucial role in automating customer service, providing information about telecom plans, assisting with troubleshooting, and guiding users through service setups.
What is an AI Voice Agent?
An AI Voice Agent is a software program that uses artificial intelligence to process and respond to voice commands. It can understand natural language, perform tasks, and provide information based on user queries.
Why are they important for the Telecom Industry?
In the telecom sector, AI Voice Agents can significantly enhance customer experience by providing instant support and reducing wait times. They can handle common inquiries, assist in troubleshooting, and offer guidance on telecom services, thus freeing up human agents for more complex issues.
Core Components of a Voice Agent
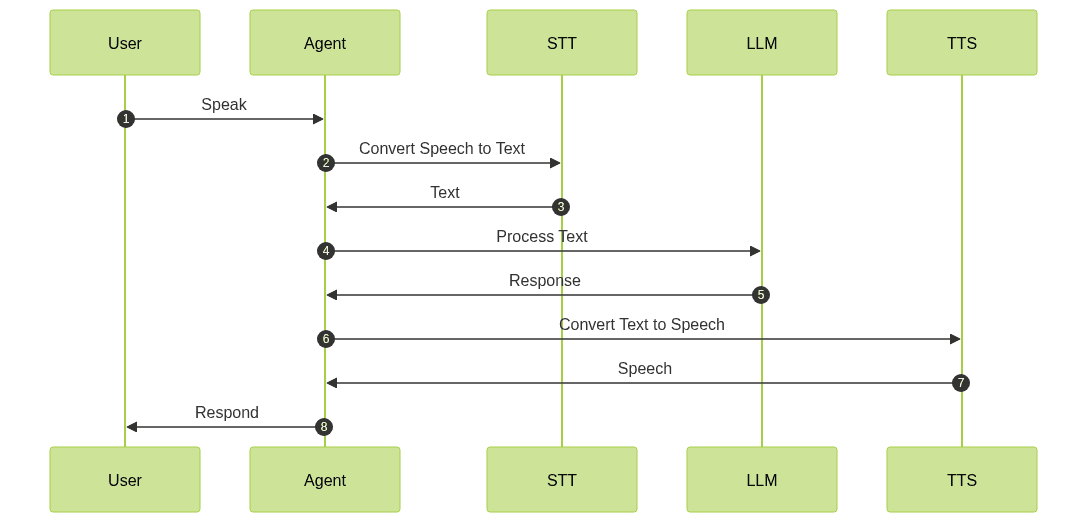
- Speech-to-Text (STT): Converts spoken language into text.
- Language Learning Model (LLM): Processes the text to understand and generate appropriate responses.
- Text-to-Speech (TTS): Converts text responses back into spoken language.
What You'll Build in This Tutorial
In this tutorial, you will build a fully functional AI Voice Agent tailored for the telecom industry using the VideoSDK framework. You will learn to set up the development environment, create a custom agent class, define a processing pipeline, and test the agent in a playground environment. For a comprehensive guide, refer to the
Voice Agent Quick Start Guide
.Architecture and Core Concepts
High-Level Architecture Overview
The AI Voice Agent architecture involves a seamless flow of data from user speech to agent response. The process begins with capturing the user's voice, converting it to text using STT, processing the text with an LLM to generate a response, and finally using TTS to deliver the response back to the user.
Understanding Key Concepts in the VideoSDK Framework
- Agent: The core class representing your bot, responsible for managing interactions.
- CascadingPipeline: A sequence of processing stages (STT -> LLM -> TTS) that transform user input into responses. Learn more about the
Cascading pipeline in AI voice Agents
. - VAD & TurnDetector: Tools that help the agent determine when to listen and when to speak, ensuring smooth interactions. Explore the
Turn detector for AI voice Agents
.
Setting Up the Development Environment
Prerequisites
Before starting, ensure you have Python 3.11+ installed and a VideoSDK account. You can create an account at the VideoSDK website.
Step 1: Create a Virtual Environment
Create a virtual environment to manage dependencies:
bash
python -m venv venv
source venv/bin/activate  # On Windows use `venv\\Scripts\\activate`
Step 2: Install Required Packages
Install the necessary packages using pip:
bash
pip install videosdk-agents videosdk-plugins
Step 3: Configure API Keys in a .env File
Create a
.env file in your project directory and add your VideoSDK API keys:
VIDEOSDK_API_KEY=your_api_key_hereBuilding the AI Voice Agent: A Step-by-Step Guide
To build the AI Voice Agent, we will use the complete code provided below and then break it down into manageable parts for detailed explanation.
1import asyncio, os
2from videosdk.agents import Agent, AgentSession, CascadingPipeline, JobContext, RoomOptions, WorkerJob, ConversationFlow
3from videosdk.plugins.silero import SileroVAD
4from videosdk.plugins.turn_detector import TurnDetector, pre_download_model
5from videosdk.plugins.deepgram import DeepgramSTT
6from videosdk.plugins.openai import OpenAILLM
7from videosdk.plugins.elevenlabs import ElevenLabsTTS
8from typing import AsyncIterator
9
10# Pre-downloading the Turn Detector model
11pre_download_model()
12
13agent_instructions = "You are an AI Voice Agent designed specifically for the telecom industry. Your primary role is to assist customers with telecom-related inquiries and tasks. You are a knowledgeable and efficient telecom assistant.\n\nCapabilities:\n1. Provide information about various telecom plans and services.\n2. Assist customers in troubleshooting common telecom issues.\n3. Guide users through the process of setting up new telecom services.\n4. Answer frequently asked questions about billing and account management.\n5. Offer insights into the latest telecom technologies and trends.\n\nConstraints and Limitations:\n1. You are not authorized to make changes to customer accounts or services.\n2. You must always recommend users to contact a human representative for complex issues or account-specific queries.\n3. You cannot access personal customer data unless explicitly provided by the user during the interaction.\n4. You must include a disclaimer that all information provided is for general guidance and users should verify details with their telecom provider.\n5. You are not a technical support agent and should direct users to official support channels for technical issues beyond basic troubleshooting."
14
15class MyVoiceAgent(Agent):
16    def __init__(self):
17        super().__init__(instructions=agent_instructions)
18    async def on_enter(self): await self.session.say("Hello! How can I help?")
19    async def on_exit(self): await self.session.say("Goodbye!")
20
21async def start_session(context: JobContext):
22    # Create agent and conversation flow
23    agent = MyVoiceAgent()
24    conversation_flow = ConversationFlow(agent)
25
26    # Create pipeline
27    pipeline = CascadingPipeline(
28        stt=DeepgramSTT(model="nova-2", language="en"),
29        llm=OpenAILLM(model="gpt-4o"),
30        tts=ElevenLabsTTS(model="eleven_flash_v2_5"),
31        vad=SileroVAD(threshold=0.35),
32        turn_detector=TurnDetector(threshold=0.8)
33    )
34
35    session = AgentSession(
36        agent=agent,
37        pipeline=pipeline,
38        conversation_flow=conversation_flow
39    )
40
41    try:
42        await context.connect()
43        await session.start()
44        # Keep the session running until manually terminated
45        await asyncio.Event().wait()
46    finally:
47        # Clean up resources when done
48        await session.close()
49        await context.shutdown()
50
51def make_context() -> JobContext:
52    room_options = RoomOptions(
53    #  room_id="YOUR_MEETING_ID",  # Set to join a pre-created room; omit to auto-create
54        name="VideoSDK Cascaded Agent",
55        playground=True
56    )
57
58    return JobContext(room_options=room_options)
59
60if __name__ == "__main__":
61    job = WorkerJob(entrypoint=start_session, jobctx=make_context)
62    job.start()
63
Step 4.1: Generating a VideoSDK Meeting ID
To interact with the AI Voice Agent, you need a meeting ID. You can generate one using the following
curl command:
bash
curl -X POST \\
  'https://api.videosdk.live/v1/rooms' \\
  -H 'Authorization: Bearer YOUR_API_KEY' \\
  -H 'Content-Type: application/json' \\
  -d '{}'
Replace YOUR_API_KEY with your actual VideoSDK API key. This command will return a meeting ID that you can use in your application.Step 4.2: Creating the Custom Agent Class
The
MyVoiceAgent class is a custom implementation of the Agent class. It defines the behavior of the agent when a session starts or ends. The on_enter method is triggered when the session begins, and the on_exit method is called when the session ends:
python
class MyVoiceAgent(Agent):
    def __init__(self):
        super().__init__(instructions=agent_instructions)
    async def on_enter(self): await self.session.say("Hello! How can I help?")
    async def on_exit(self): await self.session.say("Goodbye!")
Step 4.3: Defining the Core Pipeline
The
CascadingPipeline defines the sequence of processing stages that the agent uses to handle user interactions. It includes STT, LLM, TTS, VAD, and TurnDetector:
python
pipeline = CascadingPipeline(
    stt=DeepgramSTT(model="nova-2", language="en"),
    llm=OpenAILLM(model="gpt-4o"),
    tts=ElevenLabsTTS(model="eleven_flash_v2_5"),
    vad=SileroVAD(threshold=0.35),
    turn_detector=TurnDetector(threshold=0.8)
)
Each component in the pipeline plays a critical role in processing the user's voice input and generating a response. For instance, the Deepgram STT Plugin for voice agent
is used for speech-to-text conversion, while theOpenAI LLM Plugin for voice agent
handles language processing, and theElevenLabs TTS Plugin for voice agent
manages text-to-speech conversion.Step 4.4: Managing the Session and Startup Logic
The
start_session function handles the session management, while the make_context function sets up the job context for the agent. The main script block initializes and starts the agent:
```python
async def start_session(context: JobContext):
agent = MyVoiceAgent()
conversation_flow = ConversationFlow(agent)
pipeline = CascadingPipeline(...)
session = AgentSession(agent=agent, pipeline=pipeline, conversation_flow=conversation_flow)
try:
await context.connect()
await session.start()
await asyncio.Event().wait()
finally:
await session.close()
await context.shutdown()def make_context() -> JobContext:
room_options = RoomOptions(name="VideoSDK Cascaded Agent", playground=True)
return JobContext(room_options=room_options)
if name == "main":
job = WorkerJob(entrypoint=start_session, jobctx=make_context)
job.start()
```
The session is managed through
AI voice Agent Sessions
, ensuring efficient handling of interactions.Running and Testing the Agent
Step 5.1: Running the Python Script
To start the AI Voice Agent, run the script using Python:
bash
python main.py
This will initialize the agent and provide a link to the VideoSDK playground where you can interact with the agent.Step 5.2: Interacting with the Agent in the Playground
Once the agent is running, you'll receive a playground link in the console. Open this link in a browser to join the session and start interacting with your AI Voice Agent. You can speak into your microphone, and the agent will respond based on the instructions provided.
Advanced Features and Customizations
Extending Functionality with Custom Tools
The VideoSDK framework allows you to extend your agent's functionality by integrating custom tools. This can be done by implementing additional plugins or modifying the existing pipeline to include new processing stages.
Exploring Other Plugins
While the tutorial uses specific plugins for STT, LLM, and TTS, the VideoSDK framework supports other options. You can explore different plugins to enhance the agent's capabilities or tailor it to specific requirements. For instance, the
Silero Voice Activity Detection
plugin is crucial for detecting when the user is speaking.Troubleshooting Common Issues
API Key and Authentication Errors
Ensure that your API key is correctly configured in the
.env file. Double-check that you're using the correct key for authentication.Audio Input/Output Problems
Verify that your microphone and speakers are properly set up and configured. Check system settings and permissions to ensure the agent can access audio devices.
Dependency and Version Conflicts
Ensure that all required packages are installed and compatible with your Python version. Use a virtual environment to manage dependencies and avoid conflicts.
Conclusion
Summary of What You've Built
In this tutorial, you've built a fully functional AI Voice Agent for the telecom industry using the VideoSDK framework. You've learned to set up the development environment, create a custom agent class, define a processing pipeline, and test the agent in a playground environment.
Next Steps and Further Learning
To further enhance your AI Voice Agent, consider exploring additional plugins and customizations. You can also delve deeper into the VideoSDK documentation to discover more advanced features and capabilities.
Want to level-up your learning? Subscribe now
Subscribe to our newsletter for more tech based insights
FAQ