Introduction to Realtime OpenAI Lowcode
In an era where artificial intelligence is transforming every industry, the demand for rapid, scalable, and interactive AI solutions is skyrocketing. Realtime AI applications—like live chatbots, voice AI agents, and automated business tools—require both instant data processing and seamless integration with existing workflows. Traditionally, building such systems demanded deep technical expertise and significant development time. However, with the introduction of the OpenAI Realtime API and the surge of lowcode development platforms, creating sophisticated realtime AI solutions is more accessible than ever. This article explores how to use realtime OpenAI lowcode, guiding you through the essential concepts, setup, and advanced integrations so you can quickly leverage the power of AI in your own projects.
What is OpenAI Realtime API and Lowcode?
Understanding Realtime OpenAI API
The OpenAI Realtime API is designed to enable instant, bidirectional interaction between your applications and OpenAI’s powerful language models. Unlike traditional request-response APIs, the realtime API supports streaming input and output, allowing for dynamic, conversational experiences. This is especially valuable for applications like live chat, voice assistants, and collaborative tools where latency must be minimized and responses need to feel immediate. Core capabilities include fast text generation, context-aware conversations, and support for various data modalities.
Defining Lowcode Platforms
Lowcode and no-code platforms empower developers and non-developers alike to build robust applications with minimal hand-coded effort. By leveraging visual interfaces, drag-and-drop components, and easy integrations, these platforms accelerate prototyping and deployment. Popular lowcode solutions like Bubble, Retool, and n8n reduce development cycles, making it feasible to iterate and deploy AI-powered features rapidly—often in hours instead of weeks.
Combining OpenAI Realtime with Lowcode
By integrating the OpenAI Realtime API into lowcode environments, developers can quickly build and launch intelligent, interactive applications. This synergy allows for rapid innovation, streamlined workflows, and scalable deployment of realtime AI solutions.
Key Features and Benefits of Realtime OpenAI Lowcode
Instant Data Interaction and Low Latency
Realtime OpenAI lowcode solutions enable instant feedback and lightning-fast data processing. For example, a customer messaging a support bot receives a response in milliseconds, powered by the streaming capabilities of the OpenAI API. Here’s a simple JavaScript snippet illustrating real-time streaming response:
1const eventSource = new EventSource(\"/openai/stream\");
2eventSource.onmessage = (event) => {
3  const data = JSON.parse(event.data);
4  displayMessage(data.text);
5};
6
Such instant interactivity is crucial for applications in customer service, voice assistants, and collaborative tools.
Efficiency and Scalability
Lowcode platforms supercharge your development pipeline by removing repetitive coding tasks and introducing automation. This means you can connect OpenAI’s realtime API to various data sources, automate triggers, and scale your applications effortlessly. Deploying new features or updating models becomes a matter of configuration, not code rewrites.
Real-World Use Cases
Practical examples include AI-powered voice agents for call centers, intelligent chatbots for customer support, and automated document processing—all built rapidly with lowcode and OpenAI’s realtime capabilities.
Step-by-Step Guide: How to Use Realtime OpenAI Lowcode
Prerequisites and Tools Needed
To get started, you’ll need:
- Access to an OpenAI account (with API keys and realtime API access)
- A lowcode platform (e.g., Bubble, Retool, n8n)
- Basic JavaScript/Node.js knowledge (for custom logic)
- A web browser and internet connection
Setting Up Your Lowcode Environment
Most lowcode platforms provide intuitive onboarding. Here’s a sample setup using n8n:
- Sign up and log in to your chosen platform.
- Create a new workflow/project.
- Add a webhook node to receive incoming data.
1{
2  \"nodes\": [
3    {
4      \"parameters\": {
5        \"path\": \"ai-agent-webhook\"
6      },
7      \"name\": \"Webhook\",
8      \"type\": \"n8n-nodes-base.webhook\",
9      \"typeVersion\": 1
10    }
11  ]
12}
13
This webhook will handle incoming frontend requests for realtime AI interaction.
Connecting to OpenAI’s Realtime API
Now, connect your workflow to OpenAI’s realtime API. Authenticate using your API key and set up the streaming endpoint.
1const fetch = require('node-fetch');
2
3async function streamOpenAI(input) {
4  const response = await fetch(\"https://api.openai.com/v1/realtime/chat\", {
5    method: \"POST\",
6    headers: {
7      \"Authorization\": `Bearer ${process.env.OPENAI_API_KEY}`,
8      \"Content-Type\": \"application/json\"
9    },
10    body: JSON.stringify({
11      model: \"gpt-4\",
12      messages: [{ role: \"user\", content: input }],
13      stream: true
14    })
15  });
16  for await (const chunk of response.body) {
17    process.stdout.write(chunk);
18  }
19}
20
Insert your API key securely and handle the streaming chunks for real-time output.
Building Your First Realtime AI Agent
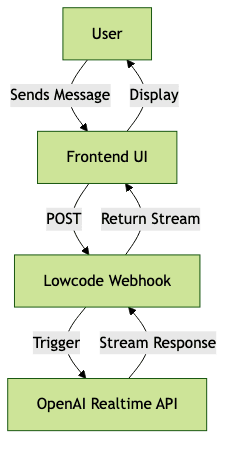
Let’s build a simple chatbot that responds instantly. Here’s a high-level workflow:
- User sends a message via a frontend UI (web or mobile)
- Message is posted to a webhook (n8n, Bubble, or Retool)
- The workflow triggers an OpenAI realtime API call
- The response streams back to the user interface
Mermaid diagram for workflow:
Sample Node.js code for handling webhook and streaming response:
1const express = require('express');
2const fetch = require('node-fetch');
3const app = express();
4app.use(express.json());
5
6app.post('/ai-agent-webhook', async (req, res) => {
7  const userInput = req.body.message;
8  const openaiRes = await fetch(\"https://api.openai.com/v1/realtime/chat\", {
9    method: \"POST\",
10    headers: {
11      \"Authorization\": `Bearer ${process.env.OPENAI_API_KEY}`,
12      \"Content-Type\": \"application/json\"
13    },
14    body: JSON.stringify({
15      model: \"gpt-4\",
16      messages: [{ role: \"user\", content: userInput }],
17      stream: true
18    })
19  });
20  openaiRes.body.pipe(res);
21});
22
23app.listen(3000);
24
This setup lets users interact with your AI agent in real time, with all backend orchestration handled by the lowcode platform and minimal custom code.
Testing and Deployment
Most lowcode platforms offer built-in testing and deployment tools. Use the preview mode to simulate user interactions, monitor API responses, and ensure latency is minimal. With platforms like Bubble or Retool, deploy your workflow to production with a single click, making your realtime AI agent publicly accessible.
Troubleshooting and Best Practices
If you encounter slow responses, check rate limits and model selection. Optimize by batching requests and caching frequent responses. Always secure your API keys and validate user inputs.
Advanced Integrations and Customizations
Adding Voice Capabilities and Streaming Output
You can extend your realtime AI agent with voice capabilities by integrating telephony APIs like Twilio. Combine with a Retrieval-Augmented Generation (RAG) backend for enhanced context.
1const twilio = require('twilio');
2const VoiceResponse = twilio.twiml.VoiceResponse;
3
4app.post('/voice', async (req, res) => {
5  const voiceInput = req.body.SpeechResult;
6  const aiResponse = await streamOpenAI(voiceInput);
7  const twiml = new VoiceResponse();
8  twiml.say(aiResponse);
9  res.type('text/xml');
10  res.send(twiml.toString());
11});
12
This lets users interact with your AI agent over the phone, with real-time responses streamed from OpenAI.
Integrating with Business Workflows
To automate complex business processes, integrate your AI agent with workflow automation tools like n8n or Zapier. Trigger actions based on AI responses, update CRM records, or send notifications.
Mermaid diagram for workflow integration:
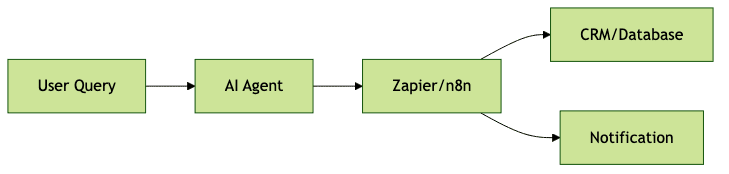
This approach lets your AI agent drive real business logic with minimal manual intervention.
Customizing User Experience
Enhance user engagement by personalizing responses, tracking customer history, and supporting multiple locations or languages. Store interaction logs in your database to inform future responses or tailor the experience per user segment.
Cost, Security, and Future Trends
Cost Considerations
OpenAI’s realtime API uses pay-as-you-go pricing, billed per token. Keep costs manageable by optimizing prompt length, leveraging caching, and monitoring usage dashboards. Many lowcode platforms offer free tiers for prototyping and predictable pricing for scale.
Security and Compliance
Protect sensitive data by securing API keys, enforcing HTTPS, and validating all user inputs. For enterprise deployments, ensure compliance with privacy standards (GDPR, SOC2) and audit access regularly.
Future of Realtime OpenAI Lowcode
Expect richer model capabilities, tighter integrations, and expanded support for voice, video, and multi-modal data. The convergence of lowcode and realtime AI will enable even faster innovation and broader accessibility.
Conclusion: Getting Started With Realtime OpenAI Lowcode
The fusion of OpenAI’s realtime API with modern lowcode platforms empowers anyone to build responsive, scalable, and intelligent applications at unprecedented speed. By following the steps outlined above, you can create voice agents, chatbots, and automation tools that deliver instant value. Don’t hesitate to experiment, iterate, and discover new possibilities—start building your realtime OpenAI lowcode solution today!
Want to level-up your learning? Subscribe now
Subscribe to our newsletter for more tech based insights
FAQ