


To add live classes to a fitness app, run each class as a real-time video room. The instructor joins as a host who sends audio and video, members join as viewers who only receive, and one viewer can be promoted on stage for a form check. Record the class so members can replay it later.
This guide is for developers choosing a live streaming SDK for fitness apps and building classes into their own product. If you want a ready-made fitness live streaming platform for a studio, most results for that phrase are studio software; this page is about building one. It covers class requirements, when a real-time room beats an HTTP Live Streaming (HLS) broadcast, React code, the promotion step the sample leaves open, and a cost formula.
What live workout streaming asks of the video layer
Live workout streaming differs from a webinar: the instructor reacts to members, one member sometimes needs to be seen, and audio mixes voice with music. The table maps each requirement to the build.
| Class requirement | Why it matters | What it implies |
|---|---|---|
| Instructor reacts to members | Correcting form needs a short round trip | A real-time path for anyone who talks back |
| Form check on one member | The instructor needs one camera, not everyone's | Receive-only members, plus a way to promote one |
| Voice over music | Browser audio processing is set per microphone track | Test audio settings with class music playing |
| Class size varies | Small and large classes have different cost curves | Choose real-time or HLS delivery per class |
| Replay after class | Members miss live slots | Record the room |
The form check row changes the architecture most: it turns a broadcast into a room with roles. The audio row is a test item: browsers expose echoCancellation, noiseSuppression and autoGainControl as audio constraints (MDN, MediaTrackConstraints). In VideoSDK's React SDK, createMicrophoneAudioTrack() sets all three in its noiseConfig and offers a music_standard encoder profile for sessions where music matters, per the custom audio track docs. Neither page says how each setting treats an instructor's voice over class music, so run a test class with music playing and compare the settings before you pick defaults.
Interactive room or HLS broadcast for a live class
A live class runs as a real-time room or an HLS broadcast. In a real-time room, every participant connects over WebRTC (Web Real-Time Communication), the browser technology for exchanging audio and video (MDN, WebRTC API). In an HLS broadcast, players download encoded segments over HTTP, which scales for watch-only audiences but adds delay.
RFC 8216, section 6.3.3, says a player SHOULD NOT start less than three target durations from the end of a live playlist, and the Apple HLS Authoring Specification says target durations SHOULD be 6 seconds. A player following both starts at least three segments behind live: fine for watching, too late for a form check.
The decision rule: use a real-time room when members talk back or appear on camera. Use HLS when the class is watch-only and large enough that per-viewer cost dominates. Combine them when a small group interacts on stage while a larger audience watches HLS. See the delay, scale and cost trade-off between HLS and WebRTC.
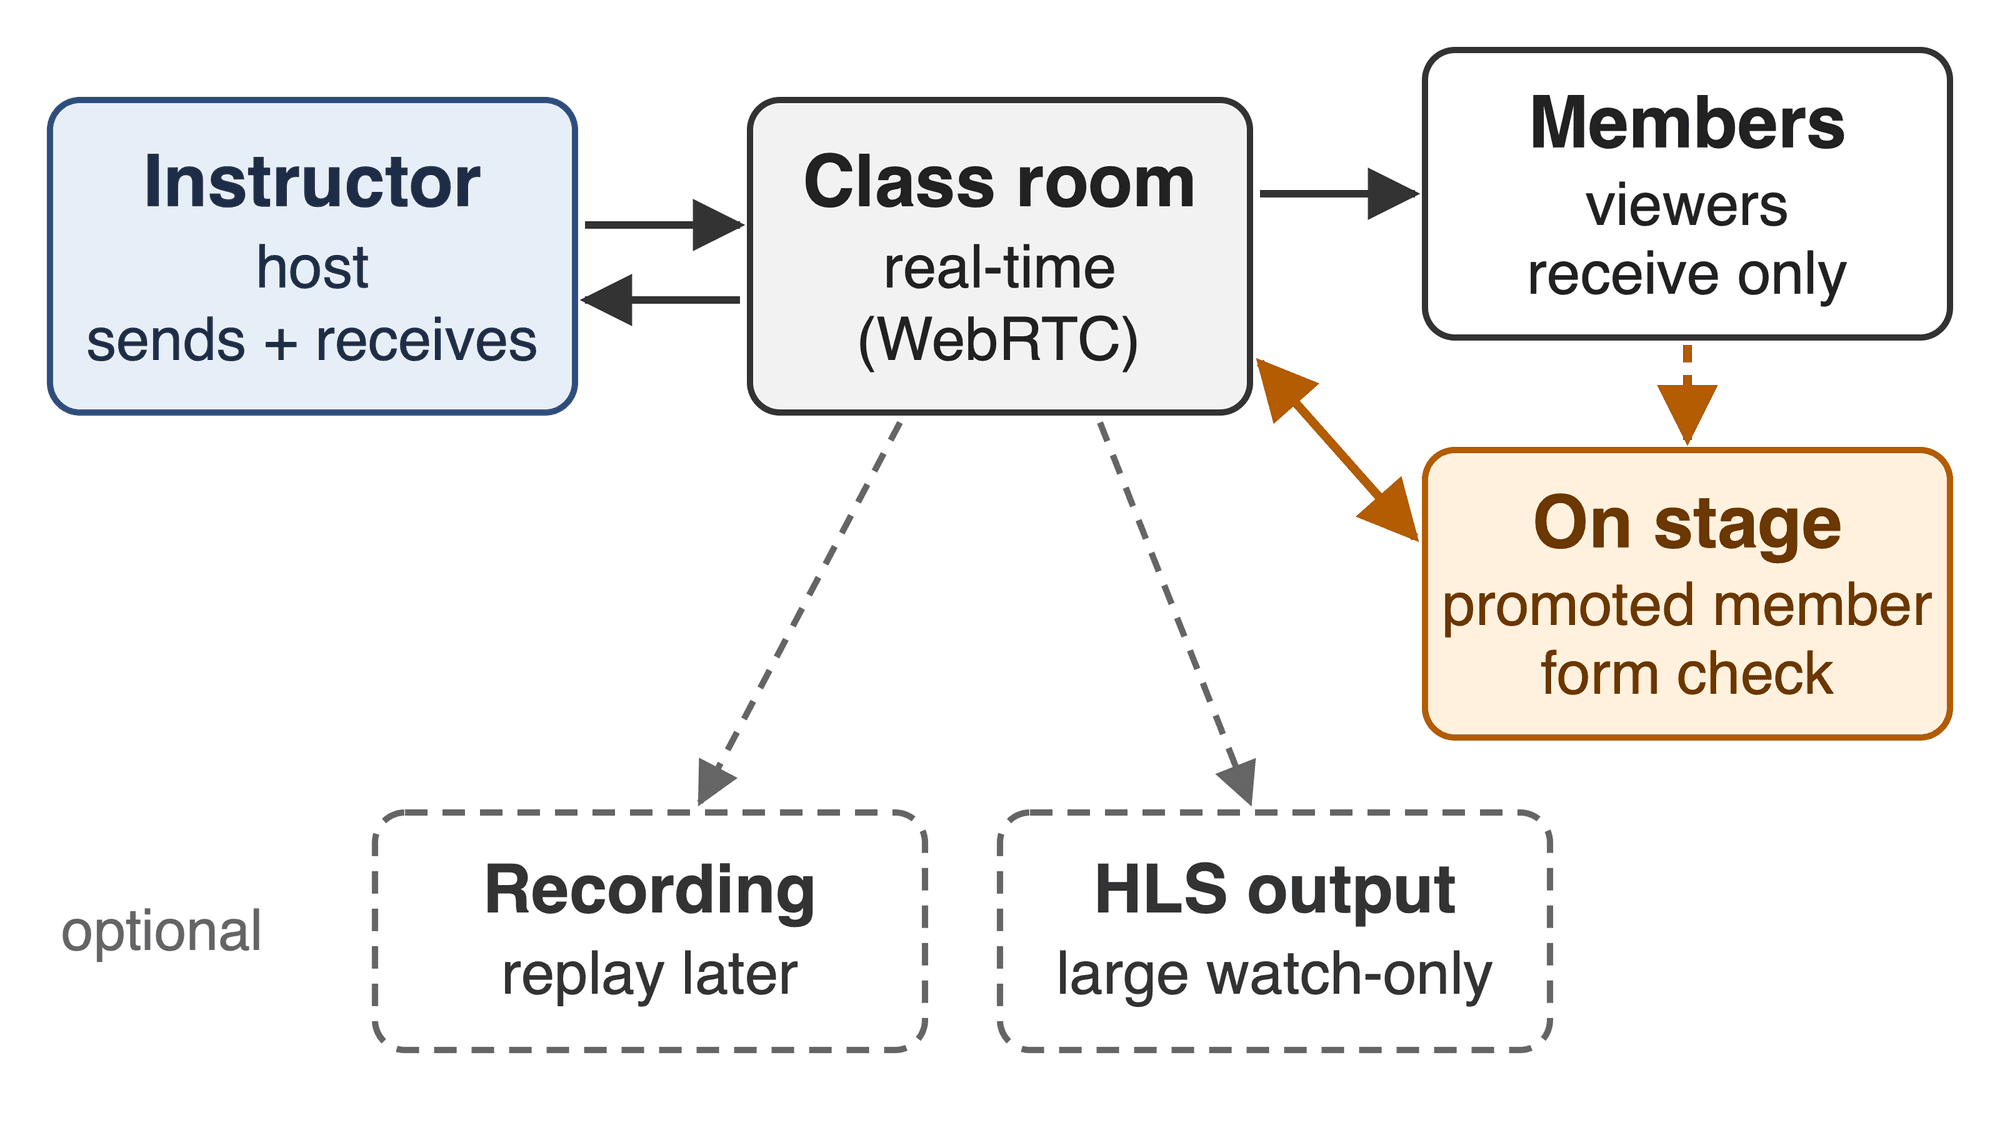
Members only receive; promoting one to sender puts them on stage. Recording and HLS output are optional branches from the same room.
VideoSDK implements the room pattern as interactive live streaming (ILS): hosts join in SEND_AND_RECV mode and the audience in RECV_ONLY mode, per the ILS concept and architecture docs.
Build the class in React: instructor as host, members as viewers
The React interactive live streaming quickstart maps onto a class: the instructor hosts, and members join as receive-only viewers. React SDK, checked 29 Sep 2026: the blocks are copied verbatim from VideoSDK's React ILS quickstart docs, whose complete example is the react-ils folder of VideoSDK's quickstart repository (commit 54b8421). It depends on @videosdk.live/react-sdk ^1.1.1, the version npm tagged latest on 29 September 2026. Comments and defects stay as published.
Not using React? The samples folder has other platforms.
Set up the project
Create a new React App using the below command.
npm create vite@latest videosdk-ils-react-app -- --template react
cd videosdk-ils-react-app
Install the VideoSDK using the below-mentioned npm command. Make sure you are in your react app directory before you run this command.
npm install "@videosdk.live/react-sdk"yarn add "@videosdk.live/react-sdk"Your project structure should look like this.
   root
   ├── node_modules
   ├── public
   ├── src
   │    ├── API.js
   │    ├── App.jsx
   │    ├── App.css
   │    ├── main.jsx
   ├── package.json
   .    .
You are going to use functional components to leverage react's reusable component architecture. There will be components for users, videos, and controls (mic, camera, leave) over the video.
You will be working on these files:
- API.js: Responsible for handling API calls such as generating unique streamId and token
- App.jsx: Responsible for rendering container and joining the Live Stream.
Create the class room
createStream posts to the rooms endpoint and returns the room ID, which the sample calls a stream ID.
// Generate your token at https://app.videosdk.live/api-keys and paste it below.
export const authToken = "";

// API call to create stream
export const createStream = async ({ token }) => {
  try {
    const res = await fetch(`https://api.videosdk.live/v2/rooms`, {
      method: "POST",
      headers: {
        authorization: `${token}`,
        "Content-Type": "application/json",
      },
      body: JSON.stringify({}),
    });

    if (!res.ok) {
      throw new Error(`Failed to create stream: ${res.status}`);
    }

    const { roomId } = await res.json();
    return roomId;
  } catch (error) {
    console.error("createStream failed", error);
    throw error;
  }
};
The sample pastes a temporary dashboard token into authToken. The React ILS quickstart docs (updated 14 September 2026) call this development only: in production the client gets its token from your backend server. Per the authentication and token docs (updated 10 July 2026), your server signs that token with your API key and secret, so the secret stays off the client.
Join as the instructor or as a class member
JoinView renders three buttons: the instructor uses Constants.modes.SEND_AND_RECV, a member uses Constants.modes.RECV_ONLY.
import "./App.css";
import React, { useEffect, useRef, useState } from "react";
import {
  MeetingProvider,
  useMeeting,
  useParticipant,
  Constants,
} from "@videosdk.live/react-sdk";
import { authToken, createStream } from "./API";

// Join Screen - Handles joining or creating a stream
function JoinView({ initializeStream, setMode }) {
  const [streamId, setStreamId] = useState("");

  const handleAction = async (mode) => {
    // Sets the mode (Host or Audience) and initializes the stream
    setMode(mode);
    await initializeStream(streamId);
  };

  return (
    <div className="container">
      {/* Button to create a new stream */}
      <button onClick={() => handleAction(Constants.modes.SEND_AND_RECV)}>
        Create Live Stream as Host
      </button>
      {/* Input field for entering an existing Stream ID */}
      <input
        type="text"
        placeholder="Enter Stream Id"
        onChange={(e) => setStreamId(e.target.value)}
      />
      {/* Button to join as a host */}
      <button onClick={() => handleAction(Constants.modes.SEND_AND_RECV)}>
        Join as Host
      </button>
      {/* Button to join as an audience member */}
      <button onClick={() => handleAction(Constants.modes.RECV_ONLY)}>
        Join as Audience
      </button>
    </div>
  );
}

// Live Stream Container - Placeholder for the live stream container
function LSContainer(props) {
  return null;
}

// Main App Component - Handles the app flow and live stream lifecycle
function App() {
  const [streamId, setStreamId] = useState(null); // Holds the current stream ID
  const [mode, setMode] = useState(Constants.modes.SEND_AND_RECV); // Holds the current user mode (Host or Audience)

  const initializeStream = async (id) => {
    if (!authToken) {
      console.error("PLEASE PROVIDE TOKEN IN API.js FROM app.videosdk.live");
      return;
    }
    // Creates a new stream if no ID is provided or uses the given stream ID
    const newStreamId = id || (await createStream({ token: authToken }));
    setStreamId(newStreamId);
  };

  const onStreamLeave = () => setStreamId(null); // Resets the stream state on leave

  return authToken && streamId ? (
    // Provides the stream context to the application
    <MeetingProvider
      config={{
        meetingId: streamId,
        micEnabled: true, // Enables microphone by default
        webcamEnabled: true, // Enables webcam by default
        name: "John Doe", // Default participant name
        mode,
      }}
      token={authToken}
    >
      {/* Renders the live stream container if a stream is active */}
      <LSContainer streamId={streamId} onLeave={onStreamLeave} />
    </MeetingProvider>
  ) : (
    // Renders the join view if no stream is active
    <JoinView initializeStream={initializeStream} setMode={setMode} />
  );
}

export default App;
LSContainer is a placeholder that returns nothing, so the app compiles at this step. The next step replaces it with the full component.
Two sample quirks: "Create Live Stream as Host" joins any ID typed in the field, and either join button with an empty field creates a new room.
App passes the chosen mode into MeetingProvider. The initialize-livestream docs mark micEnabled and webcamEnabled as ignored for the audience, so members stay off camera. Replace the "John Doe" placeholder. The quickstart docs also warn that a token cannot restrict mode, so any client with a valid token can join as SEND_AND_RECV: your server must decide who is the instructor.
Set up the live stream view and container
This step implements the Live Stream View and Container components to manage and display HOST participants:
- StreamView Component: Displays participants in
SEND_AND_RECVmode using the Participant component. Includes LSControls for managing the session. - LSContainer Component: Manages joining the stream via join from useMeeting. Shows the StreamView after joining or a
Join Streambutton otherwise.
// Component to manage live stream container and session joining
function LSContainer({ streamId, onLeave }) {
  const [joined, setJoined] = useState(false); // Track if the user has joined the stream

  const { join } = useMeeting({
    onMeetingJoined: () => setJoined(true), // Set `joined` to true when successfully joined
    onMeetingLeft: onLeave, // Handle the leave stream event
    onError: (error) => alert(error.message), // Display an alert on encountering an error
  });

  const handleJoin = async () => {
    try {
      await join();
    } catch (error) {
      console.error("Failed to join stream", error);
    }
  };

  return (
    <div className="container">
      <h3>Stream Id: {streamId}</h3>
      {/* Show the stream view if joined, otherwise display the "Join Stream" button */}
      {joined ? (
        <StreamView />
      ) : (
        <button onClick={handleJoin}>Join Stream</button>
      )}
    </div>
  );
}

// Component to display the live stream view
function StreamView() {
  const { participants } = useMeeting(); // Access participants using the VideoSDK useMeeting hook

  return (
    <div>
      <LSControls /> {/* Render live stream controls */}
      {[...participants.values()]
        .filter((p) => p.mode === Constants.modes.SEND_AND_RECV) // Filter participants in SEND_AND_RECV mode
        .map((p) => (
          <Participant participantId={p.id} key={p.id} /> // Render each participant's view
        ))}
    </div>
  );
}

function Participant() {
  return null;
}

function LSControls() {
  return null;
}
Participant and LSControls are placeholders at this step. Replace each one with the full version from the next two steps rather than adding a second function with the same name.
Render each participant's view
This step component displays an individual participant's audio and video streams. It uses the useParticipant hook to retrieve the participant's data (e.g., webcam and mic status) and dynamically sets up the streams with useEffect. Audio and video elements are rendered based on the availability of the streams.
// Component to render audio and video streams for a participant
function Participant({ participantId }) {
  const { webcamStream, micStream, webcamOn, micOn, isLocal, displayName } =
    useParticipant(participantId);

  const audioRef = useRef(null); // Reference for audio element
  const videoRef = useRef(null); // Reference for video element

  // Function to attach or clear the stream
  const setupStream = (stream, ref, condition) => {
    if (ref.current && stream) {
      ref.current.srcObject = condition
        ? new MediaStream([stream.track])
        : null;
      condition && ref.current.play().catch(console.error);
    }
  };

  useEffect(() => setupStream(micStream, audioRef, micOn), [micStream, micOn]); // Handle mic stream
  useEffect(
    () => setupStream(webcamStream, videoRef, webcamOn),
    [webcamStream, webcamOn]
  ); // Handle webcam stream

  return (
    <div>
      <p>
        {displayName} | Webcam: {webcamOn ? "ON" : "OFF"} | Mic:{" "}
        {micOn ? "ON" : "OFF"}
      </p>
      <audio ref={audioRef} autoPlay muted={isLocal} /> {/* Play mic stream */}
      {webcamOn && (
        <video
          ref={videoRef}
          autoPlay
          muted={isLocal}
          height="200"
          width="300"
        /> /* Display webcam stream */
      )}
    </div>
  );
}
Implement live stream controls
This step provides buttons to leave the stream, toggle the microphone and camera, and switch between Host Mode (send/receive streams) and Audience Mode (receive streams only). It uses useMeeting to access these functionalities.
From v1.0.0, all these methods are asynchronous and return a Promise, so await them and handle failures with try / catch. For details, see the Migration Guide.
// Component for managing stream controls
function LSControls() {
  const { leave, toggleMic, toggleWebcam, changeMode, meeting } = useMeeting(); // Access methods
  const currentMode = meeting.localParticipant.mode; // Get the current participant's mode

  const handleLeave = async () => {
    try {
      await leave();
    } catch (error) {
      console.error("Failed to leave stream", error);
    }
  };

  const handleToggleMic = async () => {
    try {
      await toggleMic();
    } catch (error) {
      console.error("Failed to toggle mic", error);
    }
  };

  const handleToggleWebcam = async () => {
    try {
      await toggleWebcam();
    } catch (error) {
      console.error("Failed to toggle webcam", error);
    }
  };

  const handleChangeMode = async () => {
    const nextMode =
      currentMode === Constants.modes.SEND_AND_RECV
        ? Constants.modes.RECV_ONLY
        : Constants.modes.SEND_AND_RECV;
    try {
      await changeMode(nextMode);
    } catch (error) {
      console.error("Failed to change mode", error);
    }
  };

  return (
    <div className="controls">
      {/* Button to leave the stream */}
      <button onClick={handleLeave}>Leave</button>

      {/* Show mic and webcam toggles if in SEND_AND_RECV mode */}
      {currentMode === Constants.modes.SEND_AND_RECV && (
        <>
          <button onClick={handleToggleMic}>Toggle Mic</button>{" "}
          {/* Mute/unmute mic */}
          <button onClick={handleToggleWebcam}>Toggle Camera</button>{" "}
          {/* Enable/disable Camera */}
        </>
      )}

      {/* Button to switch between Host Mode and Viewer Mode */}
      <button onClick={handleChangeMode}>
        {currentMode === Constants.modes.SEND_AND_RECV
          ? "Switch to Audience Mode"
          : "Switch to Host Mode"}
      </button>
    </div>
  );
}
Add the styles
The Vite template creates its own App.css, which the app runs with. To match the quickstart's layout, replace the contents of src/App.css with the quickstart's App.css from the react-ils folder.
/* App.css */
body {
  margin: 0;
  font-family: Arial, sans-serif;
  background-color: #f9f9f9;
}

.container {
  display: flex;
  flex-direction: column;
  align-items: center;
  justify-content: center;
  text-align: center;
  height: 100vh;
  gap: 20px;
  padding: 20px;
  background: #fff;
  border-radius: 8px;
  box-shadow: 0 2px 4px rgba(0, 0, 0, 0.1);
}

button {
  background: #007bff;
  color: #fff;
  border: none;
  padding: 10px 16px;
  border-radius: 5px;
  cursor: pointer;
  transition: 0.3s;
}

button:hover {
  background: #0056b3;
}

input {
  width: 60%;
  padding: 10px;
  border: 1px solid #ccc;
  border-radius: 5px;
}

.controls {
  display: flex;
  gap: 10px;
}

video,
audio {
  margin: 10px 0;
  border-radius: 8px;
}
Run the app
Start the development server with npm run dev, the command used in Vite's getting started guide, then open the local address it prints. Create the stream as the instructor in one browser tab and join it as a member in a second tab with the same stream ID.
npm run devBring a member on stage for a form check
Promotion needs code on both sides. VideoSDK's change-mode docs (updated 13 September 2026) state that changeMode() changes only the caller's own mode. The instructor publishes an invite over PubSub (publish-subscribe messaging) on a per-member topic, and the member's client calls changeMode() with SEND_AND_RECV on accepting. Every client must handle onParticipantModeChanged and rebuild both its stage list and its audience list.
The LSControls block above gives every audience member a "Switch to Host Mode" button with no instructor approval. Replace it with the invite flow.
How many members fit in a live class, and what it costs
VideoSDK limits concurrent usage per organization and per room. Its quotas and limits page sets default per-room limits of 15 active speakers, 100 participants, 1,000 interactive live streaming viewers and 200 HTTP Live Streaming viewers. Across the organization, Pay-As-You-Go defaults to up to 500 concurrent hosts and 200 concurrent viewers. Extra capacity is sold in packs at $20 per pack per month, for example 200 more viewers per pack.
As of 1 October 2026, VideoSDK pricing bills ILS and HLS separately. ILS charges $0.002 per viewer minute at 720p. HLS charges $0.001 per viewer minute at 720p, per VideoSDK's pricing FAQ, plus $0.04 per livestream minute of 720p encoding.
- ILS viewer cost per class minute is 0.002 × N, for N viewers.
- HLS cost per class minute is (0.001 × N) + 0.04.
- HLS costs less once N exceeds 0.04 ÷ (0.002 - 0.001), which is 40 viewers.
Adapting the pattern for creator apps
For creator app live video, the roles stay the same: the creator hosts, followers receive, and a guest comes on stage through the same invite flow. The relay media docs describe requestMediaRelay(), which relays a host's media into one or more other live streams for cross-stream formats such as PK battles; a host in the destination stream accepts or rejects each request. For the full creator build, see how to build a social live streaming app like TikTok Live.
Glossary
Participant mode (SEND_AND_RECV, RECV_ONLY): The role a participant joins with. VideoSDK'sMeetingProvideralso listsSIGNALLING_ONLY, which joins without media.
HTTP Live Streaming (HLS): A protocol, specified in RFC 8216, that serves video as short segments listed in a playlist. See what HTTP Live Streaming is.
Target duration: The maximum segment duration an HLS playlist declares in its EXT-X-TARGETDURATION tag.PubSub (publish-subscribe): Topic-based messaging inside a VideoSDK room;usePubSubreturnspublishandmessages.
WHIP (WebRTC-HTTP Ingestion Protocol): An IETF Standards Track protocol, RFC 9725, that uses an HTTP exchange to set up a WebRTC session for sending media into a streaming service.
Key takeaways
- A live streaming SDK for fitness apps should model the instructor as a host who sends media and members as receive-only viewers, with a way to promote one member.
- Use a real-time room when members talk back or appear on camera, and HLS when a large class only watches.
- A token cannot restrict mode, so your server issues tokens and decides who joins as instructor.
- Promotion takes a PubSub invite, a
changeMode()call by the member, and a mode-changed listener on every client.
Start from the React quickstart, move tokens and mode decisions to your server, then add the invite flow. The VideoSDK interactive live streaming docs cover each step, and a new account comes with a $20 credit.
Frequently asked questions
What is the best streaming infrastructure for fitness and creator apps?
No single setup is best for every class; match it to how much members interact. Look for host and receive-only roles, a documented promotion flow, server-issued tokens, recording, and an HLS path for large watch-only audiences. Then compare per-viewer-minute prices on the day.
What should a real-time video SDK for fitness and coaching apps include?
A real-time video SDK for fitness and coaching apps should include roles set at join time, a promotion flow, and a data channel for cues, timers and chat. Coaching adds one-to-one sessions, which a room with two senders handles. Check that the docs show each piece in code.
Can an instructor stream a class from OBS instead of a browser?
Yes, through WHIP. VideoSDK's WHIP and WHEP docs set up OBS Studio (Open Broadcaster Software) with a custom service: the server is the WHIP URL with the room ID, and the stream key is a VideoSDK token. The stream appears as a participant in the room.
Can members replay a class after it ends?
Yes. Call startRecording() from useMeeting during the class. The ILS recording docs and the recording storage docs cover storing files on VideoSDK's storage or in your own AWS S3, Azure Blob or GCP bucket. For a replay library you control, keep the recording in your own bucket.