


Interactive live streaming is live video where the audience can respond and join the broadcast in real time, not just watch it. It runs on WebRTC rather than HLS, which holds latency under one second. VideoSDK implements it with two participant modes,SEND_AND_RECVfor hosts andRECV_ONLYfor viewers, switched at runtime withchangeMode().
The gap between "live" and "interactive" is roughly 20 seconds of latency. A standard HLS stream reaches viewers 12 to 30 seconds after the camera captures it, which is fine for a keynote and useless for an auction, a quiz, or a shopping stream where someone asks a question and expects an answer.
That delay is a protocol problem, not a bandwidth problem. Interactive live streaming solves it by moving the delivery path off HTTP chunking and onto WebRTC, then adding a role system so a viewer can become a broadcaster without rejoining.
This guide covers what interactive live streaming actually is, how the architecture works, and the six steps to build it with the VideoSDK React SDK, including the cost math that decides when you should use it and when plain HLS is the better call.
What Is Interactive Live Streaming?
Interactive live streaming is defined as live video delivery in which viewers can send data or media back to the broadcast while it is happening, and can be promoted to broadcaster mid-stream.
Interactive live streaming works by publishing each host's audio and video into a Selective Forwarding Unit (SFU), which forwards those tracks to every subscribed viewer without transcoding them. Because the media is never chunked into segments and written to a CDN, glass-to-glass latency typically lands in the 200ms to 500ms range instead of the 12 to 30 seconds a standard HLS workflow produces.
VideoSDK provides interactive live streaming through the same rooms-based SDK surface as its video calling API, so a stream is a room where most participants have publishing disabled. Its documentation states support for up to 100 hosts and co-hosts alongside 2,000 real-time viewers in a single interactive session.
The word doing the work in that definition is "back." Traditional live streaming is a one-way pipe with a chat widget bolted alongside it. The chat is real time, the video is not, and the two drift apart. Interactive live streaming puts both on the same transport so they stay in sync.
What Makes a Stream Interactive Rather Than Just Live
Four capabilities separate the two, and a platform needs all four:
- Sub-second latency, so a spoken question and its answer stay in the same conversational beat
- Bidirectional media, so a viewer's camera and microphone can join the stage
- Runtime role changes, so promotion happens without a reconnect or a page reload
- A synchronized data channel for chat, polls, reactions, and Q&A that shares the stream's clock
Drop any one of those and you have live streaming with extra features, not interactive live streaming.
How Interactive Live Streaming Works Under the Hood
Every interactive stream is an SFU forwarding published tracks to subscribers, with a permission layer deciding who may publish.
The SFU Is Why Latency Stays Under a Second
A Selective Forwarding Unit receives each publisher's encoded media and routes the packets to subscribers without decoding or re-encoding them. That single design choice is where the latency budget comes from. An MCU, by contrast, mixes streams server-side into one composite, which adds an encode cycle and hundreds of milliseconds.
Segment-based protocols pay a different tax. HLS cuts video into files, writes them to an origin, propagates them to a CDN, and asks the player to buffer two or three segments before playback starts. Each of those stages is a queue, and queues are latency.
According to the WebRTC specification maintained by the W3C, the transport is built on SRTP over UDP with congestion control, which is what allows packets to be forwarded the moment they arrive instead of after a segment boundary.
Roles Are Just Publish Permissions
In VideoSDK's model, a participant joins a room in one of two modes. SEND_AND_RECV allows publishing audio and video and receiving everyone else's. RECV_ONLY subscribes to the stream without ever acquiring the device's camera or microphone.
This matters for cost and for battery. A RECV_ONLY participant never opens a media device and never uploads, so a viewer on mobile is doing roughly the work of a video player rather than the work of a call participant.
Older VideoSDK SDK versions named these modes CONFERENCE and VIEWER. If you are following a tutorial that uses those constants, you are on an older major version.
Where HLS Still Belongs in the Stack
Interactive delivery and mass delivery are different problems, and production streams usually run both at once. Hosts and the interactive tier of the audience sit on WebRTC. Everyone beyond that tier watches an HLS rendition generated from the same room.
The hybrid is not a compromise. It is the standard shape of a large interactive broadcast, and the next section explains why the economics force it.
ILS vs HLS vs RTMP: Latency and Scale Compared
The three protocols are not competitors, they are three positions on a latency-versus-scale curve, and most production systems use at least two of them.
| Protocol | Typical latency | Audience ceiling | Viewer can publish back | Best for |
|---|---|---|---|---|
| Interactive live streaming (WebRTC/SFU) | 200 to 500 ms | Thousands per session | Yes, via role change | Auctions, live shopping, tutoring, Q&A |
| Low-Latency HLS (LL-HLS) | 2 to 7 seconds | CDN scale, effectively unlimited | No | Sports, betting overlays, large webinars |
| Standard HLS | 12 to 30 seconds | CDN scale, effectively unlimited | No | Keynotes, concerts, linear-style broadcast |
| RTMP (ingest and multistreaming) | 2 to 5 seconds to platform | Depends on destination | No | Pushing your stream to YouTube, Twitch, LinkedIn |
Apple's Low-Latency HLS extension targets a stream delay of two seconds or less, though AWS Elemental's published analysis of the protocol notes that real-world workflows commonly land between three and seven seconds once player buffering is included.
The row that decides most architectures is the third column. LL-HLS closes much of the latency gap, but it cannot make a viewer a broadcaster. If your product needs a viewer on stage, no amount of HLS tuning gets you there.
What a Live Streaming API Must Handle
A live streaming API is judged on the parts that only appear under load, not on how fast the first stream connects.
Before choosing one, confirm it handles these:
- Server-side token issuance with scoped permissions, so a viewer token cannot publish media
- Runtime role changes without a reconnect, so promotion does not drop the viewer's playback
- Simulcast or adaptive bitrate, so a viewer on 3G gets a lower rendition instead of a frozen frame
- An HLS or CDN fallback path from the same session, so audience growth does not require re-architecture
- RTMP output for multistreaming to external platforms
- Reconnection semantics you can actually observe, with events for participant drop and rejoin
That fourth point is the one teams discover late. Building on a real-time-only API and then needing 50,000 concurrent viewers means adding a transcoding pipeline under deadline.
VideoSDK exposes all six through one SDK surface across React, React Native, JavaScript, Flutter, Android, iOS, and Python, which is the practical reason to prefer it over stitching a WebRTC SFU to a separate packaging service.
How to build a Live Streaming app with VideoSDK in React
VideoSDK empowers you to seamlessly integrate interactive live streaming features into your React application in minutes. While built for meetings, the SDK is easily adaptable for live streaming with support for up to 100 hosts/co-hosts and 2,000 viewers in real-time. Perfect for social use cases, this guide will walk you through integrating live streaming into your app.
info: For standard live streaming with 6-7 second latency and playback support, follow this documentation.
Prerequisites
Before proceeding, ensure that your development environment meets the following requirements:
- Video SDK Developer Account (Not having one, follow Video SDK Dashboard)
- Basic understanding of React
- React VideoSDK
- Have Node and NPM installed on your device.
- Basic understanding of Hooks (useState, useRef, useEffect)
- React Context API (optional)
Getting Started with the Code!
Follow the steps to create the environment necessary to add live streaming into your app. You can also find the code sample for quickstart here.
Create new react app
Create a new React App using the below command.
 npm create vite@latest videosdk-ils-react-app -- --template react
 cd videosdk-ils-react-app
Install Video SDK
Install the VideoSDK using the below-mentioned npm command. Make sure you are in your react app directory before you run this command.
npm:
npm install "@videosdk.live/react-sdk"
yarn:
yarn add "@videosdk.live/react-sdk"
Structure of the project
Your project structure should look like this.
   root
   ├── node_modules
   ├── public
   ├── src
   │    ├── API.js
   │    ├── App.jsx
   │    ├── App.css
   │    ├── main.jsx
   ├── package.json
   .    .
You are going to use functional components to leverage react's reusable component architecture. There will be components for users, videos, and controls (mic, camera, leave) over the video.
You will be working on these files:
- API.js: Responsible for handling API calls such as generating unique streamId and token
- App.jsx: Responsible for rendering container and joining the Live Stream.
Step 1: Get started with API.js
Prior to moving on, you must create an API request to generate a unique streamId. You will need an authentication token, which you can create either through the videosdk-rtc-api-server-examples or directly from the VideoSDK Dashboard for developers.
// Generate your token at https://app.videosdk.live/api-keys and paste it below.
//highlight-next-line
export const authToken = "";

// API call to create stream
export const createStream = async ({ token }) => {
  try {
    const res = await fetch(`https://api.videosdk.live/v2/rooms`, {
      method: "POST",
      headers: {
        authorization: `${token}`,
        "Content-Type": "application/json",
      },
      body: JSON.stringify({}),
    });

    if (!res.ok) {
      throw new Error(`Failed to create stream: ${res.status}`);
    }

    //highlight-next-line
    const { roomId } = await res.json();
    return roomId;
  } catch (error) {
    console.error("createStream failed", error);
    throw error;
  }
};
Step 2: Initialize and Join the Live Stream
To set up the wireframe of App.jsx, you'll use VideoSDK Hooks and Context Providers, which include:
- MeetingProvider: The context provider for managing live streams. Accepts config and token as props and makes them accessible to all nested components.
- useMeeting: A hook providing APIs to manage live streams, like joining, leaving, and toggling the mic or webcam.
- useParticipant: A hook to handle properties and events for a specific participant, such as their name, webcam, and mic streams.
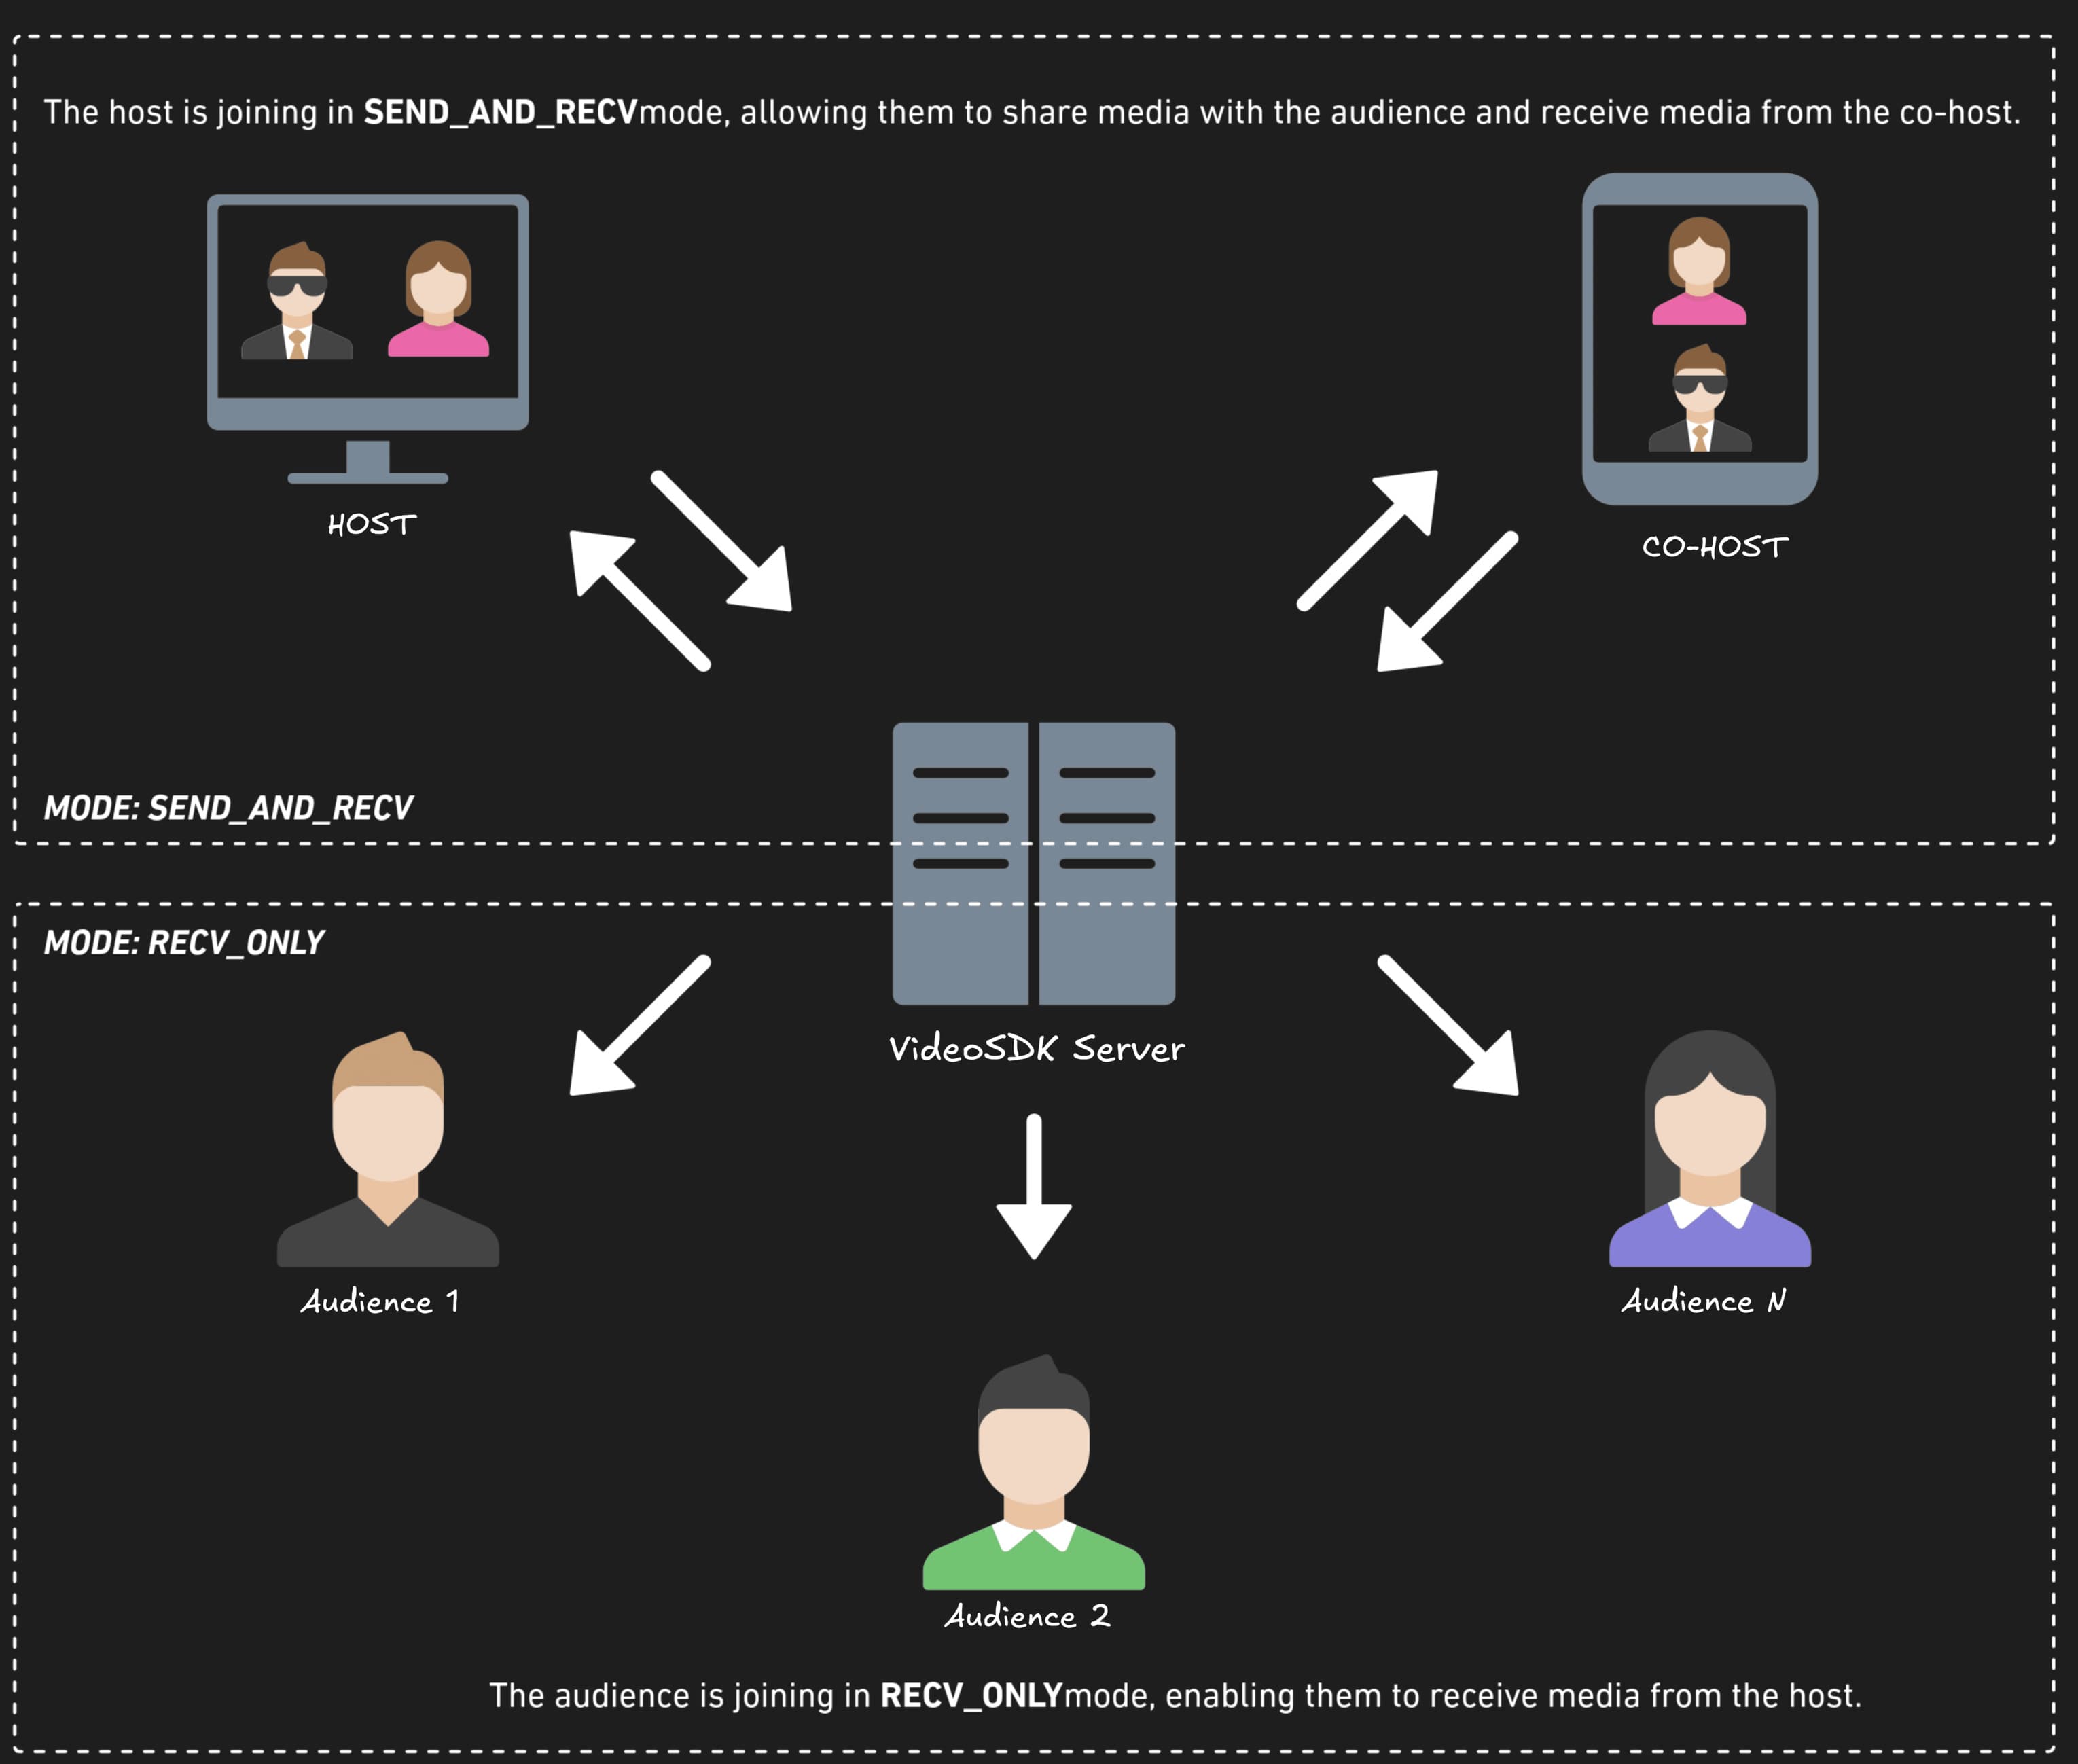
Before proceeding, let's understand the two modes of a Live Stream:
1. SEND_AND_RECV (For Host or Co-host):
- Designed primarily for the Host or Co-host.
- Allows sending and receiving media.
- Hosts can broadcast their audio/video and interact directly with the audience.
2. RECV_ONLY (For Audience):
- Tailored for the Audience.
- Enables receiving media shared by the Host.
Audience members can view and listen but cannot share their own media.
The Join Screen allows users to either create a new Live Stream or join an existing one as a host or audience, using these actions:
Join as Host: Allows the user to join an existing Live Stream using the provided streamId with theSEND_AND_RECVmode, enabling full host privileges.Join as Audience: Enables the user to join an existing Live Stream using the provided streamId with theRECV_ONLYmode, allowing view-only access.Create Live Stream as Host: Lets the user initiate a new Live Stream inSEND_AND_RECVmode, granting full host controls.
import "./App.css";
import React, { useEffect, useRef, useState } from "react";


// Join Screen - Handles joining or creating a stream
function JoinView({ initializeStream, setMode }) {
  const [streamId, setStreamId] = useState("");

  const handleAction = async (mode) => {
    // Sets the mode (Host or Audience) and initializes the stream
    setMode(mode);
    await initializeStream(streamId);
  };

  return (
    <div className="container">
      {/* Button to create a new stream */}
      <button onClick={() => handleAction(Constants.modes.SEND_AND_RECV)}>
        Create Live Stream as Host
      </button>
      {/* Input field for entering an existing Stream ID */}
      <input
        type="text"
        placeholder="Enter Stream Id"
        onChange={(e) => setStreamId(e.target.value)}
      />
      {/* Button to join as a host */}
      <button onClick={() => handleAction(Constants.modes.SEND_AND_RECV)}>
        Join as Host
      </button>
      {/* Button to join as an audience member */}
      <button onClick={() => handleAction(Constants.modes.RECV_ONLY)}>
        Join as Audience
      </button>
    </div>
  );
}

// Live Stream Container - Placeholder for the live stream container
function LSContainer(props) {
  return null;
}

// Main App Component - Handles the app flow and live stream lifecycle
function App() {
  const [streamId, setStreamId] = useState(null); // Holds the current stream ID
  const [mode, setMode] = useState(Constants.modes.SEND_AND_RECV); // Holds the current user mode (Host or Audience)

  const initializeStream = async (id) => {
    if (!authToken) {
      console.error("PLEASE PROVIDE TOKEN IN API.js FROM app.videosdk.live");
      return;
    }
    // Creates a new stream if no ID is provided or uses the given stream ID
    const newStreamId = id || (await createStream({ token: authToken }));
    setStreamId(newStreamId);
  };

  const onStreamLeave = () => setStreamId(null); // Resets the stream state on leave

  return authToken && streamId ? (
    // Provides the stream context to the application

    </MeetingProvider>
  ) : (
    // Renders the join view if no stream is active

  );
}

export default App;
Step 3: Setting Up Live Stream View and Container
This step implements the Live Stream View and Container components to manage and display HOST participants:
- StreamView Component:
- Displays participants in
SEND_AND_RECVmode using the Participant component. - Includes LSControls for managing the session.
- Displays participants in
- LSContainer Component:
- Manages joining the stream via join from useMeeting.
- Shows the StreamView after joining or a
Join Streambutton otherwise.
// Component to manage live stream container and session joining
function LSContainer({ streamId, onLeave }) {
  const [joined, setJoined] = useState(false); // Track if the user has joined the stream

  const { join } = useMeeting({
    onMeetingJoined: () => setJoined(true), // Set `joined` to true when successfully joined
    onMeetingLeft: onLeave, // Handle the leave stream event
    onError: (error) => alert(error.message), // Display an alert on encountering an error
  });

  const handleJoin = async () => {
    try {
      await join();
    } catch (error) {
      console.error("Failed to join stream", error);
    }
  };

  return (
    <div className="container">
      <h3>Stream Id: {streamId}</h3>
      {/* Show the stream view if joined, otherwise display the "Join Stream" button */}
      {joined ? (

      ) : (
        <button onClick={handleJoin}>Join Stream</button>
      )}
    </div>
  );
}

// Component to display the live stream view
function StreamView() {
  const { participants } = useMeeting(); // Access participants using the VideoSDK useMeeting hook

  return (
    <div>
       {/* Render live stream controls */}
      {[...participants.values()]
        .filter((p) => p.mode === Constants.modes.SEND_AND_RECV) // Filter participants in SEND_AND_RECV mode
        .map((p) => (
           // Render each participant's view
        ))}
    </div>
  );
}

function Participant() {
  return null;
}

function LSControls() {
  return null;
}
Step 4: Render Individual Participant's View
This step component displays an individual participant's audio and video streams. It uses the useParticipant hook to retrieve the participant's data (e.g., webcam and mic status) and dynamically sets up the streams with useEffect. Audio and video elements are rendered based on the availability of the streams.
// Component to render audio and video streams for a participant
function Participant({ participantId }) {
  const { webcamStream, micStream, webcamOn, micOn, isLocal, displayName } =
    useParticipant(participantId);

  const audioRef = useRef(null); // Reference for audio element
  const videoRef = useRef(null); // Reference for video element

  // Function to attach or clear the stream
  const setupStream = (stream, ref, condition) => {
    if (ref.current && stream) {
      ref.current.srcObject = condition
        ? new MediaStream([stream.track])
        : null;
      condition && ref.current.play().catch(console.error);
    }
  };

  useEffect(() => setupStream(micStream, audioRef, micOn), [micStream, micOn]); // Handle mic stream
  useEffect(
    () => setupStream(webcamStream, videoRef, webcamOn),
    [webcamStream, webcamOn]
  ); // Handle webcam stream

  return (
    <div>
      <p>
        {displayName} | Webcam: {webcamOn ? "ON" : "OFF"} | Mic:{" "}
        {micOn ? "ON" : "OFF"}
      </p>
      <audio ref={audioRef} autoPlay muted={isLocal} /> {/* Play mic stream */}
      {webcamOn && (
        <video
          ref={videoRef}
          autoPlay
          muted={isLocal}
          height="200"
          width="300"
        /> /* Display webcam stream */
      )}
    </div>
  );
}
Step 5: Implement Live Stream Controls
This step provides buttons to leave the stream, toggle the microphone and camera, and switch between Host Mode (send/receive streams) and Audience Mode (receive streams only). It uses useMeeting to access these functionalities.
From v1.0.0, all these methods are asynchronous and return a Promise, so await them and handle failures with try / catch. For details, see the Migration Guide.
// Component for managing stream controls
function LSControls() {
  const { leave, toggleMic, toggleWebcam, changeMode, meeting } = useMeeting(); // Access methods
  const currentMode = meeting.localParticipant.mode; // Get the current participant's mode

  const handleLeave = async () => {
    try {
      await leave();
    } catch (error) {
      console.error("Failed to leave stream", error);
    }
  };

  const handleToggleMic = async () => {
    try {
      await toggleMic();
    } catch (error) {
      console.error("Failed to toggle mic", error);
    }
  };

  const handleToggleWebcam = async () => {
    try {
      await toggleWebcam();
    } catch (error) {
      console.error("Failed to toggle webcam", error);
    }
  };

  const handleChangeMode = async () => {
    const nextMode =
      currentMode === Constants.modes.SEND_AND_RECV
        ? Constants.modes.RECV_ONLY
        : Constants.modes.SEND_AND_RECV;
    try {
      await changeMode(nextMode);
    } catch (error) {
      console.error("Failed to change mode", error);
    }
  };

  return (
    <div className="controls">
      {/* Button to leave the stream */}
      <button onClick={handleLeave}>Leave</button>

      {/* Show mic and webcam toggles if in SEND_AND_RECV mode */}
      {currentMode === Constants.modes.SEND_AND_RECV && (
        <>
          <button onClick={handleToggleMic}>Toggle Mic</button>{" "}
          {/* Mute/unmute mic */}
          <button onClick={handleToggleWebcam}>Toggle Camera</button>{" "}
          {/* Enable/disable Camera */}
        </>
      )}

      {/* Button to switch between Host Mode and Viewer Mode */}
      <button onClick={handleChangeMode}>
        {currentMode === Constants.modes.SEND_AND_RECV
          ? "Switch to Audience Mode"
          : "Switch to Host Mode"}
      </button>
    </div>
  );
}
Tip: You can checkout the complete quick start example here.
Common Errors and Fixes
Invalid token / 401 on join. The token expired, or it was signed with the wrong secret. Tokens are short-lived by design. Fetch a fresh one on every join rather than caching it in localStorage.
changeMode() resolves but no video appears. The browser never got camera permission because the participant joined as RECV_ONLY and no device prompt fired. Call toggleWebcam() after the mode change and handle the permission rejection.
Stream works on localhost, fails on the staging domain. getUserMedia requires a secure context. Any origin other than localhost needs HTTPS.
Viewers on corporate networks never connect. UDP is blocked and the client is not falling back to TURN over TCP/443. Test on a restricted network before launch, not after.
What Changes When You Go to Production
The interactive tier bills per viewer minute and the HLS tier bills per stream minute, which is the single fact that shapes production architecture.
The Cost Crossover, With Real Numbers
VideoSDK's published rates put HD (720p) interactive video at $0.002 per viewer minute and HLS 720p encoding at $0.04 per livestream minute.
Run the math on a one-hour stream:
- Interactive tier: $0.002 × 60 minutes = $0.12 per viewer, so 1,000 concurrent viewers costs roughly $120 for the hour
- HLS encoding: $0.04 × 60 minutes = $2.40 for the hour, flat, whether 20 people watch or 20,000
The crossover sits around 20 concurrent HD viewers. Past that point, every additional interactive viewer is a marginal cost and every additional HLS viewer is close to free on the encoding line. Note that CDN delivery for HLS viewers is billed separately from encoding, so the true crossover is somewhat higher than 20.
The design conclusion is concrete: keep the interactive tier small and deliberate. A live shopping stream does not need 5,000 people able to speak. It needs 5,000 people watching and 10 able to come on camera.
Production Checklist Most Tutorials Skip
- Token refresh: rotate before expiry mid-stream rather than letting a two-hour broadcast die at minute 121
- TURN over TCP/443: required for viewers behind restrictive firewalls
- Reconnection handling: subscribe to participant-left and rejoin events, and hold the UI slot for a few seconds instead of tearing the tile down instantly
- Recording: start it server-side so it does not depend on the host's tab staying open
- Simulcast: confirm it is enabled, or one viewer on a weak connection degrades the encode for everyone
Where Interactive Live Streaming Falls Short
Interactive live streaming is the wrong choice when nobody in the audience will ever speak.
Three honest limitations:
Cost scales with viewers, not with time. A passive audience on WebRTC is money spent on a capability nobody uses. Route them to HLS.
Browser playback is less forgiving. HLS players handle network drops, seeking, and background tabs with years of hardening behind them. WebRTC playback in a browser tab that gets backgrounded on mobile can suspend.
Reach beyond the SFU needs a second path. Real-time delivery to hundreds of thousands of concurrent viewers means CDN distribution, which means accepting segment latency for that tier. VideoSDK's documented real-time ceiling is 2,000 viewers per interactive session, with HLS handling the rest.
If your use case is a concert broadcast or a recorded-style keynote, standard HLS is cheaper, simpler, and better supported. Use interactivity where interaction is the product.
Key Terms in Interactive Live Streaming
Interactive Live Streaming (ILS): Live video where viewers can send media or data back to the broadcast in real time and be promoted to broadcaster mid-session. VideoSDK implements it through participant modes on a standard room.
SFU (Selective Forwarding Unit): A media server that forwards each publisher's encoded stream to subscribers without decoding it. Avoiding the re-encode is what keeps WebRTC latency in the 200ms to 500ms range.
SEND_AND_RECV/RECV_ONLY: VideoSDK's two participant modes. The first publishes and subscribes (host or co-host), the second only subscribes (viewer).changeMode()switches between them without a reconnect.
HLS (HTTP Live Streaming): Apple's segment-based protocol that delivers video as chunked files over a CDN. It scales to effectively unlimited viewers at a cost of 12 to 30 seconds of latency.
Multistreaming: Broadcasting one live source to several destinations at once. VideoSDK performs the fan-out server-side via startLivestream(), so the host uploads a single stream.Simulcast: Publishing multiple quality layers of the same video track so the SFU can send each viewer the rendition their bandwidth supports.
Key Takeaways
- Interactive live streaming is defined by the return path, not by the video quality: if a viewer cannot publish back, it is live streaming with a chat box attached.
- WebRTC delivery holds latency at 200ms to 500ms, while standard HLS runs 12 to 30 seconds behind and Apple's LL-HLS extension targets two seconds or less.
- VideoSDK builds interactive streams on its rooms architecture, with
SEND_AND_RECVandRECV_ONLYmodes swapped live throughchangeMode()across React, React Native, JavaScript, Flutter, Android, iOS, and Python. - The interactive tier bills per viewer minute and the HLS tier bills per stream minute, so a hybrid architecture is an economic requirement above roughly 20 concurrent HD viewers, not a stylistic choice.
- Multistreaming should happen server-side through
startLivestream()so the host's upstream bandwidth stays flat no matter how many platforms you add.
Conclusion
Interactive live streaming is worth building when the audience's response is part of the product: a bid, a question, a purchase, a promoted guest. When it is not, HLS does the job for less money and with fewer moving parts.
If you are building the interactive kind, the shortest path is a token server, a room, two participant modes, and one changeMode() call. VideoSDK's free tier includes $20 of credit with no card required, which covers a realistic load test.
Start with the React ILS quickstart, or sign up at VideoSDK and create your first stream room.
What are you building with interactive live streaming? Drop a comment with your use case, especially if you have hit the WebRTC-to-HLS crossover in production and had to redesign around it.
Frequently Asked Questions
What is interactive live streaming?
Interactive live streaming is live video in which viewers can respond in real time and be promoted to broadcaster during the stream. It uses WebRTC rather than segment-based delivery, keeping latency in the 200ms to 500ms range instead of the 12 to 30 seconds typical of standard HLS. VideoSDK provides it through two participant modes on a standard room, with changeMode() switching a viewer to the stage without a reconnect.
What is the difference between ILS and HLS?
The main difference is the return path and the latency budget. Interactive live streaming (ILS) delivers over WebRTC at 200ms to 500ms and lets a viewer publish audio and video back into the stream. HLS delivers chunked files over a CDN at 12 to 30 seconds of latency and is strictly one-way, which is why it scales further and costs less per viewer.
How do you build a live streaming app?
Build it in six steps: generate a JWT server-side, create a room through the REST API, join participants in the correct publish mode, expose a role-change control for promotion, start an HLS rendition when the audience outgrows the real-time tier, and push RTMP outputs for multistreaming. With the VideoSDK React SDK, each step is one SDK method, and the interactive layer is a mode value on MeetingProvider.
Can a viewer become a host during the stream?
Yes. In VideoSDK, a viewer joined as RECV_ONLY calls changeMode(Constants.modes.SEND_AND_RECV) to start publishing without leaving and rejoining the room. Because the method runs client-side, gate it behind a host approval message so viewers cannot put themselves on camera unprompted.
What is multistreaming and how does it work?
Multistreaming is broadcasting one live source to several platforms simultaneously, such as YouTube, Twitch, and LinkedIn at once. VideoSDK's startLivestream() accepts an array of RTMP outputs, each with a url and streamKey, and performs the fan-out on its servers. The host therefore uploads a single stream regardless of how many destinations are configured.
How much does interactive live streaming cost?
VideoSDK bills the interactive tier per viewer minute, listing HD (720p) video at $0.002 per viewer minute, and bills HLS at $0.04 per livestream minute for 720p encoding. A one-hour stream with 1,000 concurrent interactive viewers costs roughly $120, while the HLS encoding line stays flat at about $2.40 for that hour.
Is WebRTC good enough for large live streams?
WebRTC is the right transport for the interactive tier and the wrong one for mass reach. VideoSDK documents support for up to 100 hosts and 2,000 real-time viewers per interactive session, with HLS handling audiences beyond that. Production streams commonly run both from the same room, keeping interaction on WebRTC and reach on the CDN.