
1Help me add video calling to my React Native app with VideoSDK.
2
31. Run `npx @react-native-community/cli init videosdkRtcReactNativeApp`.
4
52. Run `npm install @videosdk.live/react-native-sdk @videosdk.live/react-native-incallmanager react-native-safe-area-context`,
6
7   then do the native setup: camera and mic permissions, `minSdkVersion 24`,
8
9   `WebRTCModulePackage` in `MainApplication.kt`, the `:rnwebrtc` entry in
10
11   `settings.gradle`, the `react-native-webrtc` pod, and `pod install`.
12
133. Call `register()` in `index.js`; create `api.js` with `createMeeting({ token })`
14
15   that POSTs to `https://api.videosdk.live/v2/rooms`; create `App.js` with a join
16
17   screen and meeting view using `MeetingProvider`, `useMeeting`, `useParticipant`,
18
19   and `RTCView` fed by `new MediaStream([webcamStream.track]).toURL()`.
20
214. Ask me for a token from app.videosdk.live/api-keys and set it as `token` in `api.js`.
22
235. Run `npm run android` or `npm run ios` on a device or simulator.
24
25REFERENCE
26
27https://docs.videosdk.live/react-native/guide/video-and-audio-calling-api-sdk/quick-start.md
Prerequisites
Before you begin, make sure you have:
- Node.js >= 22.11.0
- NPM v10+ (comes installed with newer Node versions)
- Android Studio or Xcode installed
- A VideoSDK developer account
- An authentication token, generated with the videosdk-rtc-api-server-examples or directly from the VideoSDK Dashboard
App Architecture
The App will contain two screens :
Join Screen: This screen allows users to either create a meeting or join a predefined meeting.Meeting Screen: This screen contains a participant list and meeting controls, such as enabling/disabling the microphone and camera, and leaving the meeting.
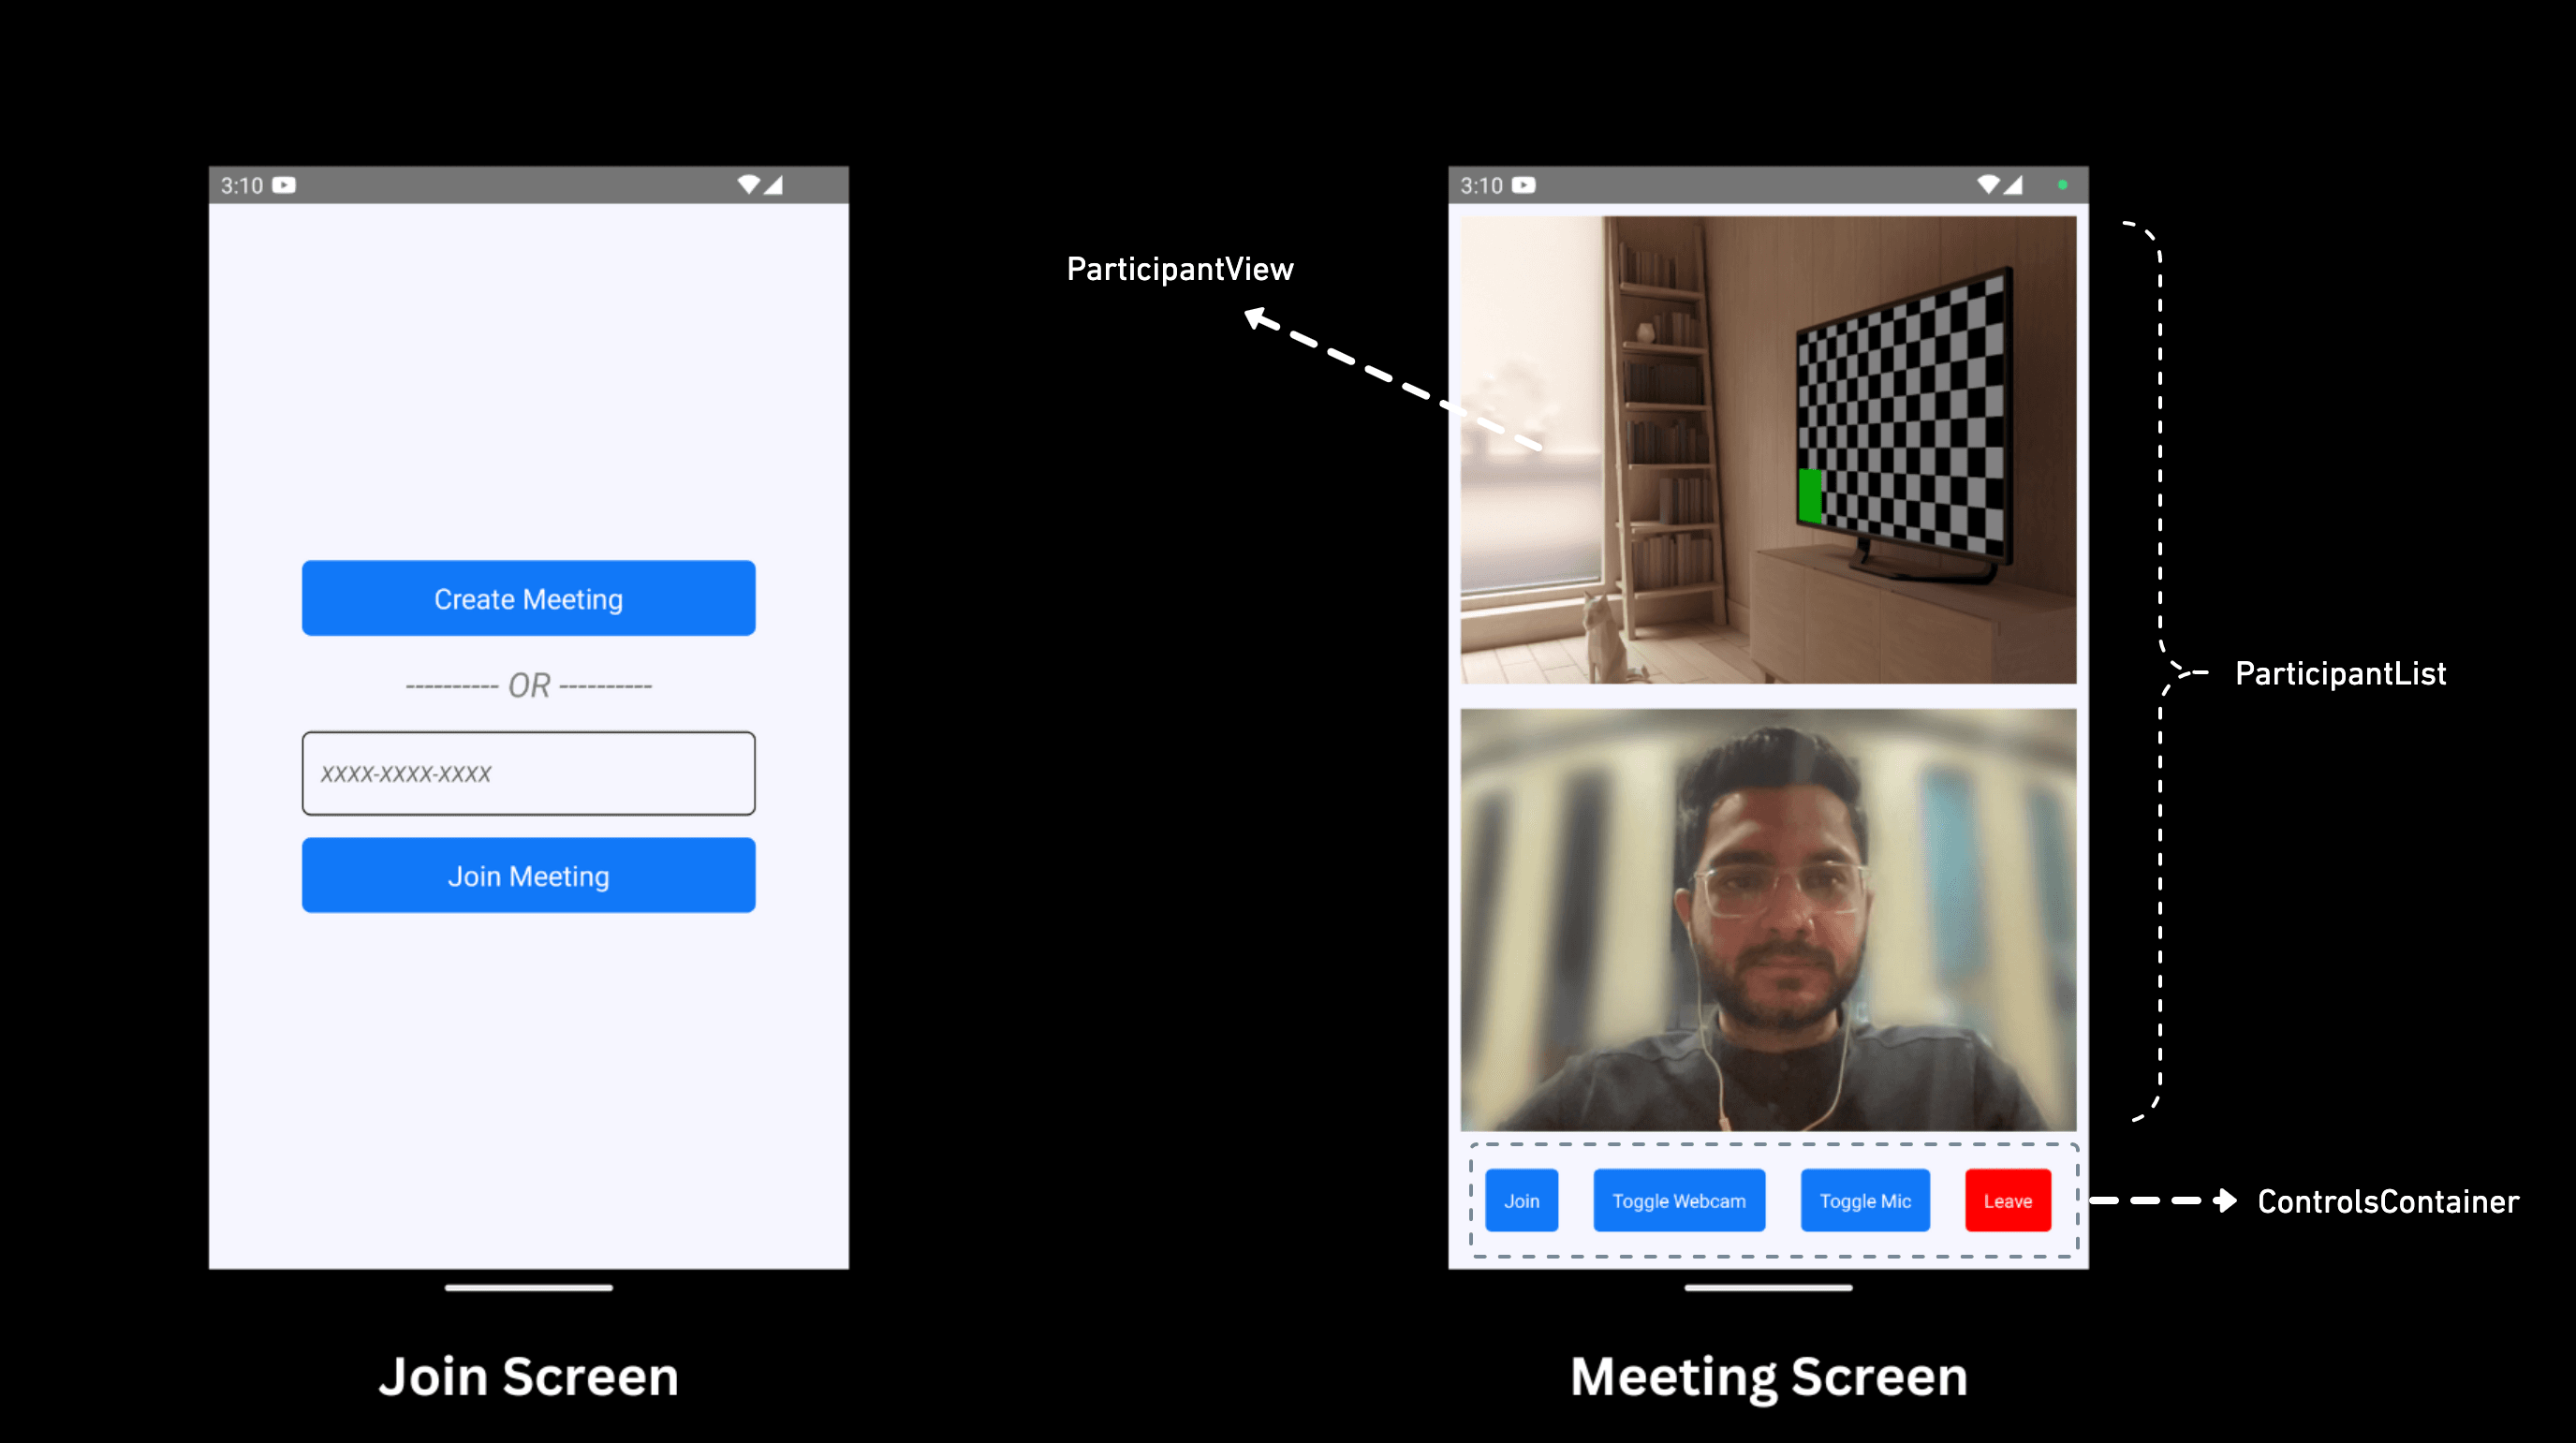
Getting Started with the Code!
This tutorial builds the app in small, testable pieces. You will create the React Native project, install the SDK and its WebRTC dependency, configure the Android and iOS native projects, and then implement meeting creation, joining, controls, and participant rendering.
Create App
Create a new React Native App using the below command.
1npx @react-native-community/cli init AppNameFor React Native setup, you can follow the Official Documentation.
VideoSDK Installation
Install the VideoSDK by using the following command. Ensure that you are in your project directory before running this command. Use only the command for your package manager.
NPM
1npm install "@videosdk.live/react-native-sdk" "@videosdk.live/react-native-incallmanager" "react-native-safe-area-context"Yarn
1yarn add "@videosdk.live/react-native-sdk" "@videosdk.live/react-native-incallmanager" "react-native-safe-area-context"Project Structure
1  root
2   ├── node_modules
3   ├── android
4   ├── ios
5   ├── App.js
6   ├── api.js
7 ├── index.jsapi.jscreates a room by calling the VideoSDK Rooms API.App.jsrenders the join screen, provides the meeting context, displays participants, and exposes call controls.index.jsregisters the VideoSDK services alongside your app component.
Project Configuration
Android Setup
1. Add the required permissions in the AndroidManifest.xml file.
1<manifest
2  xmlns:android="http://schemas.android.com/apk/res/android"
3  package="com.cool.app"
4>
5    <!-- Give all the required permissions to app -->
6    <uses-permission android:name="android.permission.INTERNET" />
7    <uses-permission android:name="android.permission.ACCESS_NETWORK_STATE" />
8    <!-- Needed to communicate with already-paired Bluetooth devices. (Legacy up to Android 11) -->
9    <uses-permission
10        android:name="android.permission.BLUETOOTH"
11        android:maxSdkVersion="30" />
12    <uses-permission
13        android:name="android.permission.BLUETOOTH_ADMIN"
14        android:maxSdkVersion="30" />
15
16    <!-- Needed to communicate with already-paired Bluetooth devices. (Android 12 upwards)-->
17    <uses-permission android:name="android.permission.BLUETOOTH_CONNECT" />
18
19    <uses-permission android:name="android.permission.CAMERA" />
20    <uses-permission android:name="android.permission.MODIFY_AUDIO_SETTINGS" />
21    <uses-permission android:name="android.permission.RECORD_AUDIO" />
22    <uses-permission android:name="android.permission.WAKE_LOCK" />
23</manifest>
2. Link the necessary VideoSDK Dependencies.
1 dependencies {
2  implementation project(' :rnwebrtc')
3 }1include ':rnwebrtc'
2project(':rnwebrtc').projectDir = new File(rootProject.projectDir, '../node_modules/@videosdk.live/react-native-webrtc/android')1import live.videosdk.rnwebrtc.WebRTCModulePackage
2
3class MainApplication : Application(), ReactApplication {
4
5 override val reactHost: ReactHost by lazy {
6 getDefaultReactHost(
7 context = applicationContext,
8 packageList =
9 PackageList(this).packages.apply {
10 // Packages that cannot be autolinked yet can be added manually here, for example:
11 // add(MyReactNativePackage())
12 add(WebRTCModulePackage())
13 },
14 )
15 }
16
17 override fun onCreate() {
18 super.onCreate()
19 loadReactNative(this)
20 }
21}Note
This MainApplication.kt matches the template of recent React Native versions — verified against the React Native 0.87 template that npx @react-native-community/cli init currently produces. On an older React Native version, add WebRTCModulePackage() to the package list in your project's existing MainApplication file instead — for example, inside getPackages() in the Java template.
3. Include the following line in your proguard-rules.pro file (optional: if you are using Proguard).
1-keep class org.webrtc.** { *; }4. In your build.gradle file, update the minimum OS/SDK version to 24.
1buildscript {
2 ext {
3     minSdkVersion = 24
4 }
5}
iOS Setup
1. IMPORTANT: Ensure that you are using CocoaPods version 1.10 or later.
To update CocoaPods, you can reinstall the gem using the following command:
1 sudo gem install cocoapods2. Manually link react-native-incall-manager (if it is not linked automatically).
Select YourXcodeProject/TARGETS/BuildSettings, in Header Search Paths, add "$(SRCROOT)/../node_modules/@videosdk.live/react-native-incall-manager/ios/RNInCallManager"
3. Change the path of react-native-webrtc using the following command:
1pod 'react-native-webrtc', :path => '../node_modules/@videosdk.live/react-native-webrtc'Note
Your Podfile's default platform :ios, min_ios_version_supported line already satisfies react-native-webrtc's minimum iOS requirement.
4. Install pods.
After updating the podfile, you need to install the pods by running the following command:
1pod install5. Declare permissions in Info.plist :
Add the following lines to your info.plist file located at (project folder/ios/projectname/info.plist):
1<key>NSCameraUsageDescription</key>
2<string>Camera permission description</string>
3<key>NSMicrophoneUsageDescription</key>
4<string>Microphone permission description</string>
Register Service
Register VideoSDK services in your root index.js file for the initialization service.
1import { AppRegistry } from "react-native";
2
3import App from "./App";
4
5import { name as appName } from "./app.json";
6
7import { register } from "@videosdk.live/react-native-sdk";
8
9register();
10
11AppRegistry.registerComponent(appName, () => App);
Step 1: Get started with API.js
Prior to moving on, you must create an API request to generate a unique meetingId. You will need an authentication token, which you can create either through the videosdk-rtc-api-server-examples or directly from the VideoSDK Dashboard for developers.
1// Generate your token at https://app.videosdk.live/api-keys and paste it below.
2export const token = "";
3
4// API call to create meeting
5export const createMeeting = async ({ token }) => {
6  try {
7    const res = await fetch(`https://api.videosdk.live/v2/rooms`, {
8      method: "POST",
9      headers: {
10        authorization: `${token}`,
11        "Content-Type": "application/json",
12      },
13      body: JSON.stringify({}),
14    });
15
16    if (!res.ok) {
17      throw new Error(`Failed to create meeting: ${res.status}`);
18    }
19
20    const { roomId } = await res.json();
21    return roomId;
22  } catch (error) {
23    console.error("createMeeting failed", error);
24    throw error;
25  }
26};
Step 2: Wireframe App.js with all the components
To build up wireframe of App.js, you need to use VideoSDK Hooks and Context Providers. VideoSDK provides MeetingProvider, MeetingConsumer, useMeeting and useParticipant hooks.
First you need to understand Context Provider and Consumer. Context is primarily used when some data needs to be accessible by many components at different nesting levels.
- MeetingProvider: This is the Context Provider. It accepts value config and token as props. The Provider component accepts a value prop to be passed to consuming components that are descendants of this Provider. One Provider can be connected to many consumers. Providers can be nested to override values deeper within the tree.
- MeetingConsumer: This is the Context Consumer. All consumers that are descendants of a Provider will re-render whenever the Provider's value prop changes.
- useMeeting: This is the meeting hook API. It includes all the information related to meeting such as join, leave, enable/disable mic or webcam etc.
- useParticipant: This is the participant hook API. It is responsible for handling all the events and props related to one particular participant such as name, webcamStream, micStream etc.
The Meeting Context provides a way to listen for any changes that occur when a participant joins the meeting or makes modifications to their microphone, camera, and other settings.
Begin by making a few changes to the code in the App.js file.
1import React, { useState } from "react";
2import {
3  TouchableOpacity,
4  Text,
5  TextInput,
6  View,
7  FlatList,
8} from "react-native";
9import { SafeAreaProvider, SafeAreaView } from "react-native-safe-area-context";
10import {
11  MeetingProvider,
12  useMeeting,
13  useParticipant,
14  MediaStream,
15  RTCView,
16} from "@videosdk.live/react-native-sdk";
17import { createMeeting, token } from "./api";
18
19function JoinScreen(props) {
20  return null;
21}
22
23function ControlsContainer() {
24  return null;
25}
26
27function MeetingView() {
28  return null;
29}
30
31function AppContent() {
32  const [meetingId, setMeetingId] = useState(null);
33
34  const getMeetingId = async (id) => {
35    if (!token) {
36      console.error("PLEASE PROVIDE TOKEN IN api.js FROM app.videosdk.live");
37      return;
38    }
39    const meetingId = id == null ? await createMeeting({ token }) : id;
40    setMeetingId(meetingId);
41  };
42
43  return meetingId ? (
44    <SafeAreaView style={{ flex: 1, backgroundColor: "#F6F6FF" }}>
45      <MeetingProvider
46        config={{
47          meetingId,
48          micEnabled: false,
49          webcamEnabled: true,
50          name: "Test User",
51          defaultCamera: "front",
52        }}
53        token={token}
54      >
55        <MeetingView />
56      </MeetingProvider>
57    </SafeAreaView>
58  ) : (
59    <JoinScreen getMeetingId={getMeetingId} />
60  );
61}
62
63export default function App() {
64  return (
65    <SafeAreaProvider>
66      <AppContent />
67    </SafeAreaProvider>
68  );
69}
At this stage, the child components intentionally return null. You will replace each placeholder in the next four steps.
Step 3: Implement Join Screen
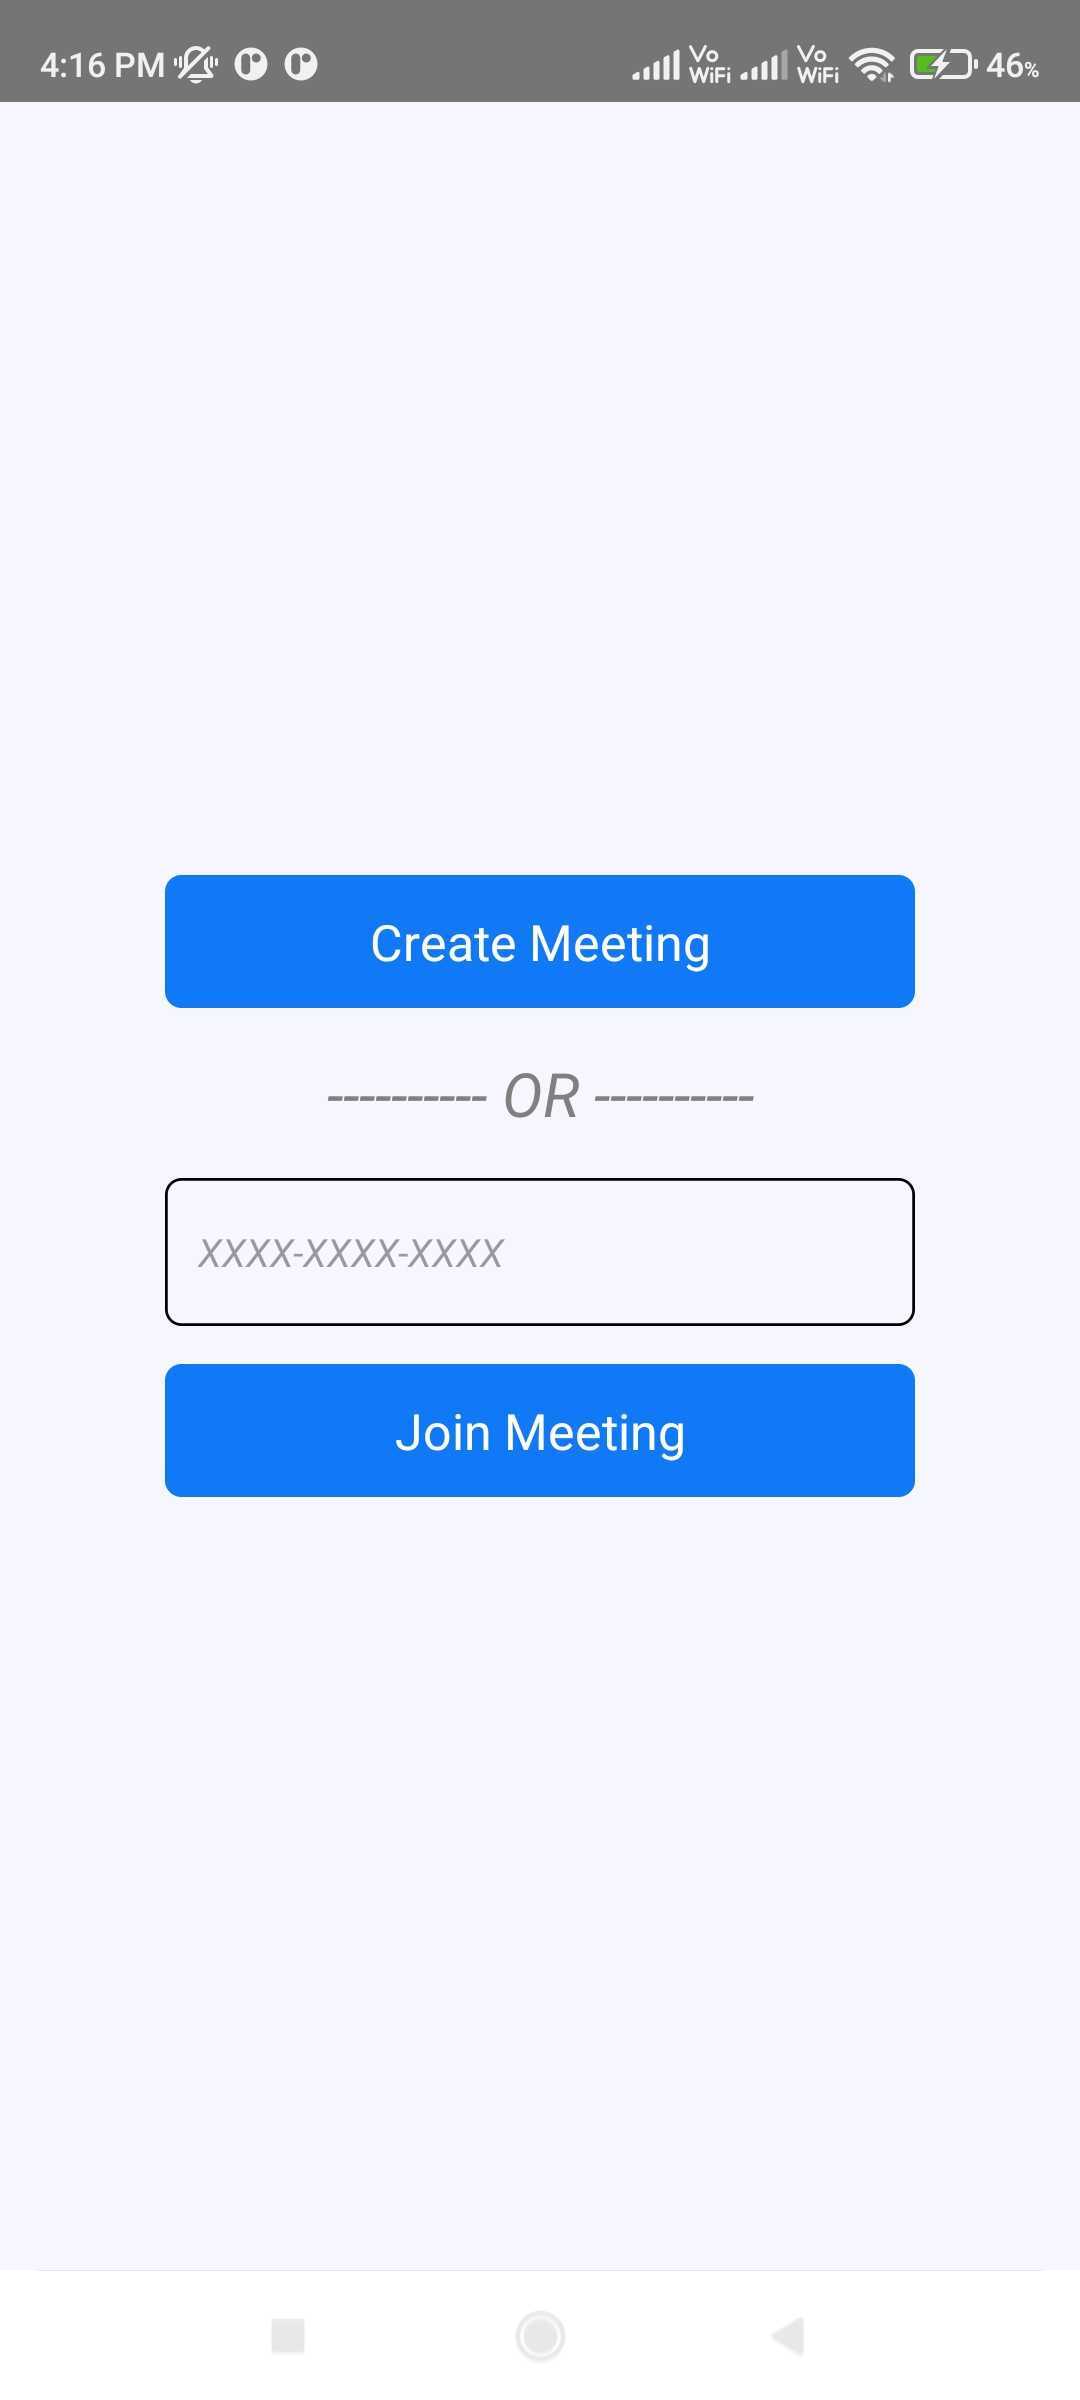
Join screen will serve as a medium to either schedule a new meeting or join an existing one.
1function JoinScreen(props) {
2  const [meetingVal, setMeetingVal] = useState("");
3  return (
4    <SafeAreaView
5      style={{
6        flex: 1,
7        backgroundColor: "#F6F6FF",
8        justifyContent: "center",
9        paddingHorizontal: 6 * 10,
10      }}
11    >
12      <TouchableOpacity
13        onPress={() => {
14          props.getMeetingId();
15        }}
16        style={{ backgroundColor: "#1178F8", padding: 12, borderRadius: 6 }}
17      >
18        <Text style={{ color: "white", alignSelf: "center", fontSize: 18 }}>
19          Create Meeting
20        </Text>
21      </TouchableOpacity>
22
23      <Text
24        style={{
25          alignSelf: "center",
26          fontSize: 22,
27          marginVertical: 16,
28          fontStyle: "italic",
29          color: "grey",
30        }}
31      >
32        ---------- OR ----------
33      </Text>
34      <TextInput
35        value={meetingVal}
36        onChangeText={setMeetingVal}
37        placeholder={"XXXX-XXXX-XXXX"}
38        style={{
39          padding: 12,
40          borderWidth: 1,
41          borderRadius: 6,
42          fontStyle: "italic",
43        }}
44      />
45      <TouchableOpacity
46        style={{
47          backgroundColor: "#1178F8",
48          padding: 12,
49          marginTop: 14,
50          borderRadius: 6,
51        }}
52        onPress={() => {
53          props.getMeetingId(meetingVal);
54        }}
55      >
56        <Text style={{ color: "white", alignSelf: "center", fontSize: 18 }}>
57          Join Meeting
58        </Text>
59      </TouchableOpacity>
60    </SafeAreaView>
61  );
62}
The Create Meeting action calls getMeetingId without an ID, which makes api.js create a room first. The Join Meeting action passes the entered room ID straight through.
Output
Step 4: Implement Controls
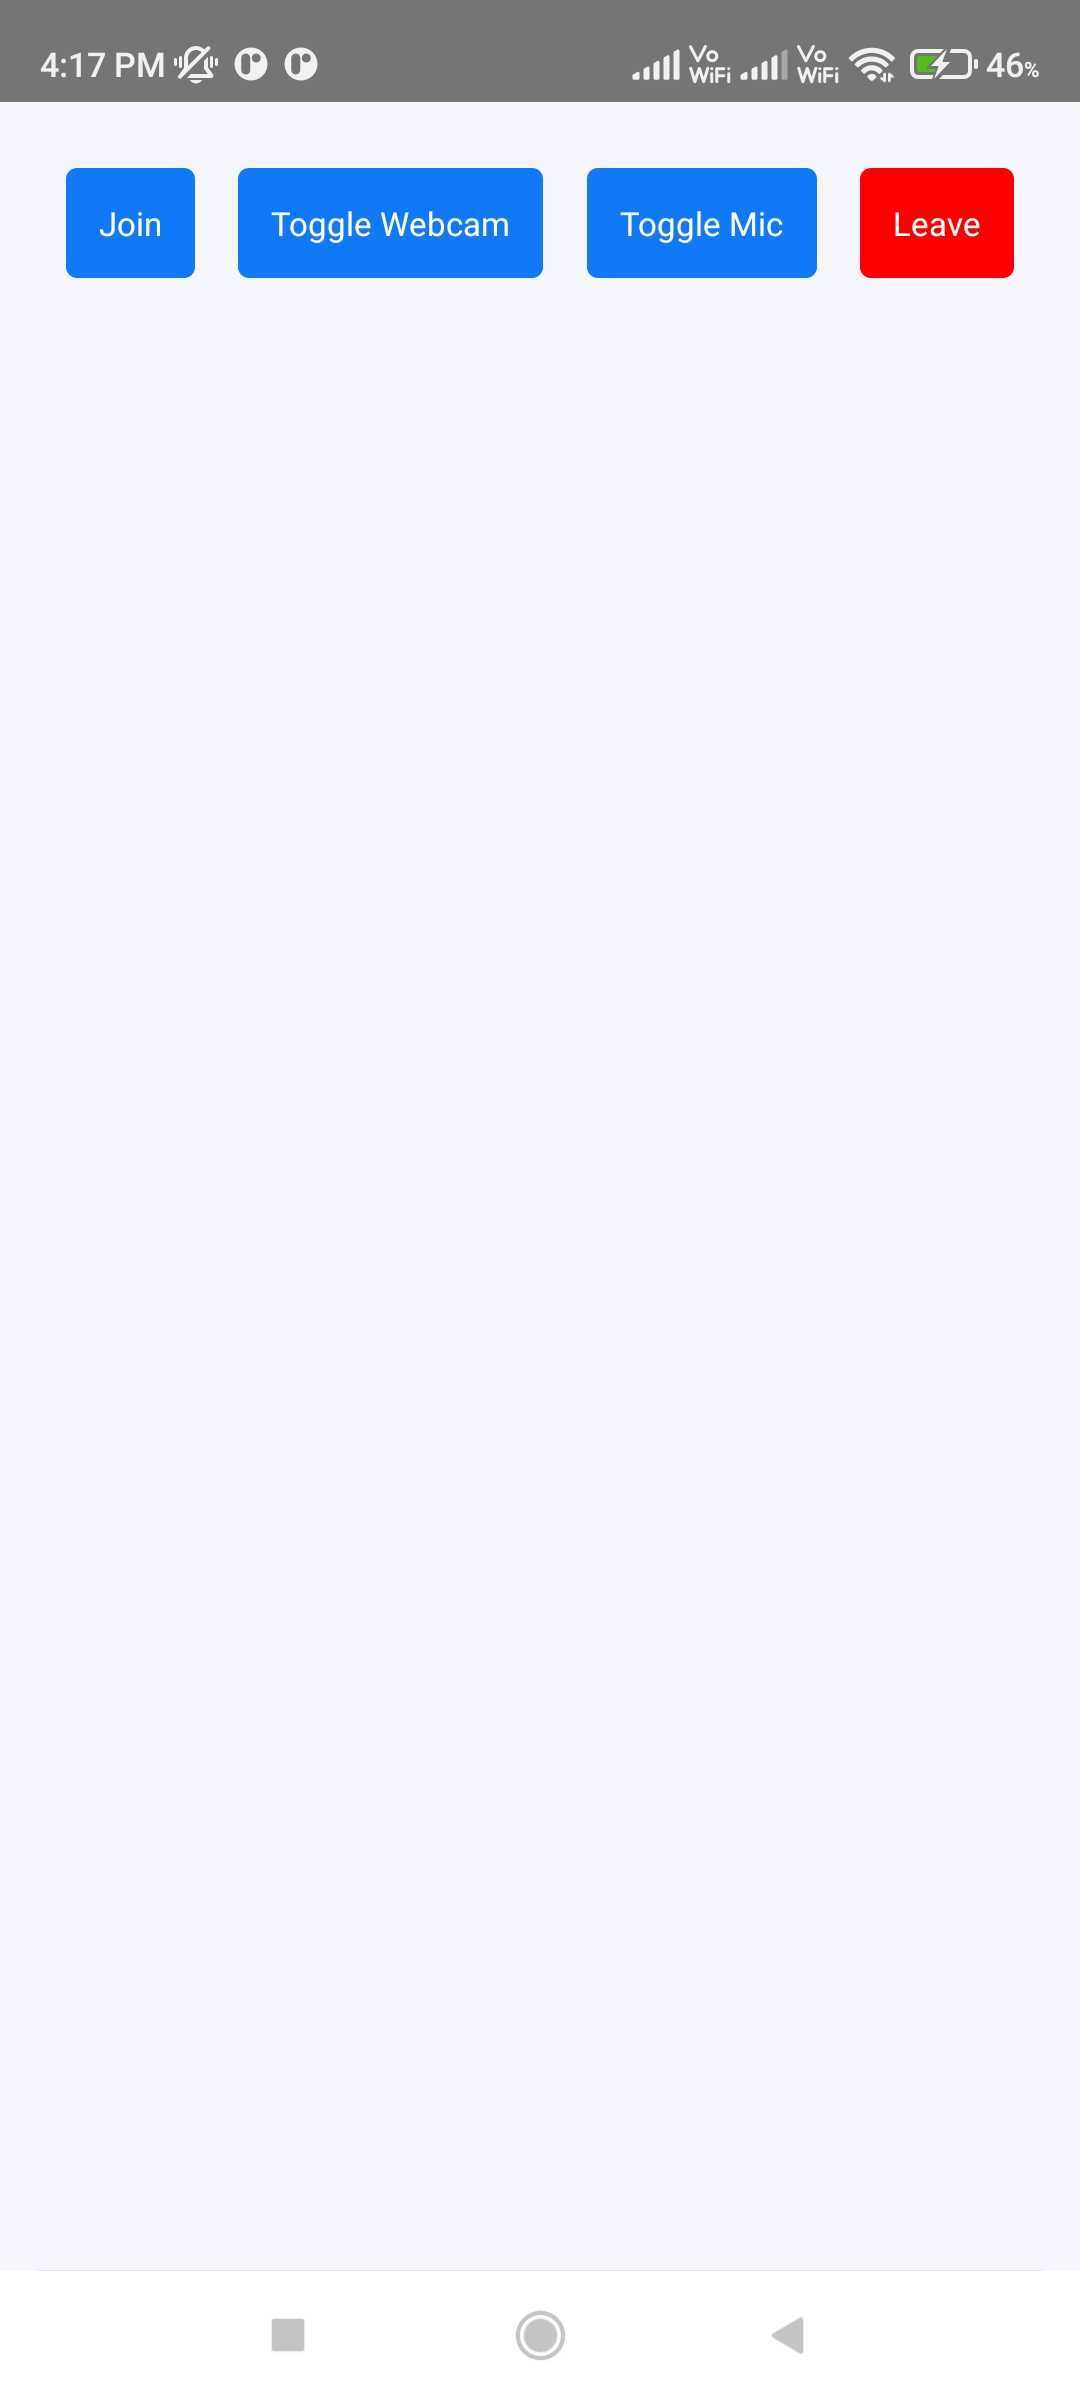
Next step is to create a ControlsContainer component to manage features such as Join or Leave Meeting and Enable or Disable Webcam/Mic.
In this step, the useMeeting hook is utilized to acquire all the required methods such as join(), leave(), toggleWebcam and toggleMic.
From v1.0.0, all these methods are asynchronous and return a Promise, so await them and handle failures with try / catch. For details, see the Migration Guide.
1const Button = ({ onPress, buttonText, backgroundColor }) => {
2  return (
3    <TouchableOpacity
4      onPress={onPress}
5      style={{
6        backgroundColor: backgroundColor,
7        justifyContent: "center",
8        alignItems: "center",
9        padding: 12,
10        borderRadius: 4,
11      }}
12    >
13      <Text style={{ color: "white", fontSize: 12 }}>{buttonText}</Text>
14    </TouchableOpacity>
15  );
16};
17
18function ControlsContainer({ join, leave, toggleWebcam, toggleMic }) {
19  const handleJoin = async () => {
20    try {
21      await join();
22    } catch (error) {
23      console.error("Failed to join meeting", error);
24    }
25  };
26
27  const handleToggleWebcam = async () => {
28    try {
29      await toggleWebcam();
30    } catch (error) {
31      console.error("Failed to toggle webcam", error);
32    }
33  };
34
35  const handleToggleMic = async () => {
36    try {
37      await toggleMic();
38    } catch (error) {
39      console.error("Failed to toggle mic", error);
40    }
41  };
42
43  const handleLeave = async () => {
44    try {
45      await leave();
46    } catch (error) {
47      console.error("Failed to leave meeting", error);
48    }
49  };
50
51  return (
52    <View
53      style={{
54        padding: 24,
55        flexDirection: "row",
56        justifyContent: "space-between",
57      }}
58    >
59      <Button
60        onPress={handleJoin}
61        buttonText={"Join"}
62        backgroundColor={"#1178F8"}
63      />
64      <Button
65        onPress={handleToggleWebcam}
66        buttonText={"Toggle Webcam"}
67        backgroundColor={"#1178F8"}
68      />
69      <Button
70        onPress={handleToggleMic}
71        buttonText={"Toggle Mic"}
72        backgroundColor={"#1178F8"}
73      />
74      <Button
75        onPress={handleLeave}
76        buttonText={"Leave"}
77        backgroundColor={"#FF0000"}
78      />
79    </View>
80  );
81}1function ParticipantList() {
2 return null;
3}
4function MeetingView() {
5 const { join, leave, toggleWebcam, toggleMic, meetingId } = useMeeting({});
6
7 return (
8 <View style={{ flex: 1 }}>
9 {meetingId ? (
10 <Text style={{ fontSize: 18, padding: 12 }}>
11 Meeting Id :{meetingId}
12 </Text>
13 ) : null}
14 <ParticipantList />
15 <ControlsContainer
16 join={join}
17 leave={leave}
18 toggleWebcam={toggleWebcam}
19 toggleMic={toggleMic}
20 />
21 </View>
22 );
23}Output
Step 5: Render Participant List
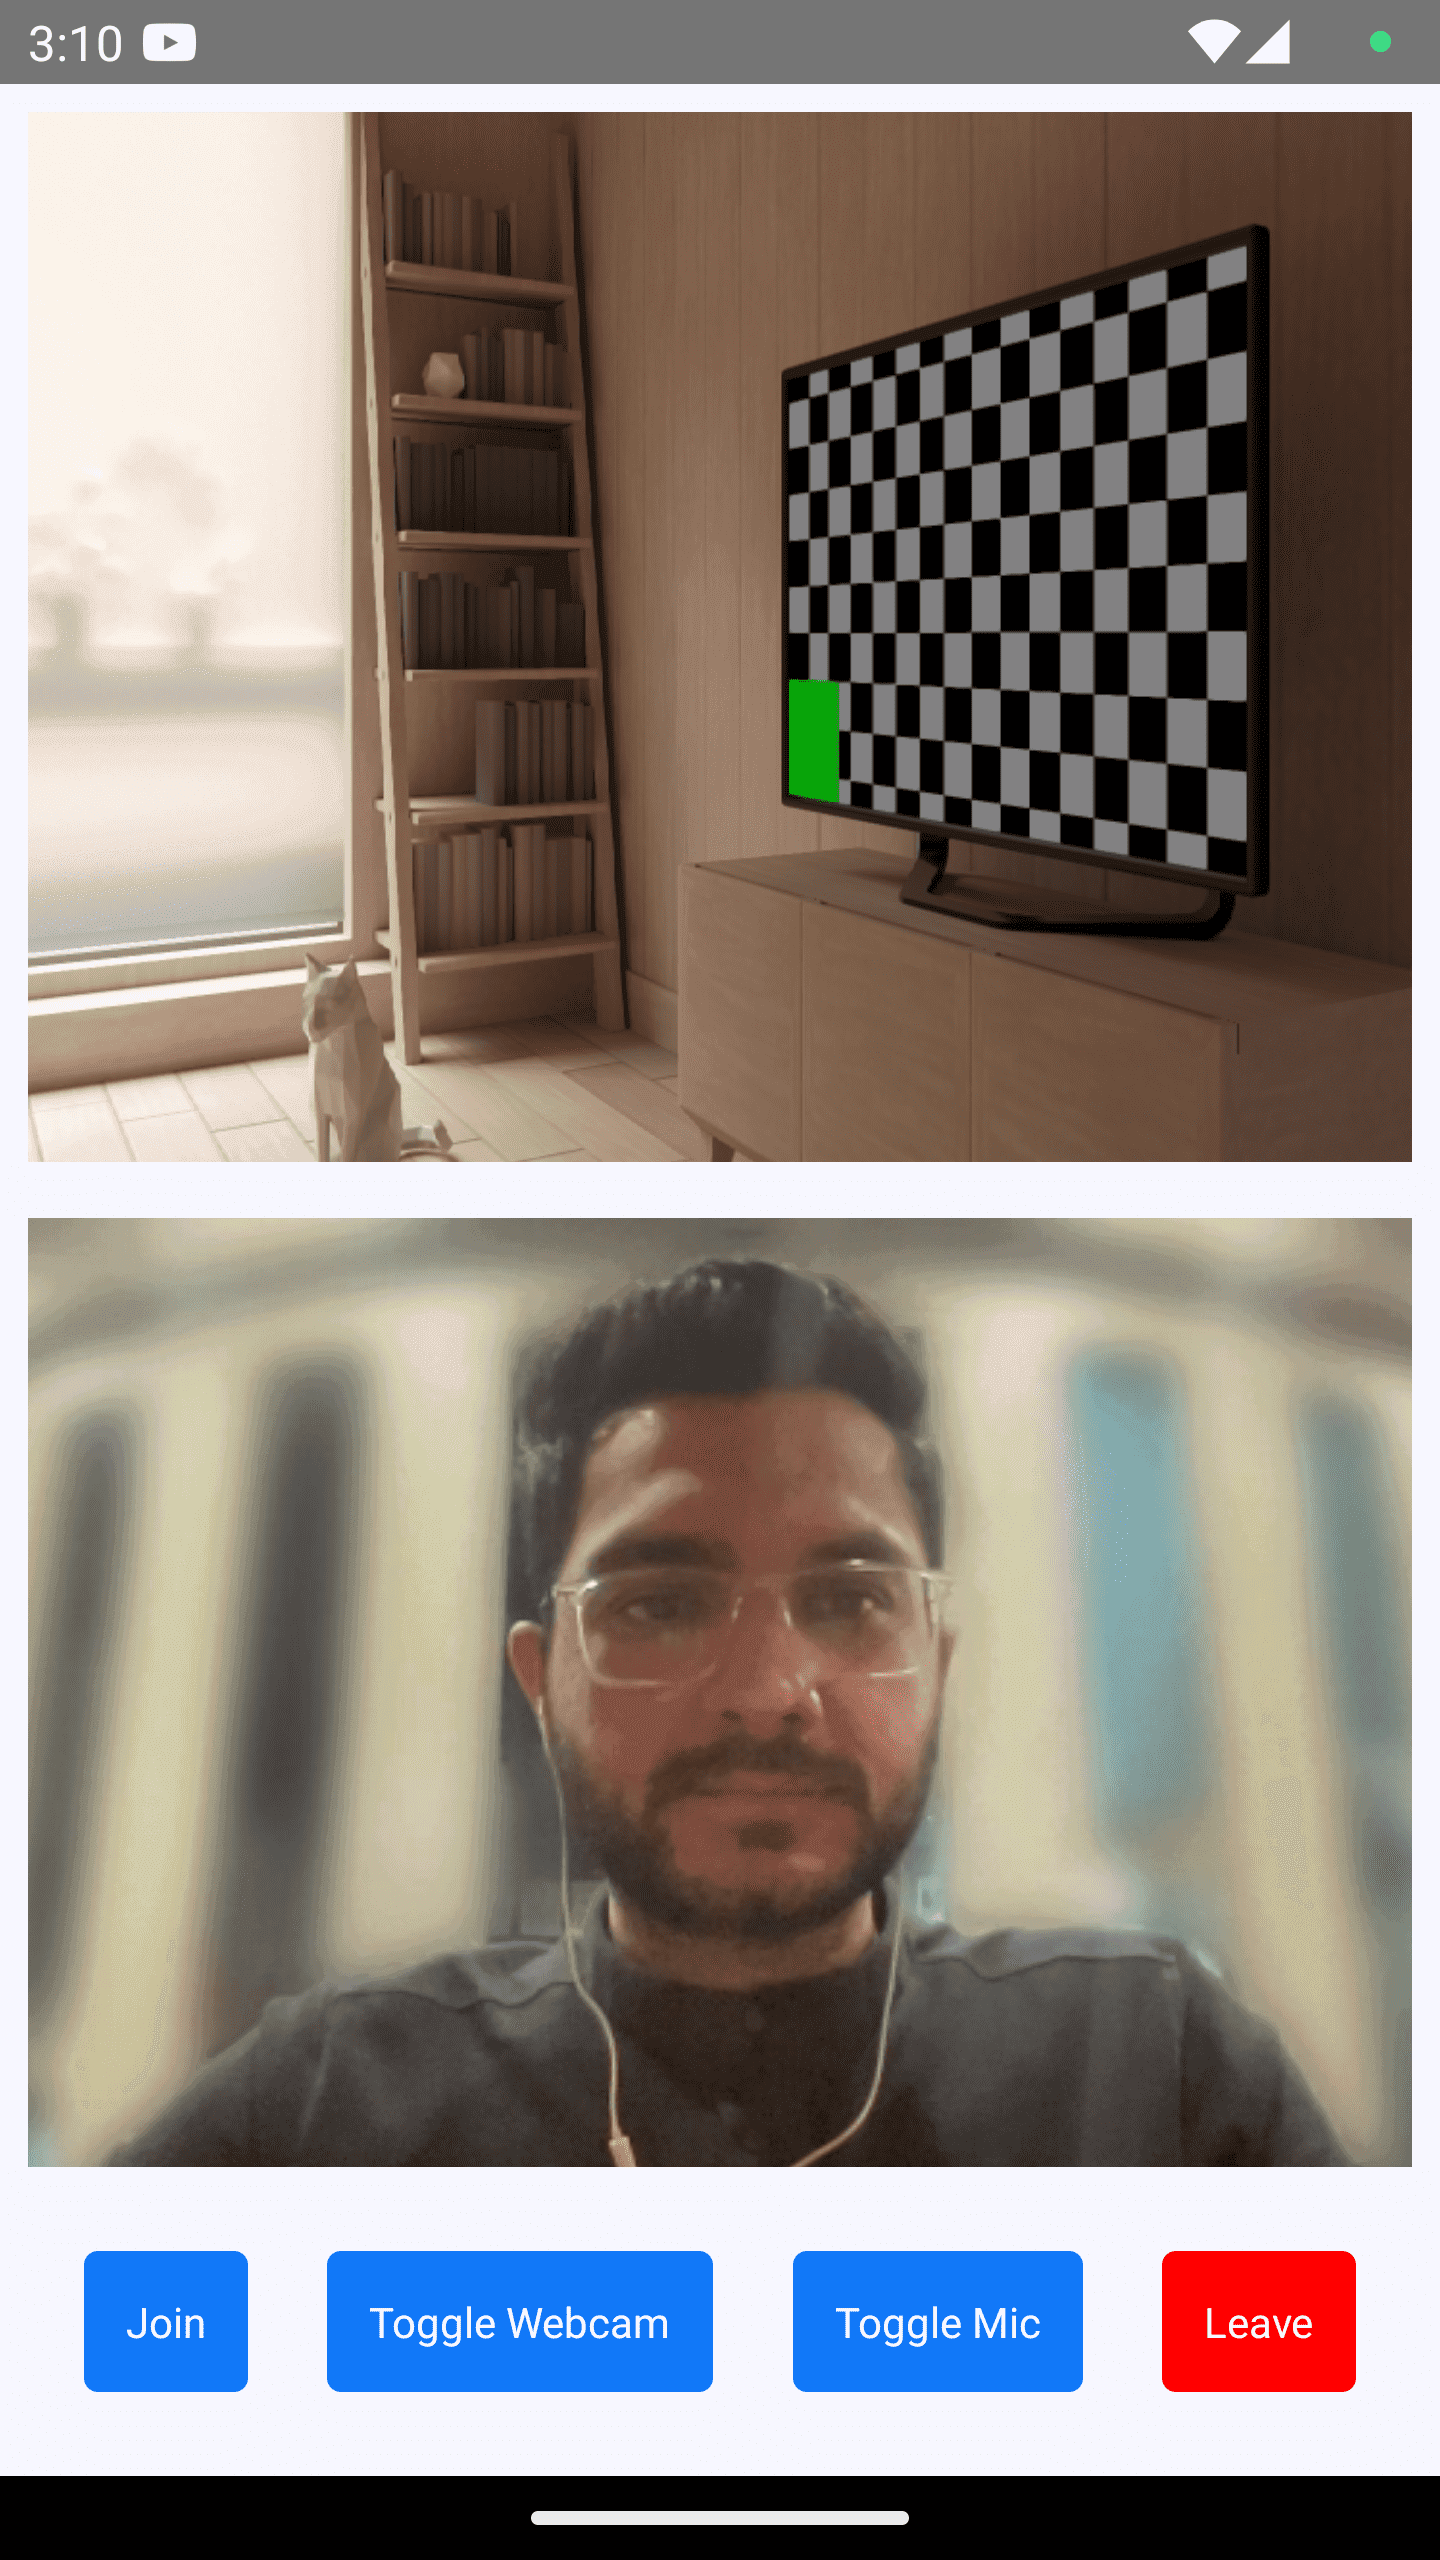
After implementing the controls, next step is to render the joined participants.
You can get all the joined participants from the useMeeting Hook.
1function ParticipantView() {
2  return null;
3}
4
5function ParticipantList({ participants }) {
6  return participants.length > 0 ? (
7    <FlatList
8      data={participants}
9      renderItem={({ item }) => {
10        return <ParticipantView participantId={item} />;
11      }}
12    />
13  ) : (
14    <View
15      style={{
16        flex: 1,
17        backgroundColor: "#F6F6FF",
18        justifyContent: "center",
19        alignItems: "center",
20      }}
21    >
22      <Text style={{ fontSize: 20 }}>Press Join button to enter meeting.</Text>
23    </View>
24  );
25}1function MeetingView() {
2 // Get `participants` from useMeeting Hook
3 const { join, leave, toggleWebcam, toggleMic, participants, meetingId } =
4 useMeeting({});
5 const participantsArrId = [...participants.keys()];
6
7 return (
8 <View style={{ flex: 1 }}>
9 {meetingId ? (
10 <Text style={{ fontSize: 18, padding: 12 }}>
11 Meeting Id :{meetingId}
12 </Text>
13 ) : null}
14 <ParticipantList participants={participantsArrId} />
15 <ControlsContainer
16 join={join}
17 leave={leave}
18 toggleWebcam={toggleWebcam}
19 toggleMic={toggleMic}
20 />
21 </View>
22 );
23}This version of MeetingView replaces the one from Step 4. The participant map from useMeeting is converted to an array of IDs, which ParticipantList renders through a FlatList.
Step 6: Handling Participant's Media
Before Handling the Participant's Media, you need to understand a couple of concepts.
- useParticipant Hook
The useParticipant hook is responsible for handling all the properties and events of one particular participant joined in the meeting. It will take participantId as argument.
1const { webcamStream, webcamOn, displayName } = useParticipant(participantId);- MediaStream API
The MediaStream API is beneficial for adding a MediaTrack into the RTCView component, enabling the playback of audio or video.
1<RTCView
2  streamURL={new MediaStream([webcamStream.track]).toURL()}
3  objectFit={"cover"}
4  style={{
5    height: 300,
6    marginVertical: 8,
7    marginHorizontal: 8,
8  }}
9/>
Now you can use the hook and the API to create ParticipantView
1function ParticipantView({ participantId }) {
2  const { webcamStream, webcamOn } = useParticipant(participantId);
3
4  return webcamOn && webcamStream ? (
5    <RTCView
6      streamURL={new MediaStream([webcamStream.track]).toURL()}
7      objectFit={"cover"}
8      style={{
9        height: 300,
10        marginVertical: 8,
11        marginHorizontal: 8,
12      }}
13    />
14  ) : (
15    <View
16      style={{
17        backgroundColor: "grey",
18        height: 300,
19        justifyContent: "center",
20        alignItems: "center",
21        marginVertical: 8,
22        marginHorizontal: 8,
23      }}
24    >
25      <Text style={{ fontSize: 16 }}>NO MEDIA</Text>
26    </View>
27  );
28}
Output
Run your application
1npm run android // Android
2npm run ios //  iOS
Final Output
Run the app on an Android device or emulator, or on an iOS device, and allow camera and microphone access when the system asks for permission.
To test the call:
- Select Create Meeting on the Join Screen of the first device.
- Copy the meeting ID shown at the top of the Meeting Screen.
- Run the app on a second device or emulator.
- Paste the same meeting ID into the XXXX-XXXX-XXXX field.
- Select Join Meeting, then press Join in the controls row.
- Allow camera and microphone permission on both devices.
Your completed React Native app can now:
- Create a new VideoSDK room
- Join an existing room by meeting ID
- Publish camera and microphone media
- Render every joined participant in a scrollable list
- Show a NO MEDIA placeholder when a participant's camera is off
- Toggle the local microphone
- Toggle the local camera
- Leave the meeting
Tip: Stuck anywhere? Check out this example code on GitHub. Expo user, you can refer to this example code on GitHub.


