
1Help me add video calling to my iOS app with VideoSDK, using SwiftUI.
2
31. Create a new Xcode project using the App template (iOS 11+, Xcode 12+, Swift 5).
4
52. Run `pod init`, add `pod 'VideoSDKRTC', :git => 'https://github.com/videosdk-live/videosdk-rtc-ios-sdk.git'`
6
7   to the Podfile, run `pod install`, and add `NSCameraUsageDescription` and
8
9   `NSMicrophoneUsageDescription` to `Info.plist`.
10
113. Create `RoomStruct.swift` with the `RoomsStruct` and `Links` models, a
12
13   `JoinScreenView` taking a meeting id and a name, and a `MeetingView` backed by an
14
15   observable `MeetingViewController` that creates a room by POSTing to
16
17   `https://api.videosdk.live/v2/rooms`, then calls `VideoSDK.config(token:)` in
18
19   `onAppear` and `VideoSDK.initMeeting(meetingId:participantName:micEnabled:webcamEnabled:)`
20
21   followed by `addEventListener(self)` and `join()`.
22
234. Implement `MeetingEventListener` (`onMeetingJoined`, `onParticipantJoined`,
24
25   `onParticipantLeft`, `onMeetingLeft`, `onMeetingStateChanged`) and
26
27   `ParticipantEventListener` (`onStreamEnabled`, `onStreamDisabled`), publish the
28
29   participant list, and render each video track through a `ParticipantView`
30
31   `UIViewRepresentable` wrapping an `RTCMTLVideoView`. Wire mic, webcam and screen
32
33   share buttons to `muteMic`, `unmuteMic`, `enableWebcam`, `disableWebcam`,
34
35   `enableScreenShare` and `disableScreenShare`.
36
375. Ask me for a token from app.videosdk.live/api-keys, set it as `token` on
38
39   `MeetingViewController`, then run on a real device, since the camera does not
40
41   work in the simulator.
42
43REFERENCE
44
45https://docs.videosdk.live/ios/guide/video-and-audio-calling-api-sdk/quick-start-swiftui.md
Prerequisites
Before you begin, make sure you have:
- iOS 11.0+
- Xcode 12.0+
- Swift 5.0+
- A VideoSDK developer account
- CocoaPods installed, for running
pod initandpod install - An auth token, generated with the videosdk-server-api-example or from the VideoSDK Dashboard
Production note: A temporary dashboard token is suitable only for development and testing. In production, generate short-lived access tokens on a secure server. Never ship your VideoSDK API secret inside an app binary or a public repository.
App Architecture
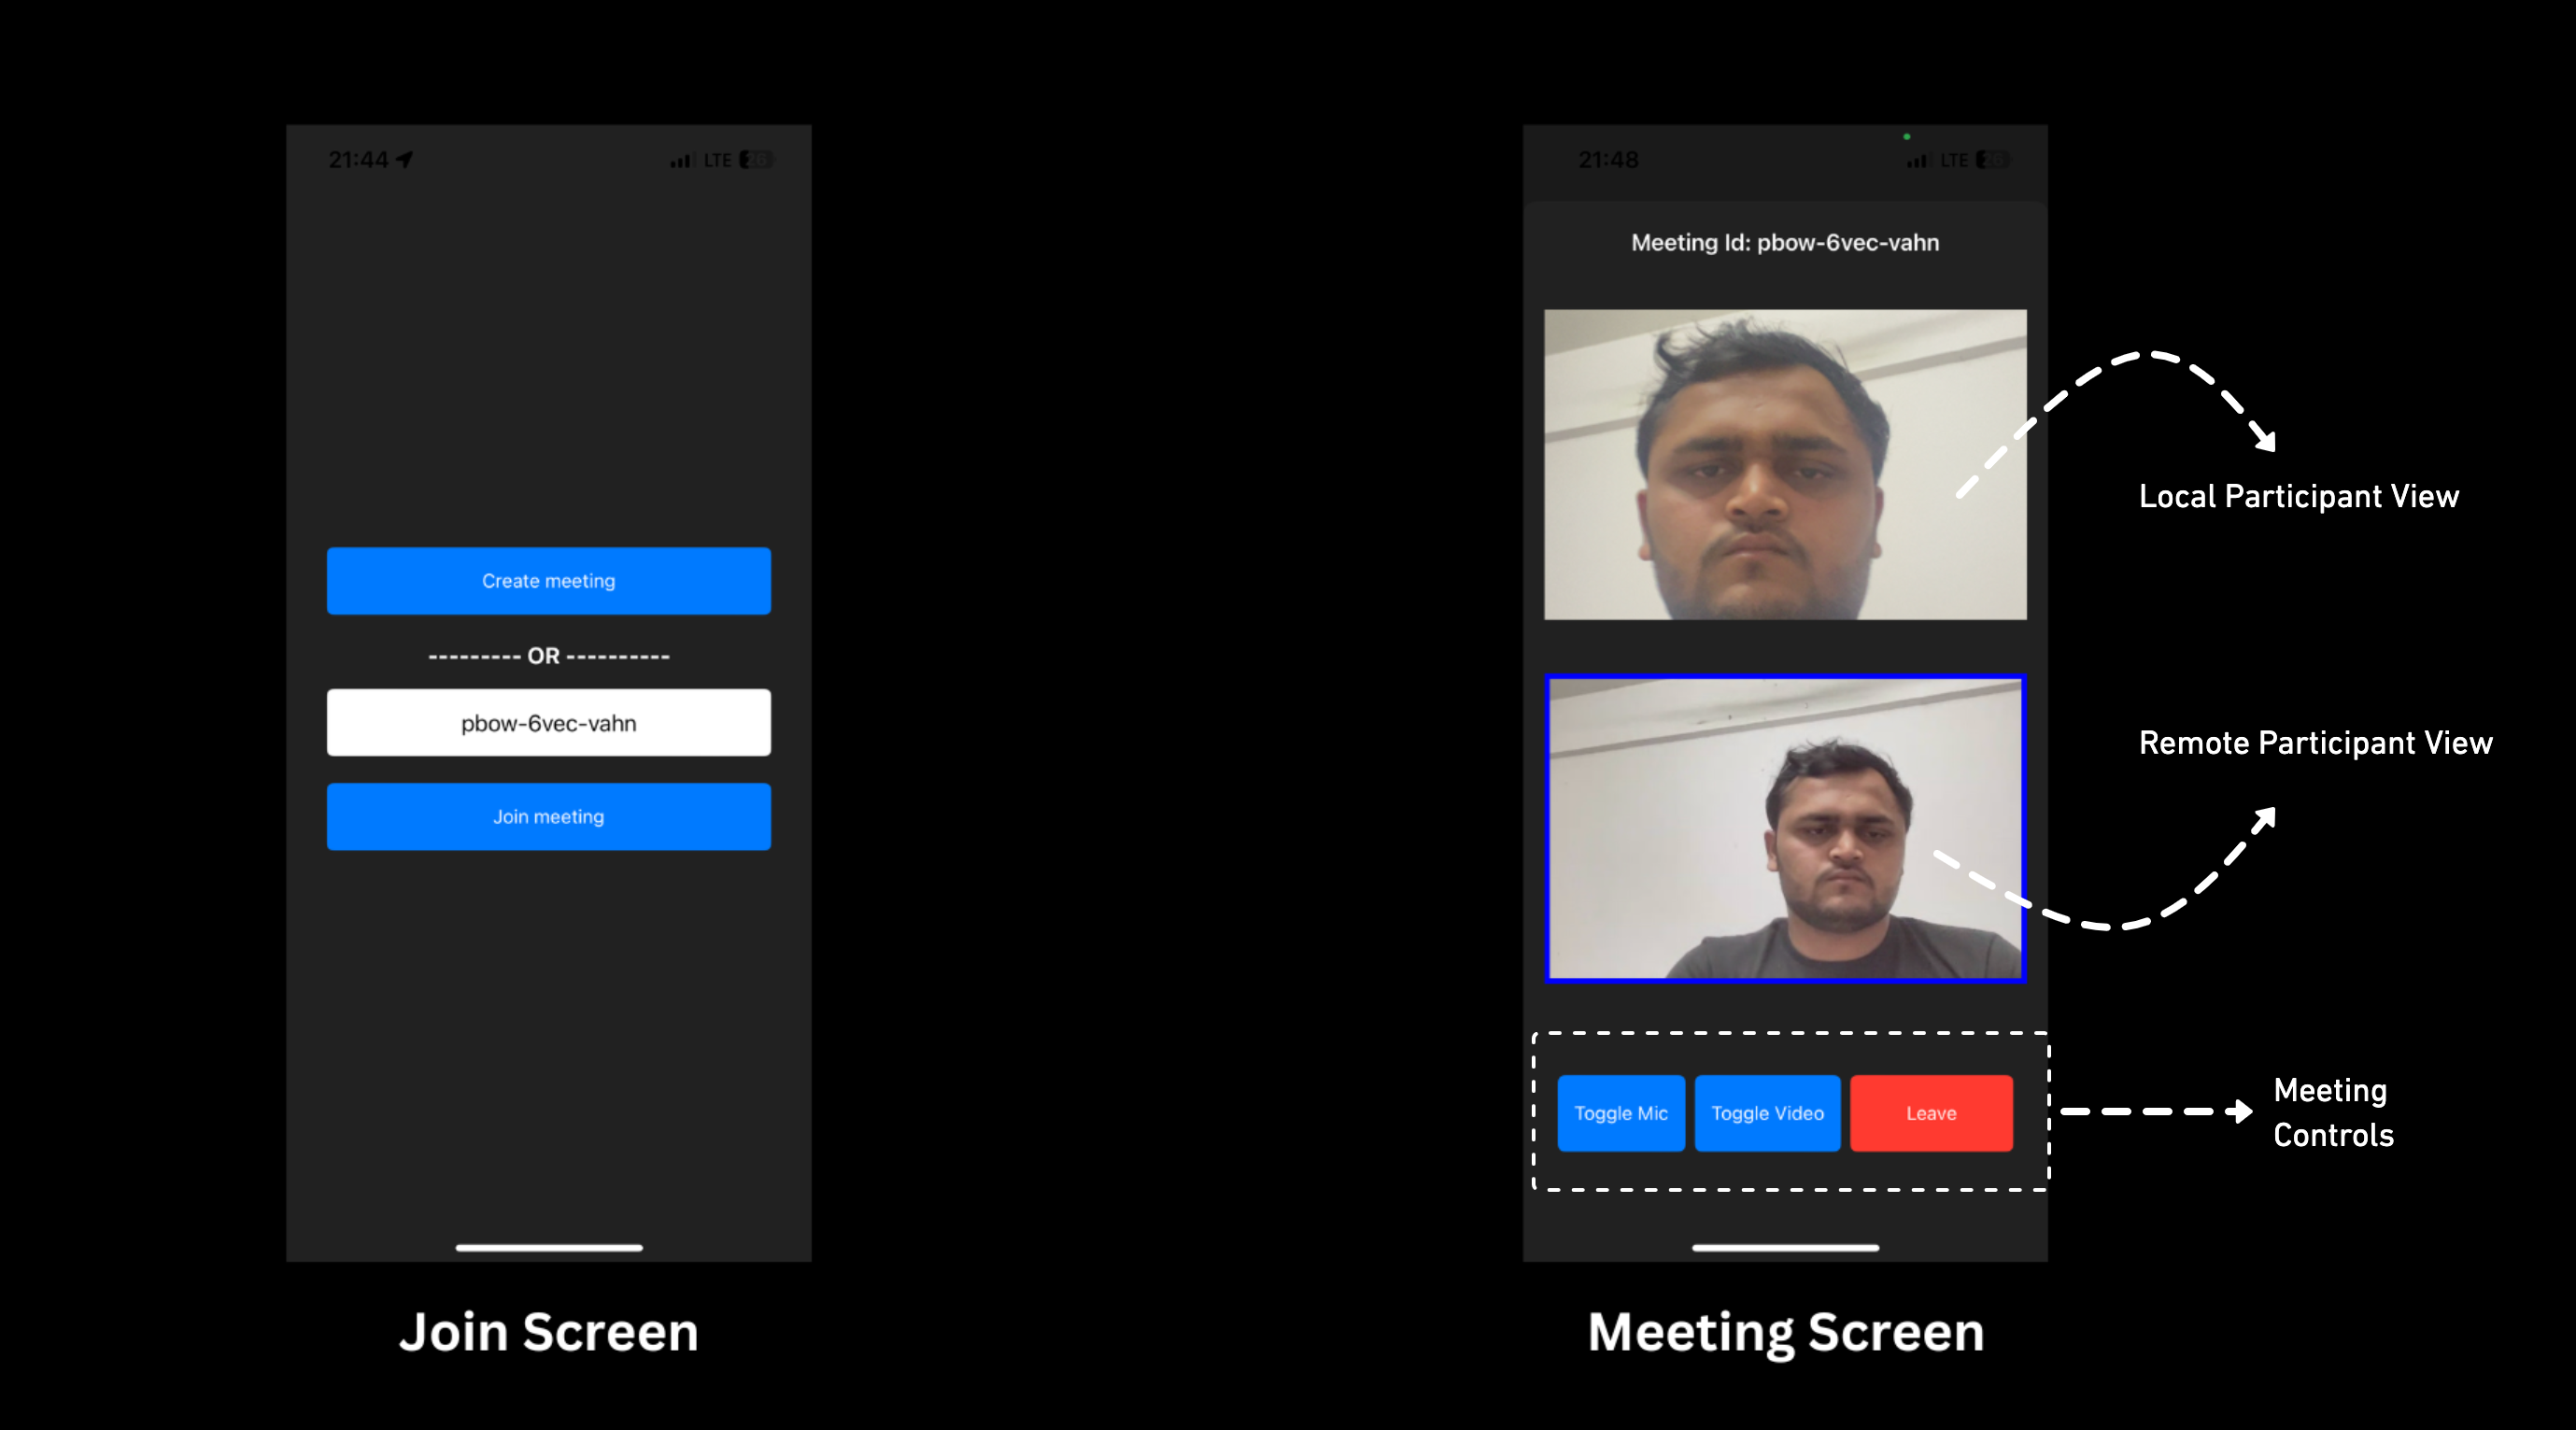
This app will contain two screens:
Join Screen: This screen allows the user to either create a meeting or join a predefined meeting.Meeting Screen: This screen basically contains the local and remote participant view and some meeting controls such as Enable / Disable Mic & Camera and Leave meeting.
Getting Started With the Code!
This tutorial builds the app in small, testable pieces. You will create the Xcode project, install the SDK with CocoaPods, add the data models and API client, and then implement the join screen, the meeting screen, the call controls, and the two event listeners that drive the UI.
Step 1: Create App
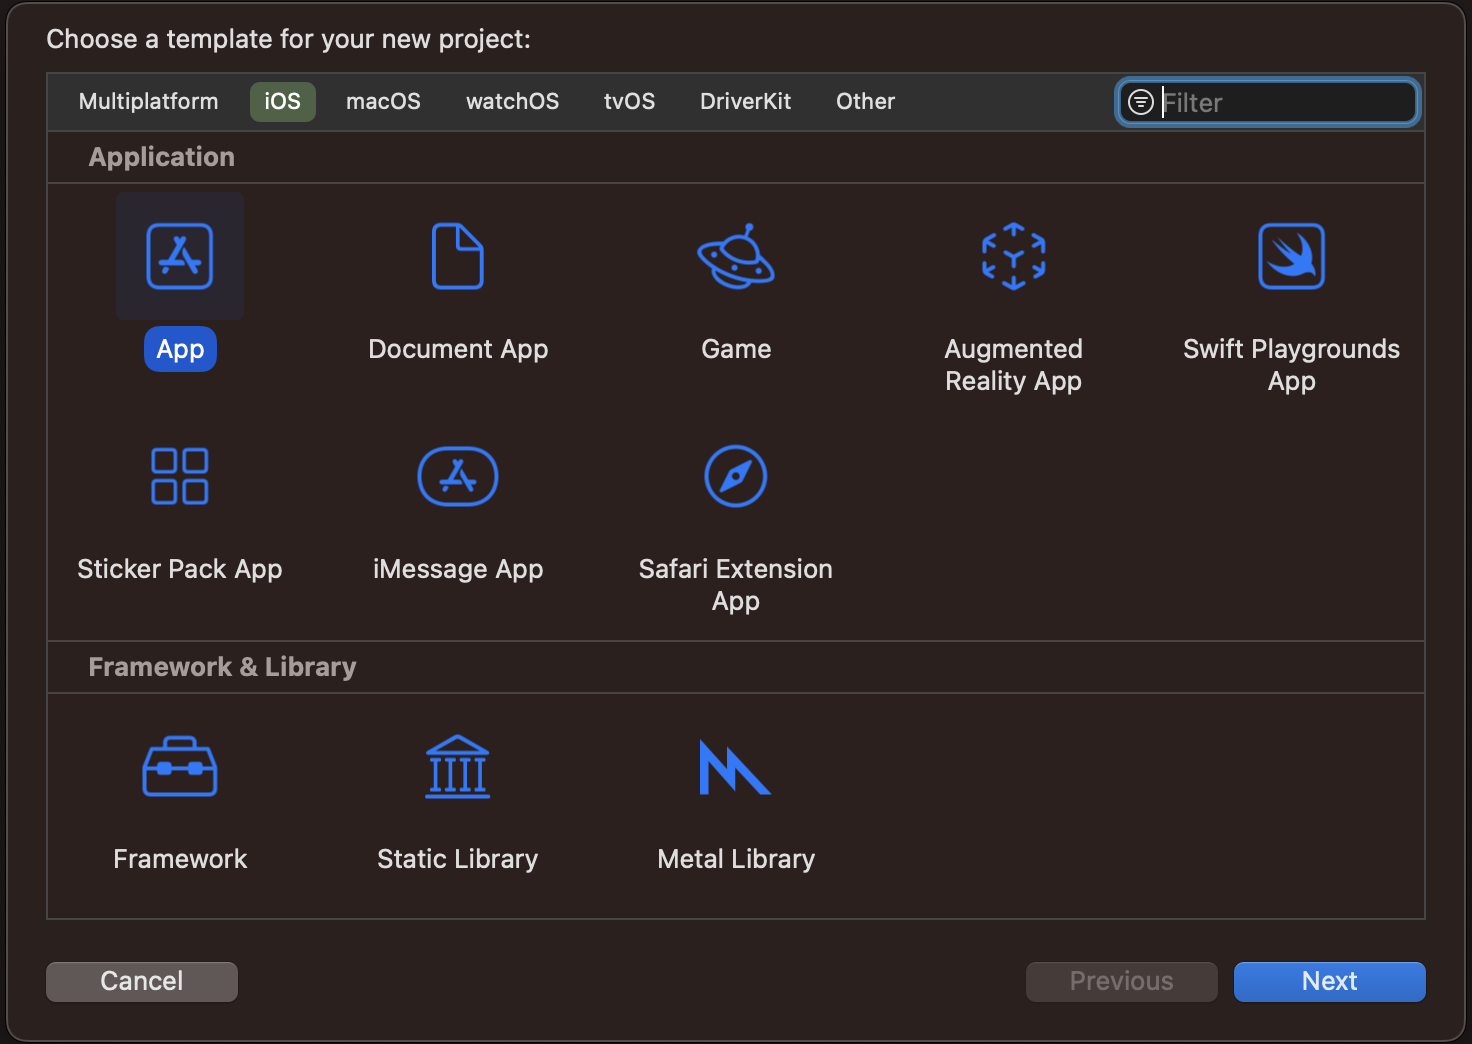
Step 1: Create a new application by selecting Create a new Xcode project
Step 2: Choose App then click Next
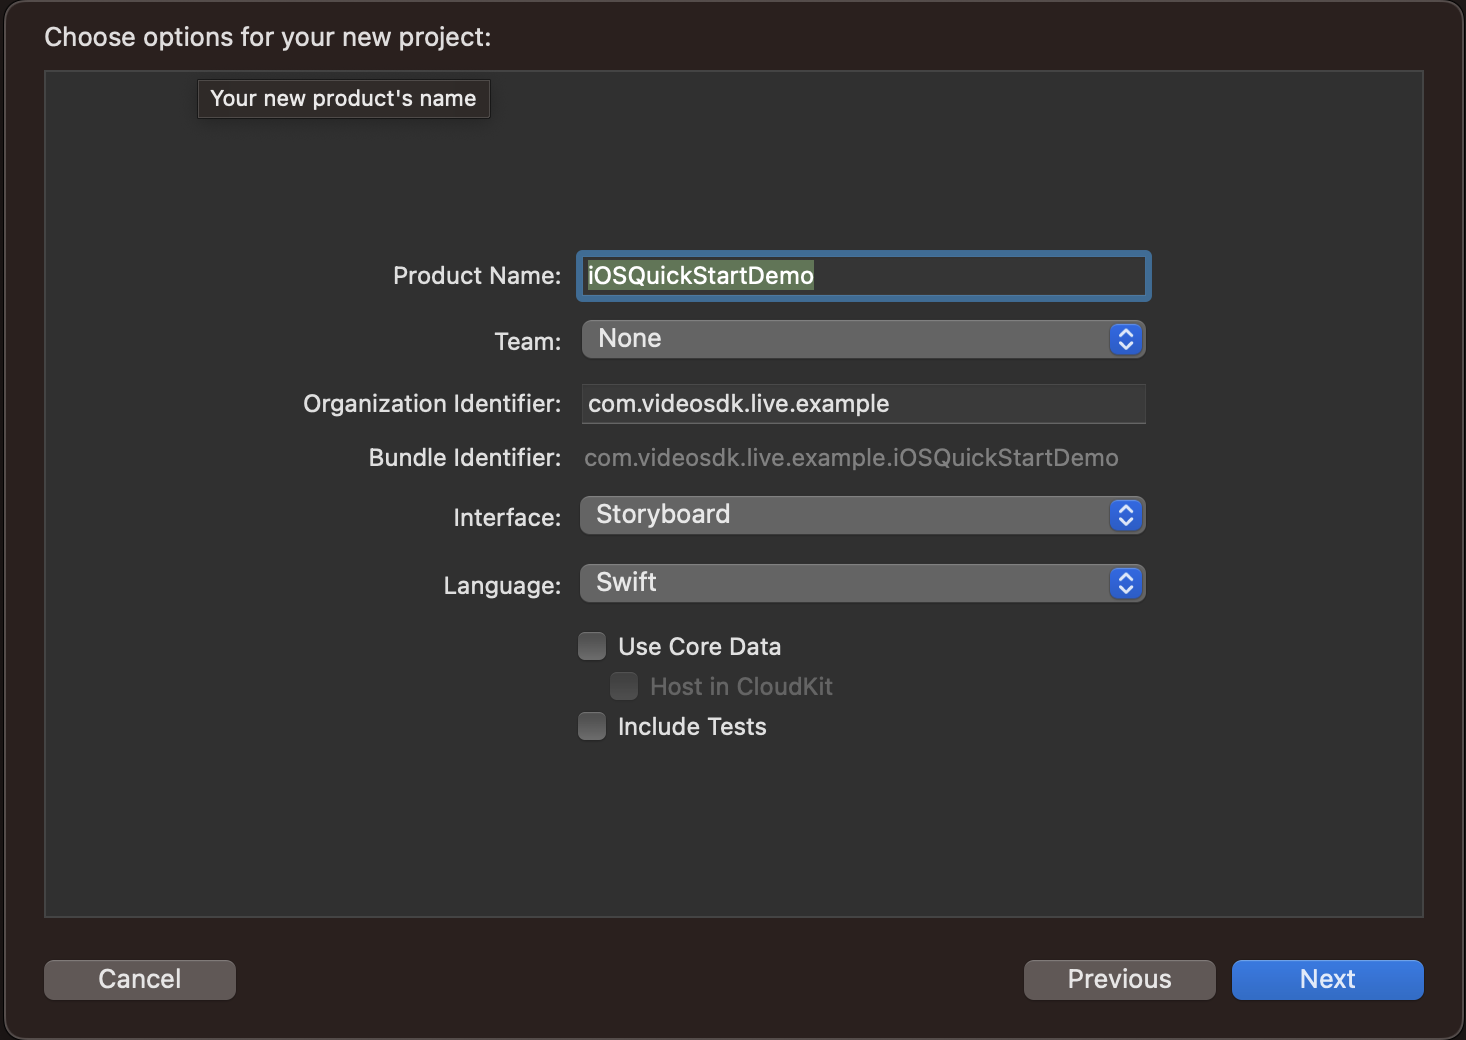
Step 3: Add Product Name and Save the project.
Step 2: VideoSDK Installation
To install VideoSDK, you must initialise the pod on the project by running the following command.
1pod initIt will create the Podfile in your project folder, open that file and add the dependency for the VideoSDK like below:
1pod 'VideoSDKRTC', :git => 'https://github.com/videosdk-live/videosdk-rtc-ios-sdk.git'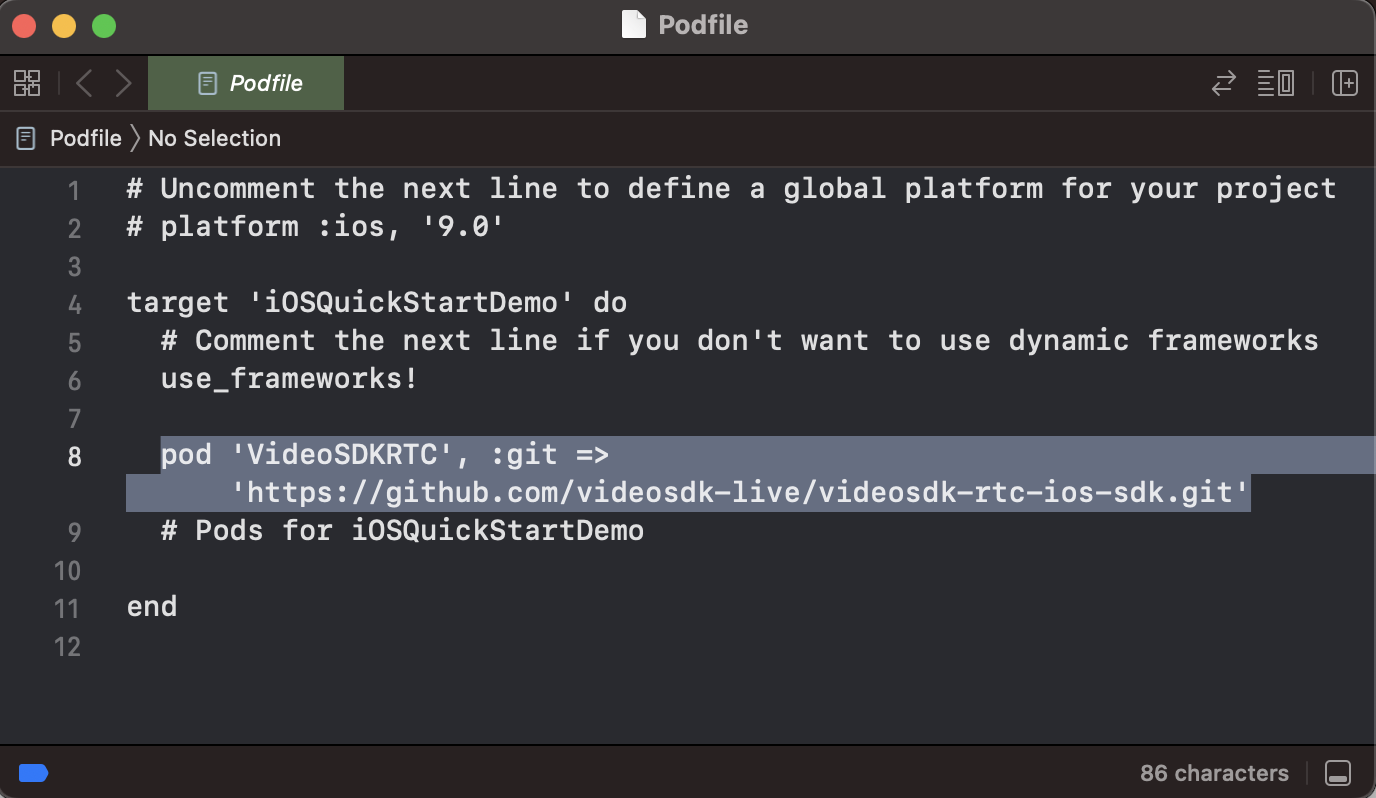
then run the below code to install the pod:
1pod installthen declare the permissions in Info.plist :
1<key>NSCameraUsageDescription</key>
2<string>Camera permission description</string>
3<key>NSMicrophoneUsageDescription</key>
4<string>Microphone permission description</string>
Step 3: Project Structure
1iOSQuickStartDemo
2   ├── Models
3        ├── RoomStruct.swift
4        └── MeetingData.swift
5   ├── ViewControllers
6        ├── StartMeetingViewController.swift
7        └── MeetingViewController.swift
8   ├── AppDelegate.swift // Default
9   ├── SceneDelegate.swift // Default
10   └── APIService
11           └── APIService.swift
12   ├── Main.storyboard // Default
13   ├── LaunchScreen.storyboard // Default
14   └── Info.plist // Default
15 Pods
16     └── Podfile
Main.storyboard Design
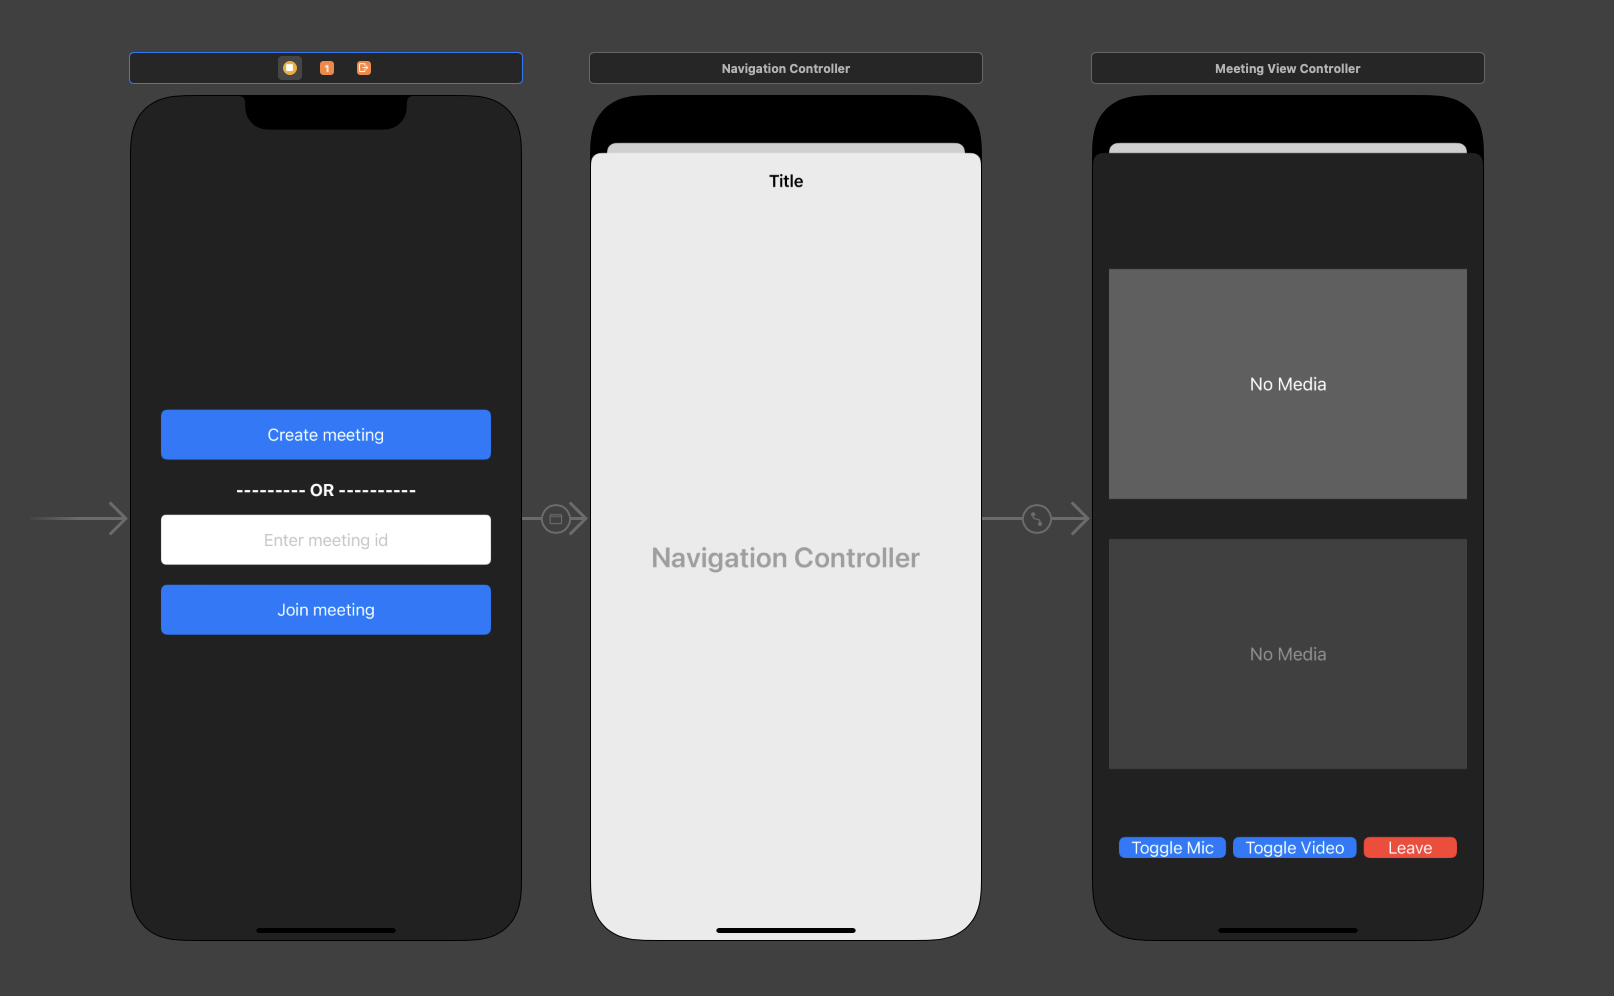
Wire the outlets and actions used in Steps 7 and 8 to the views in this storyboard. The code will not run until each @IBOutlet and @IBAction is connected.
Step 4: Create Models
Create swift file for MeetingData and RoomStruct class model for setting data in object pattern.
1import Foundation
2
3struct MeetingData {
4    let token: String
5    let name: String
6    let meetingId: String
7    let micEnabled: Bool
8    let cameraEnabled: Bool
9}1import Foundation
2
3struct RoomsStruct: Codable {
4 let createdAt, updatedAt, roomID: String?
5 let links: Links?
6 let id: String?
7
8 enum CodingKeys: String, CodingKey {
9 case createdAt, updatedAt
10 case roomID = "roomId"
11 case links, id
12 }
13}
14
15// MARK: - Links
16struct Links: Codable {
17 let getRoom, getSession: String?
18
19 enum CodingKeys: String, CodingKey {
20 case getRoom = "get_room"
21 case getSession = "get_session"
22 }
23}MeetingData carries the token, participant name, meeting ID, and the initial mic and camera state from the join screen to the meeting screen. RoomsStruct decodes the response from the VideoSDK Rooms API.
Step 5: Get Started with APIClient
Before jumping to anything else, we have to write API to generate unique meetingId. You will require Auth token, you can generate it using either videosdk-server-api-example or generate it from the VideoSDK Dashboard for developer.
1import Foundation
2
3let TOKEN_STRING: String = "<AUTH_TOKEN>";
4
5class APIService {
6
7    class func createMeeting(token: String, completion: @escaping (Result<String, Error>) -> Void) {
8        let url = URL(string: "https://api.videosdk.live/v2/rooms")!
9
10        var request = URLRequest(url: url)
11        request.httpMethod = "POST"
12        request.addValue(TOKEN_STRING, forHTTPHeaderField: "authorization")
13
14        URLSession.shared.dataTask(with: request, completionHandler: { (data: Data?, response: URLResponse?, error: Error?) in
15            DispatchQueue.main.async {
16                if let data = data, let utf8Text = String(data: data, encoding: .utf8)
17                {
18                    do{
19                        let dataArray = try JSONDecoder().decode(RoomsStruct.self,from: data)
20                        completion(.success(dataArray.roomID ?? ""))
21                    } catch {
22                        print("Error while creating a meeting: \(error)")
23                        completion(.failure(error))
24                    }
25                }
26            }
27        }).resume()
28    }
29}
Step 6: Implement Join Screen
Join screen will work as medium to either schedule new meeting or to join existing meeting.
1import Foundation
2import UIKit
3
4class StartMeetingViewController: UIViewController, UITextFieldDelegate {
5
6        private var serverToken = ""
7
8        /// MARK: outlet for create meeting button
9        @IBOutlet weak var btnCreateMeeting: UIButton!
10
11        /// MARK: outlet for join meeting button
12        @IBOutlet weak var btnJoinMeeting: UIButton!
13
14        /// MARK: outlet for meetingId textfield
15        @IBOutlet weak var txtMeetingId: UITextField!
16
17        /// MARK: Initialize the private variable with TOKEN_STRING &
18        /// setting the meeting id in the textfield
19        override func viewDidLoad() {
20            txtMeetingId.delegate = self
21            serverToken = TOKEN_STRING
22            txtMeetingId.text = "PROVIDE-STATIC-MEETING-ID"
23        }
24
25        /// MARK: method for joining meeting through seague named as "StartMeeting"
26        /// after validating the serverToken in not empty
27        func joinMeeting() {
28            txtMeetingId.resignFirstResponder()
29
30            if !serverToken.isEmpty {
31                DispatchQueue.main.async {
32                    self.dismiss(animated: true) {
33                        self.performSegue(withIdentifier: "StartMeeting", sender: nil)
34                    }
35                }
36            } else {
37                print("Please provide auth token to start the meeting.")
38            }
39        }
40
41        /// MARK: outlet for create meeting button tap event
42        @IBAction func btnCreateMeetingTapped(_ sender: Any) {
43                print("show loader while meeting gets connected with server")
44            joinRoom()
45        }
46
47        /// MARK: outlet for join meeting button tap event
48        @IBAction func btnJoinMeetingTapped(_ sender: Any) {
49            if((txtMeetingId.text ?? "").isEmpty){
50
51                        print("Please provide meeting id to start the meeting.")
52                txtMeetingId.resignFirstResponder()
53            } else {
54                joinMeeting()
55            }
56        }
57
58        // MARK: - method for creating room api call and getting meetingId for joining meeting
59
60        func joinRoom() {
61
62           APIService.createMeeting(token: self.serverToken) { result in
63            if case .success(let meetingId) = result {
64                DispatchQueue.main.async {
65                    self.txtMeetingId.text = meetingId
66                    self.joinMeeting()
67                }
68            }
69        }
70        }
71
72        /// MARK: preparing to animate to meetingViewController screen
73        override func prepare(for segue: UIStoryboardSegue, sender: Any?) {
74
75            guard let navigation = segue.destination as? UINavigationController,
76                  let meetingViewController = navigation.topViewController as? MeetingViewController else {
77                  return
78              }
79
80            meetingViewController.meetingData = MeetingData(
81                token: serverToken,
82                name: txtMeetingId.text ?? "Guest",
83                meetingId: txtMeetingId.text ?? "",
84                micEnabled: true,
85                cameraEnabled: true
86            )
87        }
88   }
89
Output
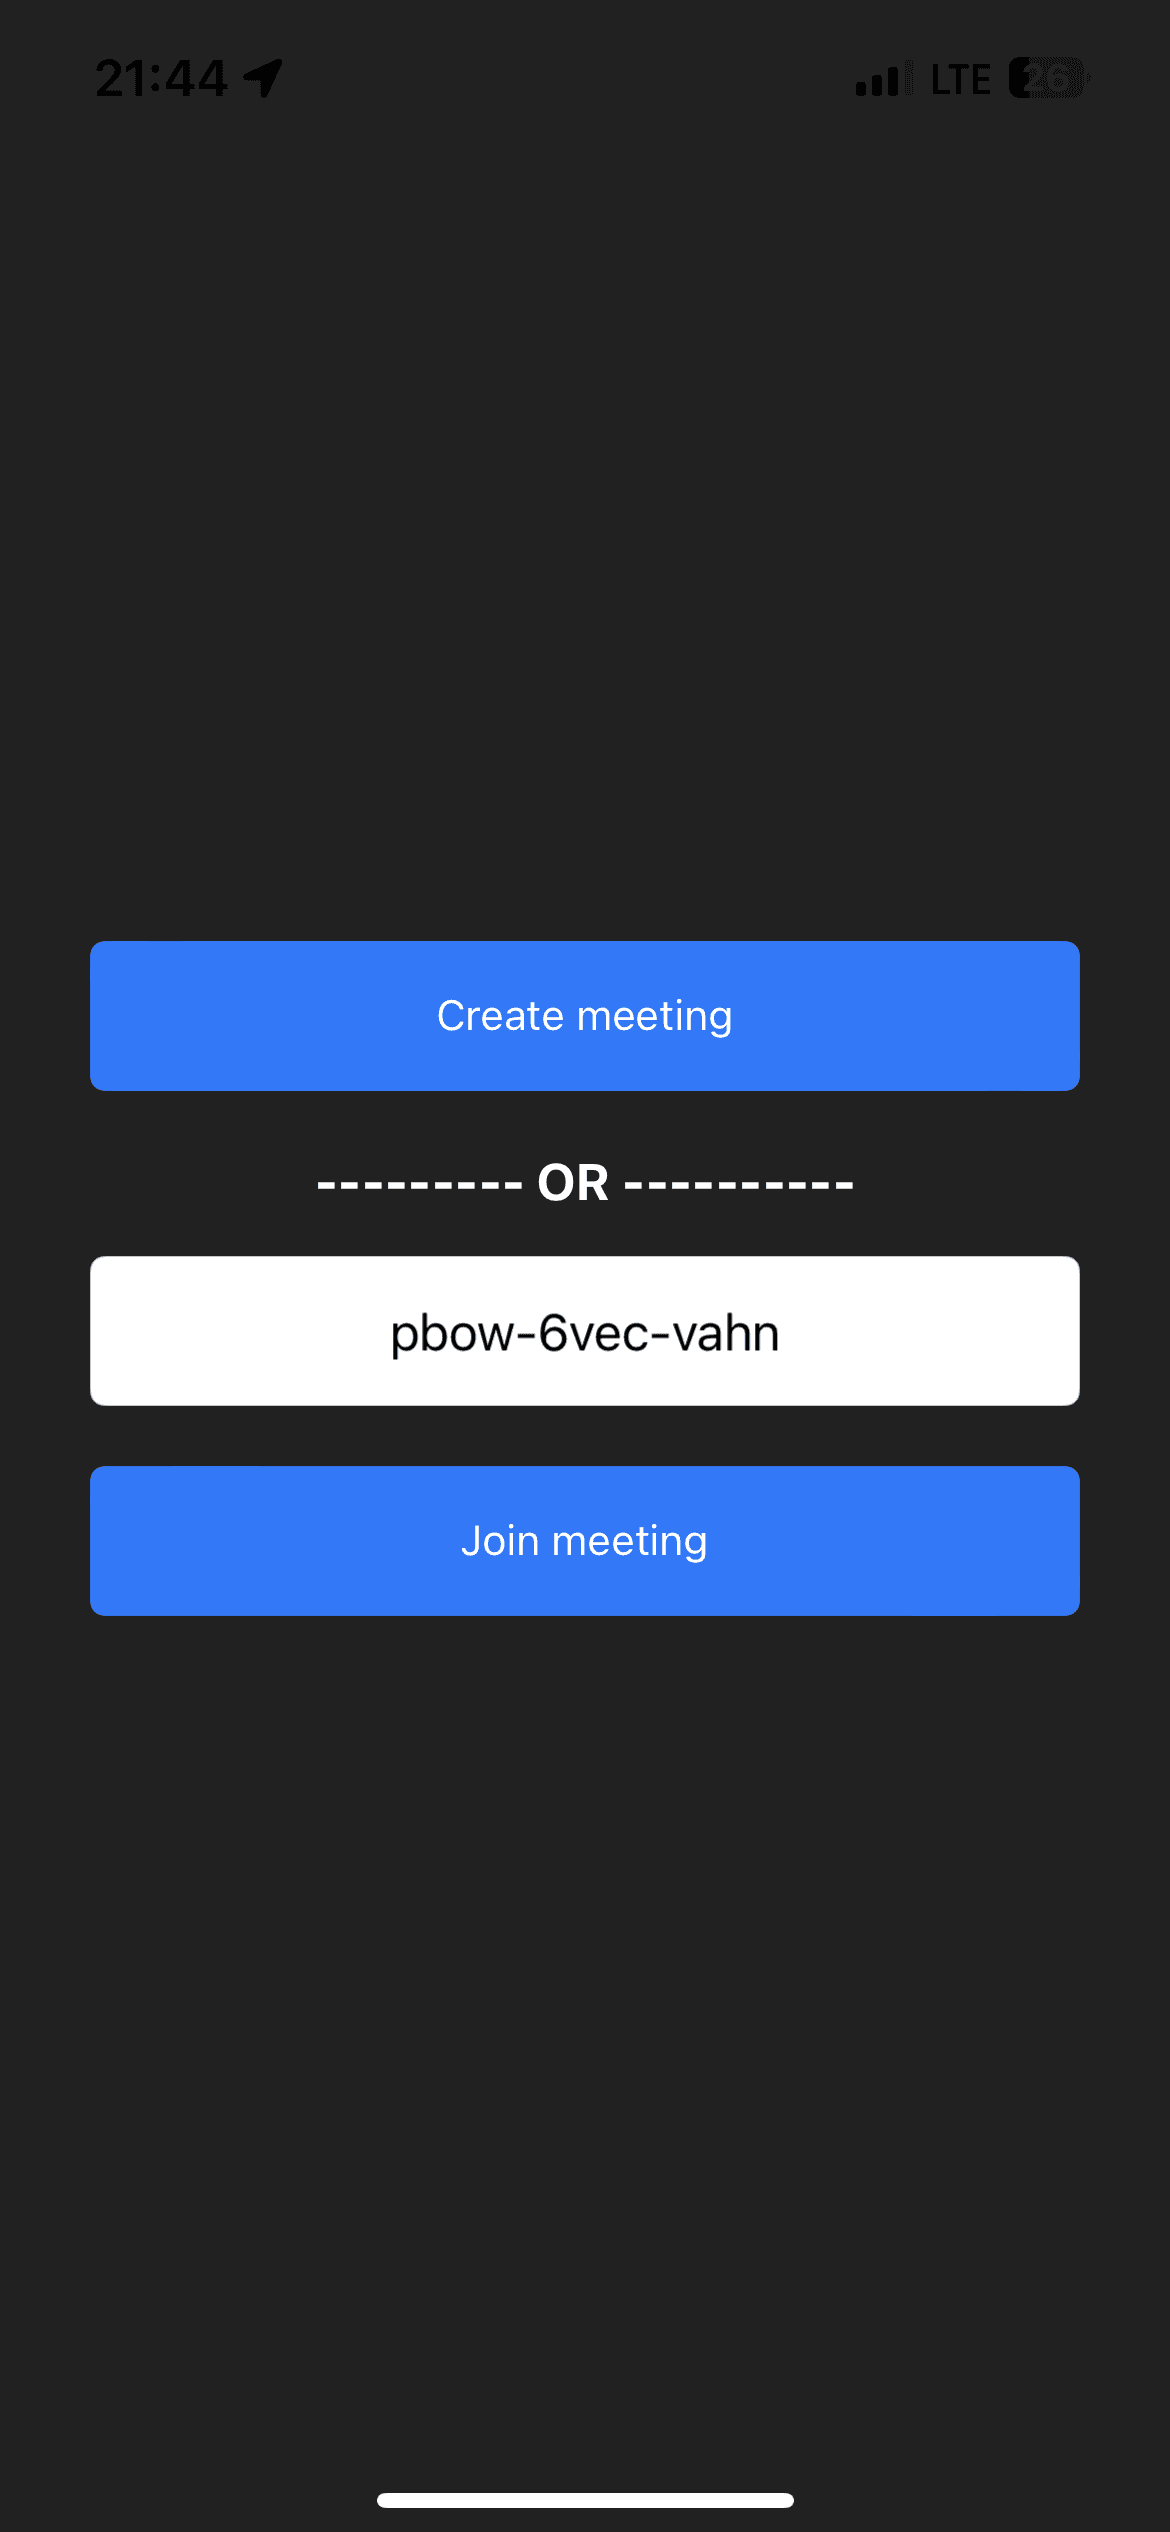
Step 7: Initialize and Join Meeting
Using the provided token and meetingId, we will configure and initialise the meeting in viewDidLoad().
Then, we'll add @IBOutlet for localParticipantVideoView and remoteParticipantVideoView, which can render local and remote participant media respectively.
1import UIKit
2import VideoSDKRTC
3import WebRTC
4import AVFoundation
5
6class MeetingViewController: UIViewController {
7
8    // MARK: - Properties
9
10    // outlet for local participant container view
11    @IBOutlet weak var localParticipantViewContainer: UIView!
12
13    // outlet for label for meeting Id
14    @IBOutlet weak var lblMeetingId: UILabel!
15
16    // outlet for local participant video view
17    @IBOutlet weak var localParticipantVideoView: RTCMTLVideoView!
18
19    // outlet for remote participant video view
20    @IBOutlet weak var remoteParticipantVideoView: RTCMTLVideoView!
21
22    // outlet for remote participant no media label
23    @IBOutlet weak var lblRemoteParticipantNoMedia: UILabel!
24
25    // outlet for remote participant container view
26    @IBOutlet weak var remoteParticipantViewContainer: UIView!
27
28    // outlet for local participant no media label
29    @IBOutlet weak var lblLocalParticipantNoMedia: UILabel!
30
31    /// Meeting data - required to start
32    var meetingData: MeetingData!
33
34    /// current meeting reference
35    private var meeting: Meeting?
36
37    // MARK: - video participants including self to show in UI
38    private var participants: [Participant] = []
39
40    // MARK: - Lifecycle Events
41
42    override func viewDidLoad() {
43        super.viewDidLoad()
44        // configure the VideoSDK with token
45        VideoSDK.config(token: meetingData.token)
46
47        // init meeting
48        initializeMeeting()
49
50        // set meeting id in button text
51        lblMeetingId.text = "Meeting Id: \(meetingData.meetingId)"
52    }
53
54    override func viewWillAppear(_ animated: Bool) {
55        super.viewWillAppear(animated)
56        navigationController?.navigationBar.isHidden = true
57    }
58
59    override func viewWillDisappear(_ animated: Bool) {
60        super.viewWillDisappear(animated)
61        navigationController?.navigationBar.isHidden = false
62        NotificationCenter.default.removeObserver(self)
63    }
64
65    // MARK: - Meeting
66
67    private func initializeMeeting() {
68
69        // Initialize the VideoSDK
70        meeting = VideoSDK.initMeeting(
71            meetingId: meetingData.meetingId,
72            participantName: meetingData.name,
73            micEnabled: meetingData.micEnabled,
74            webcamEnabled: meetingData.cameraEnabled
75        )
76
77        // Adding the listener to meeting
78        meeting?.addEventListener(self)
79
80        // joining the meeting
81        meeting?.join()
82    }
83}
micEnabled and webcamEnabled are read from the MeetingData object passed in by the join screen, so the participant publishes camera and microphone media as soon as join() succeeds.
Step 8: Implement Controls
After initialising the meeting in the previous step, we will now add @IBOutlet for btnLeave, btnToggleVideo and btnToggleMic which can control the media in the meeting.
In the block below, ... marks the code you already wrote in Step 7. Add these members inside the same MeetingViewController class.
1class MeetingViewController: UIViewController {
2
3    ...
4
5    // outlet for leave button
6    @IBOutlet weak var btnLeave: UIButton!
7
8    // outlet for toggle video button
9    @IBOutlet weak var btnToggleVideo: UIButton!
10
11    // outlet for toggle audio button
12    @IBOutlet weak var btnToggleMic: UIButton!
13
14    // bool for mic
15    var micEnabled = true
16    // bool for video
17    var videoEnabled = true
18
19    // outlet for leave button click event
20    @IBAction func btnLeaveTapped(_ sender: Any) {
21        DispatchQueue.main.async {
22            self.meeting?.leave()
23            self.dismiss(animated: true)
24        }
25    }
26
27    // outlet for toggle mic button click event
28    @IBAction func btnToggleMicTapped(_ sender: Any) {
29        if micEnabled {
30            micEnabled = !micEnabled // false
31            self.meeting?.muteMic()
32        } else {
33            micEnabled = !micEnabled // true
34            self.meeting?.unmuteMic()
35        }
36    }
37
38    // outlet for toggle video button click event
39    @IBAction func btnToggleVideoTapped(_ sender: Any) {
40        if videoEnabled {
41            videoEnabled = !videoEnabled // false
42            self.meeting?.disableWebcam()
43        } else {
44            videoEnabled = !videoEnabled // true
45            self.meeting?.enableWebcam()
46        }
47    }
48
49    ...
50
51}
Output
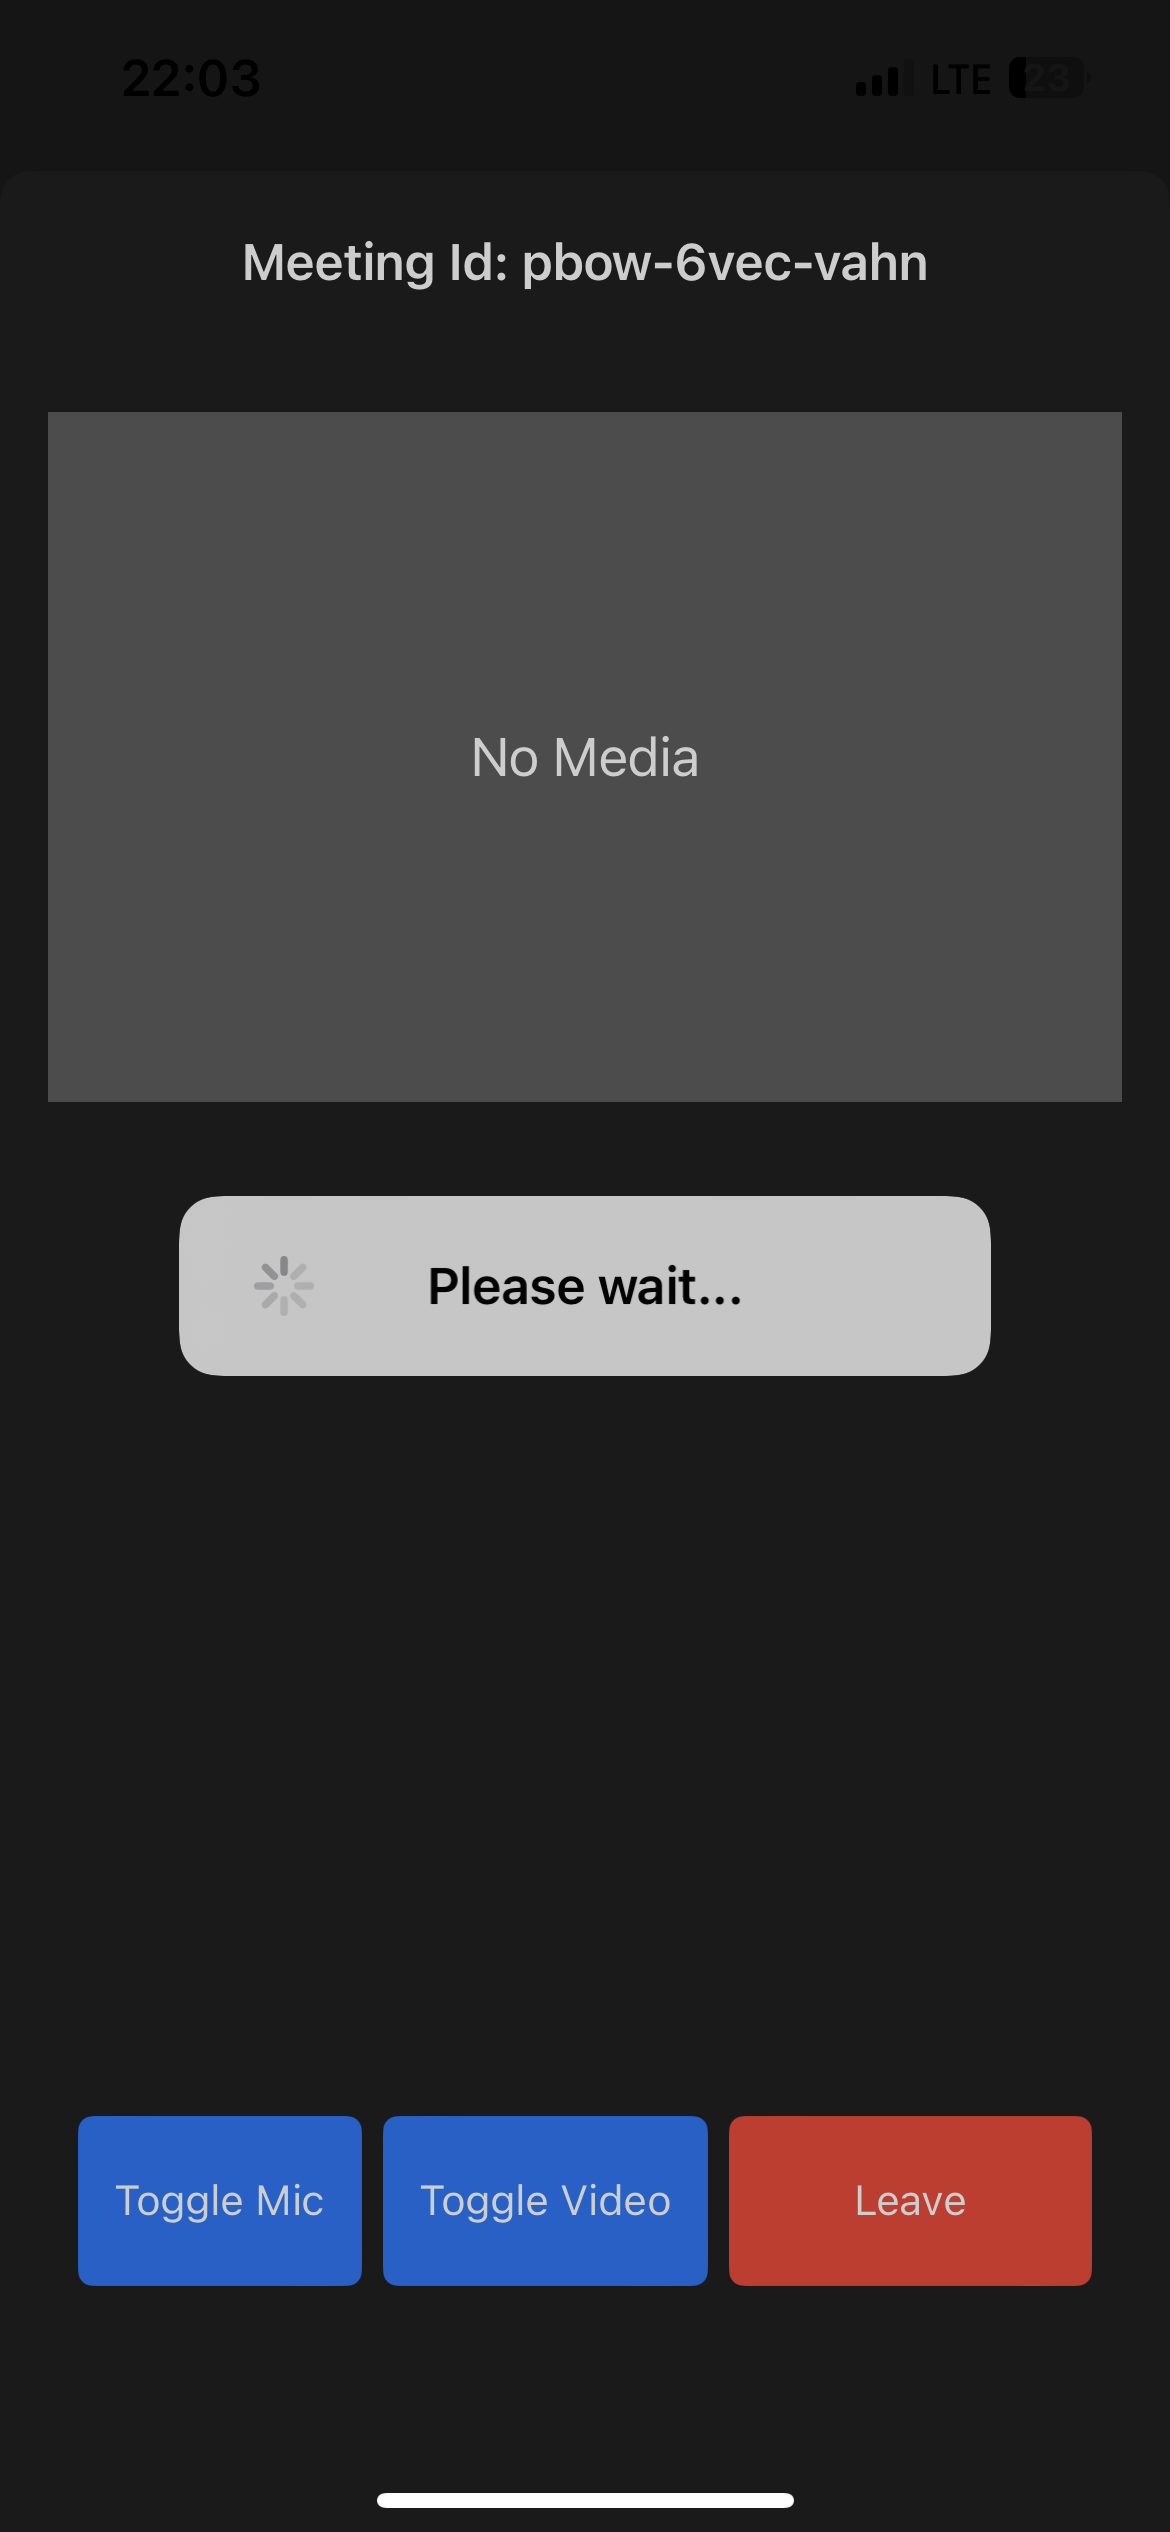
Step 9: Implementing MeetingEventListener
In this step, we'll create an extension for the MeetingViewController that implements the MeetingEventListener, which implements the onMeetingJoined, onMeetingLeft, onParticipantJoined, onParticipantLeft, onParticipantChanged, onSpeakerChanged, etc. methods.
Add this extension at file scope in MeetingViewController.swift, below the closing brace of the class.
1extension MeetingViewController: MeetingEventListener {
2
3    /// Meeting started
4    func onMeetingJoined() {
5
6        // handle local participant on start
7        guard let localParticipant = self.meeting?.localParticipant else { return }
8        // add to list
9        participants.append(localParticipant)
10
11        // add event listener
12        localParticipant.addEventListener(self)
13
14        localParticipant.setQuality(.high)
15
16        if(localParticipant.isLocal){
17            self.localParticipantViewContainer.isHidden = false
18        } else {
19            self.remoteParticipantViewContainer.isHidden = false
20        }
21    }
22
23    /// Meeting ended
24    func onMeetingLeft() {
25        // remove listeners
26        meeting?.localParticipant.removeEventListener(self)
27        meeting?.removeEventListener(self)
28    }
29
30    /// A new participant joined
31    func onParticipantJoined(_ participant: Participant) {
32        participants.append(participant)
33
34        // add listener
35        participant.addEventListener(self)
36
37        participant.setQuality(.high)
38
39        if(participant.isLocal){
40            self.localParticipantViewContainer.isHidden = false
41        } else {
42            self.remoteParticipantViewContainer.isHidden = false
43        }
44    }
45
46    /// A participant left from the meeting
47    /// - Parameter participant: participant object
48    func onParticipantLeft(_ participant: Participant) {
49        participant.removeEventListener(self)
50        guard let index = self.participants.firstIndex(where: { $0.id == participant.id }) else {
51            return
52        }
53        // remove participant from list
54        participants.remove(at: index)
55        // hide from ui
56        UIView.animate(withDuration: 0.5){
57            if(!participant.isLocal){
58                self.remoteParticipantViewContainer.isHidden = true
59            }
60        }
61    }
62
63    /// Called when speaker is changed
64    /// - Parameter participantId: participant id of the speaker, nil when no one is speaking.
65    func onSpeakerChanged(participantId: String?) {
66
67        // show indication for active speaker
68        if let participant = participants.first(where: { $0.id == participantId }) {
69            self.showActiveSpeakerIndicator(participant.isLocal ? localParticipantViewContainer : remoteParticipantViewContainer, true)
70        }
71
72        // hide indication for others participants
73        let otherParticipants = participants.filter { $0.id != participantId }
74        for participant in otherParticipants {
75            if participants.count > 1 && participant.isLocal {
76                showActiveSpeakerIndicator(localParticipantViewContainer, false)
77            } else {
78                showActiveSpeakerIndicator(remoteParticipantViewContainer, false)
79            }
80        }
81    }
82
83    func showActiveSpeakerIndicator(_ view: UIView, _ show: Bool) {
84        view.layer.borderWidth = 4.0
85        view.layer.borderColor = show ? UIColor.blue.cgColor : UIColor.clear.cgColor
86    }
87
88}
Step 10: Implementing ParticipantEventListener
In this stage, we'll add an extension for the MeetingViewController that implements the ParticipantEventListener, which implements the onStreamEnabled and onStreamDisabled methods for the audio and video of MediaStreams enabled or disabled.
The function updateUI is frequently used to control or modify the user interface (enable / disable camera & mic) in accordance with MediaStream state.
1extension MeetingViewController: ParticipantEventListener {
2
3    /// Participant has enabled mic, video or screenshare
4    /// - Parameters:
5    ///   - stream: enabled stream object
6    ///   - participant: participant object
7    func onStreamEnabled(_ stream: MediaStream, forParticipant participant: Participant) {
8        updateUI(participant: participant, forStream: stream, enabled: true)
9    }
10
11    /// Participant has disabled mic, video or screenshare
12    /// - Parameters:
13    ///   - stream: disabled stream object
14    ///   - participant: participant object
15    func onStreamDisabled(_ stream: MediaStream, forParticipant participant: Participant) {
16        updateUI(participant: participant, forStream: stream, enabled: false)
17    }
18}
19
20private extension MeetingViewController {
21
22    func updateUI(participant: Participant, forStream stream: MediaStream, enabled: Bool) { // true
23        switch stream.kind {
24        case .state(value: .video):
25            if let videotrack = stream.track as? RTCVideoTrack {
26                if enabled {
27                    DispatchQueue.main.async {
28                        UIView.animate(withDuration: 0.5){
29                            if(participant.isLocal){
30                                self.localParticipantViewContainer.isHidden =   false
31                                self.localParticipantVideoView.isHidden = false
32                                self.localParticipantVideoView.videoContentMode = .scaleAspectFill
33                                self.localParticipantViewContainer.bringSubviewToFront(self.localParticipantVideoView)
34                                videotrack.add(self.localParticipantVideoView)
35                                self.lblLocalParticipantNoMedia.isHidden = true
36                            } else {
37                                self.remoteParticipantViewContainer.isHidden = false
38                                self.remoteParticipantVideoView.isHidden = false
39                                self.remoteParticipantVideoView.videoContentMode = .scaleAspectFill
40                                self.remoteParticipantViewContainer.bringSubviewToFront(self.remoteParticipantVideoView)
41                                videotrack.add(self.remoteParticipantVideoView)
42                                self.lblRemoteParticipantNoMedia.isHidden = true
43                            }
44                        }
45                    }
46                } else {
47                    UIView.animate(withDuration: 0.5){
48                        if(participant.isLocal){
49                            self.localParticipantViewContainer.isHidden = false
50                            self.localParticipantVideoView.isHidden = true
51                            self.lblLocalParticipantNoMedia.isHidden = false
52                            videotrack.remove(self.localParticipantVideoView)
53                        } else {
54                            self.remoteParticipantViewContainer.isHidden = false
55                            self.remoteParticipantVideoView.isHidden = true
56                            self.lblRemoteParticipantNoMedia.isHidden = false
57                            videotrack.remove(self.remoteParticipantVideoView)
58                        }
59                    }
60                }
61            }
62
63        case .state(value: .audio):
64            if participant.isLocal {
65                localParticipantViewContainer.layer.borderWidth = 4.0
66                localParticipantViewContainer.layer.borderColor = enabled ? UIColor.clear.cgColor : UIColor.red.cgColor
67            } else {
68                remoteParticipantViewContainer.layer.borderWidth = 4.0
69                remoteParticipantViewContainer.layer.borderColor = enabled ? UIColor.clear.cgColor : UIColor.red.cgColor
70            }
71        default:
72            break
73        }
74    }
75}
Output
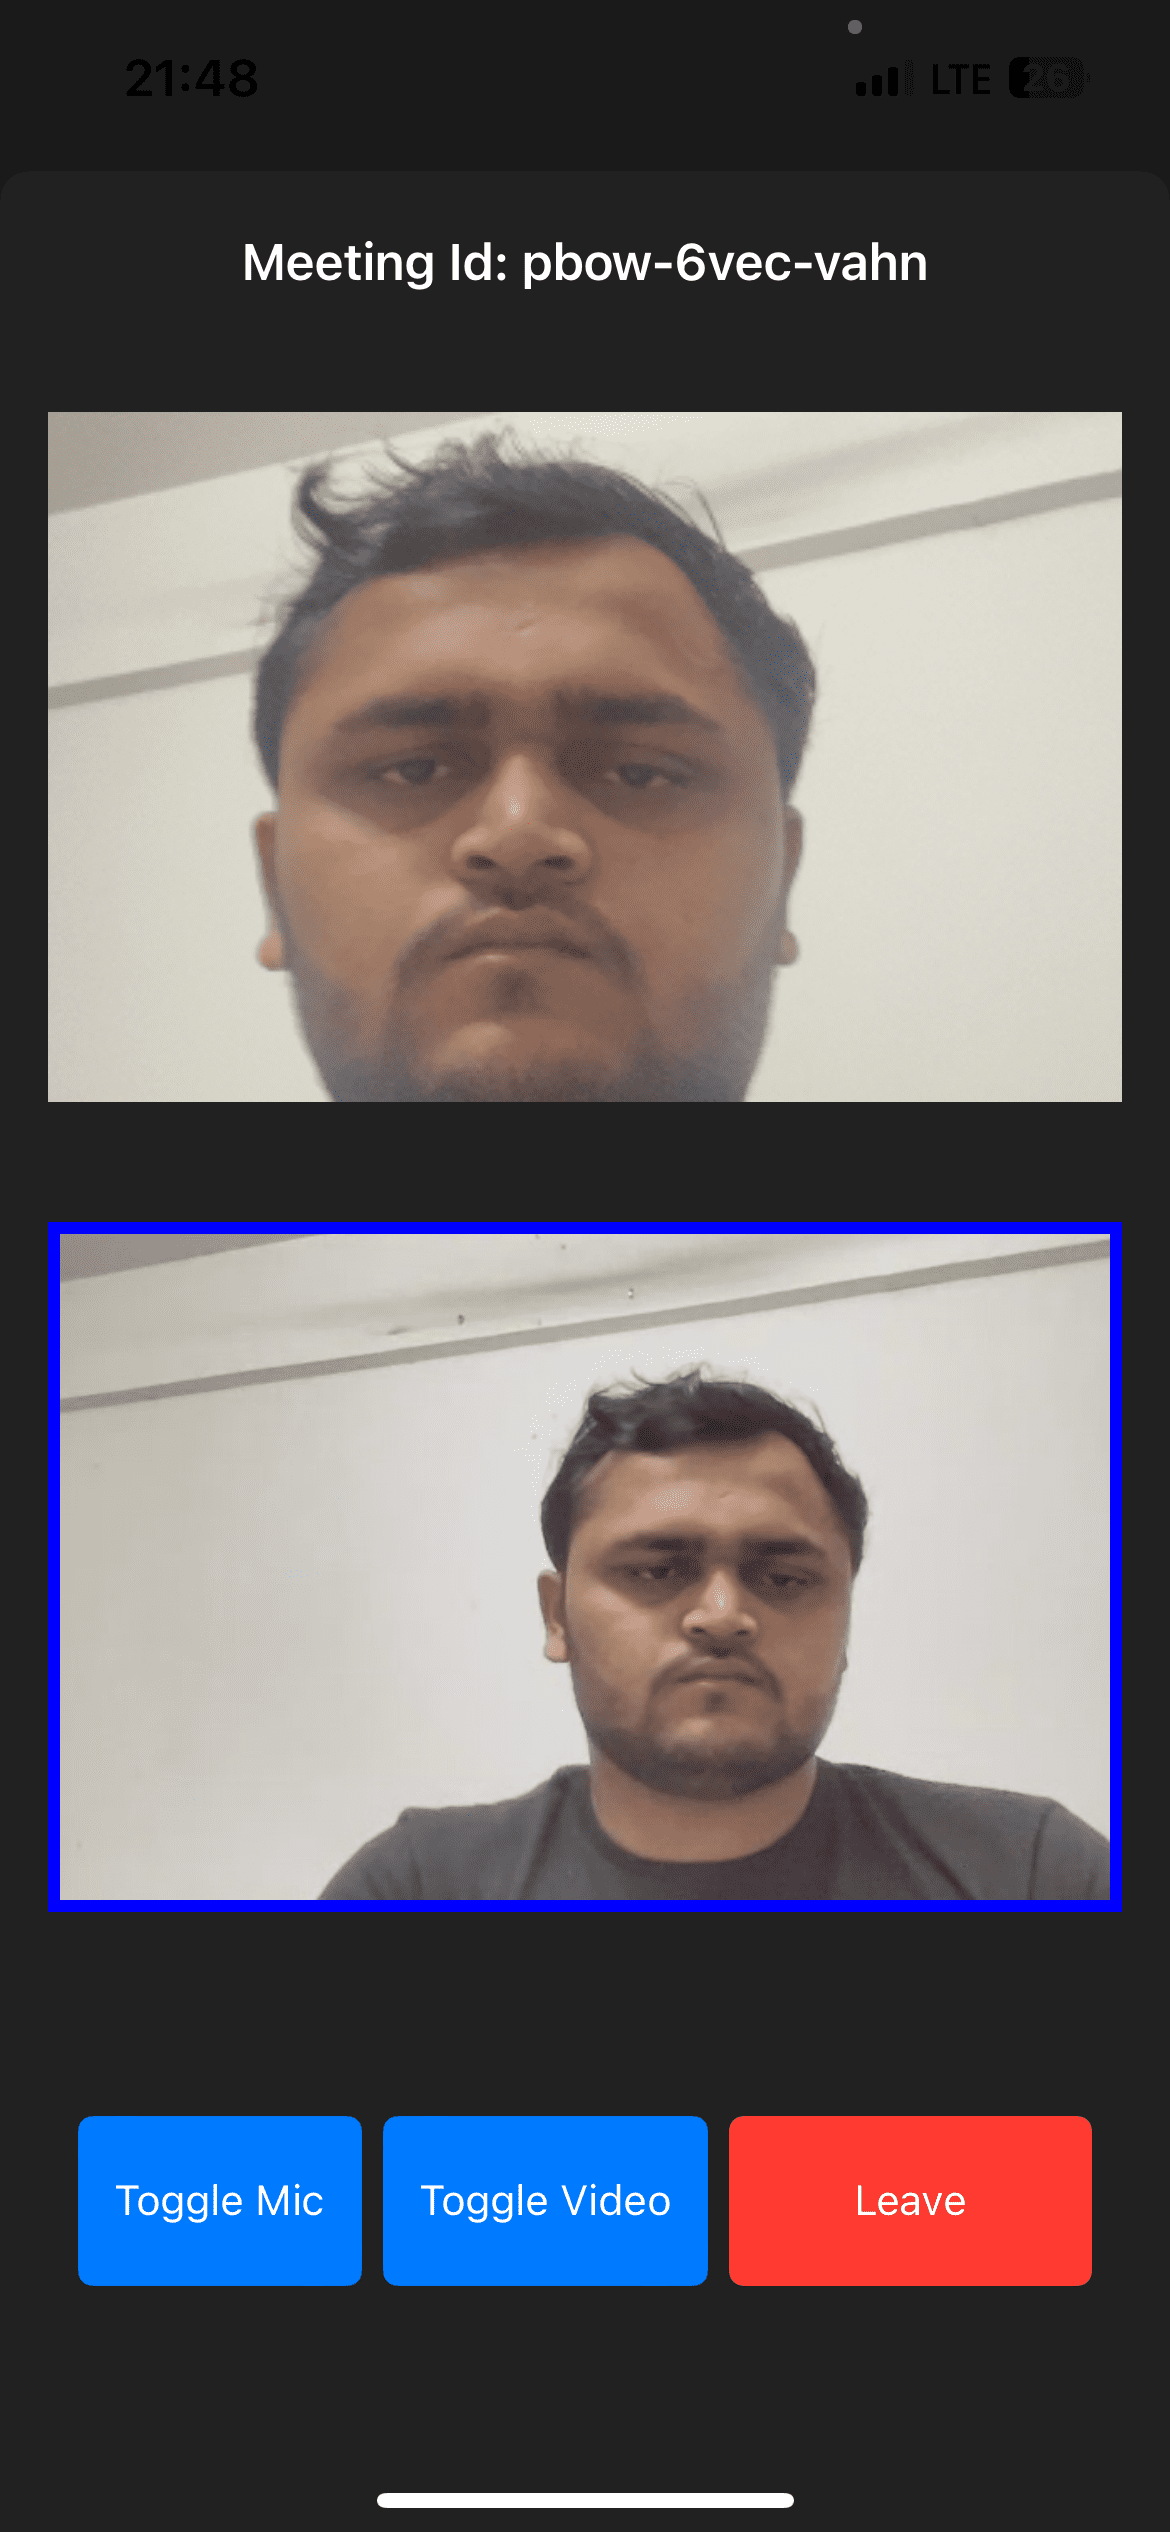
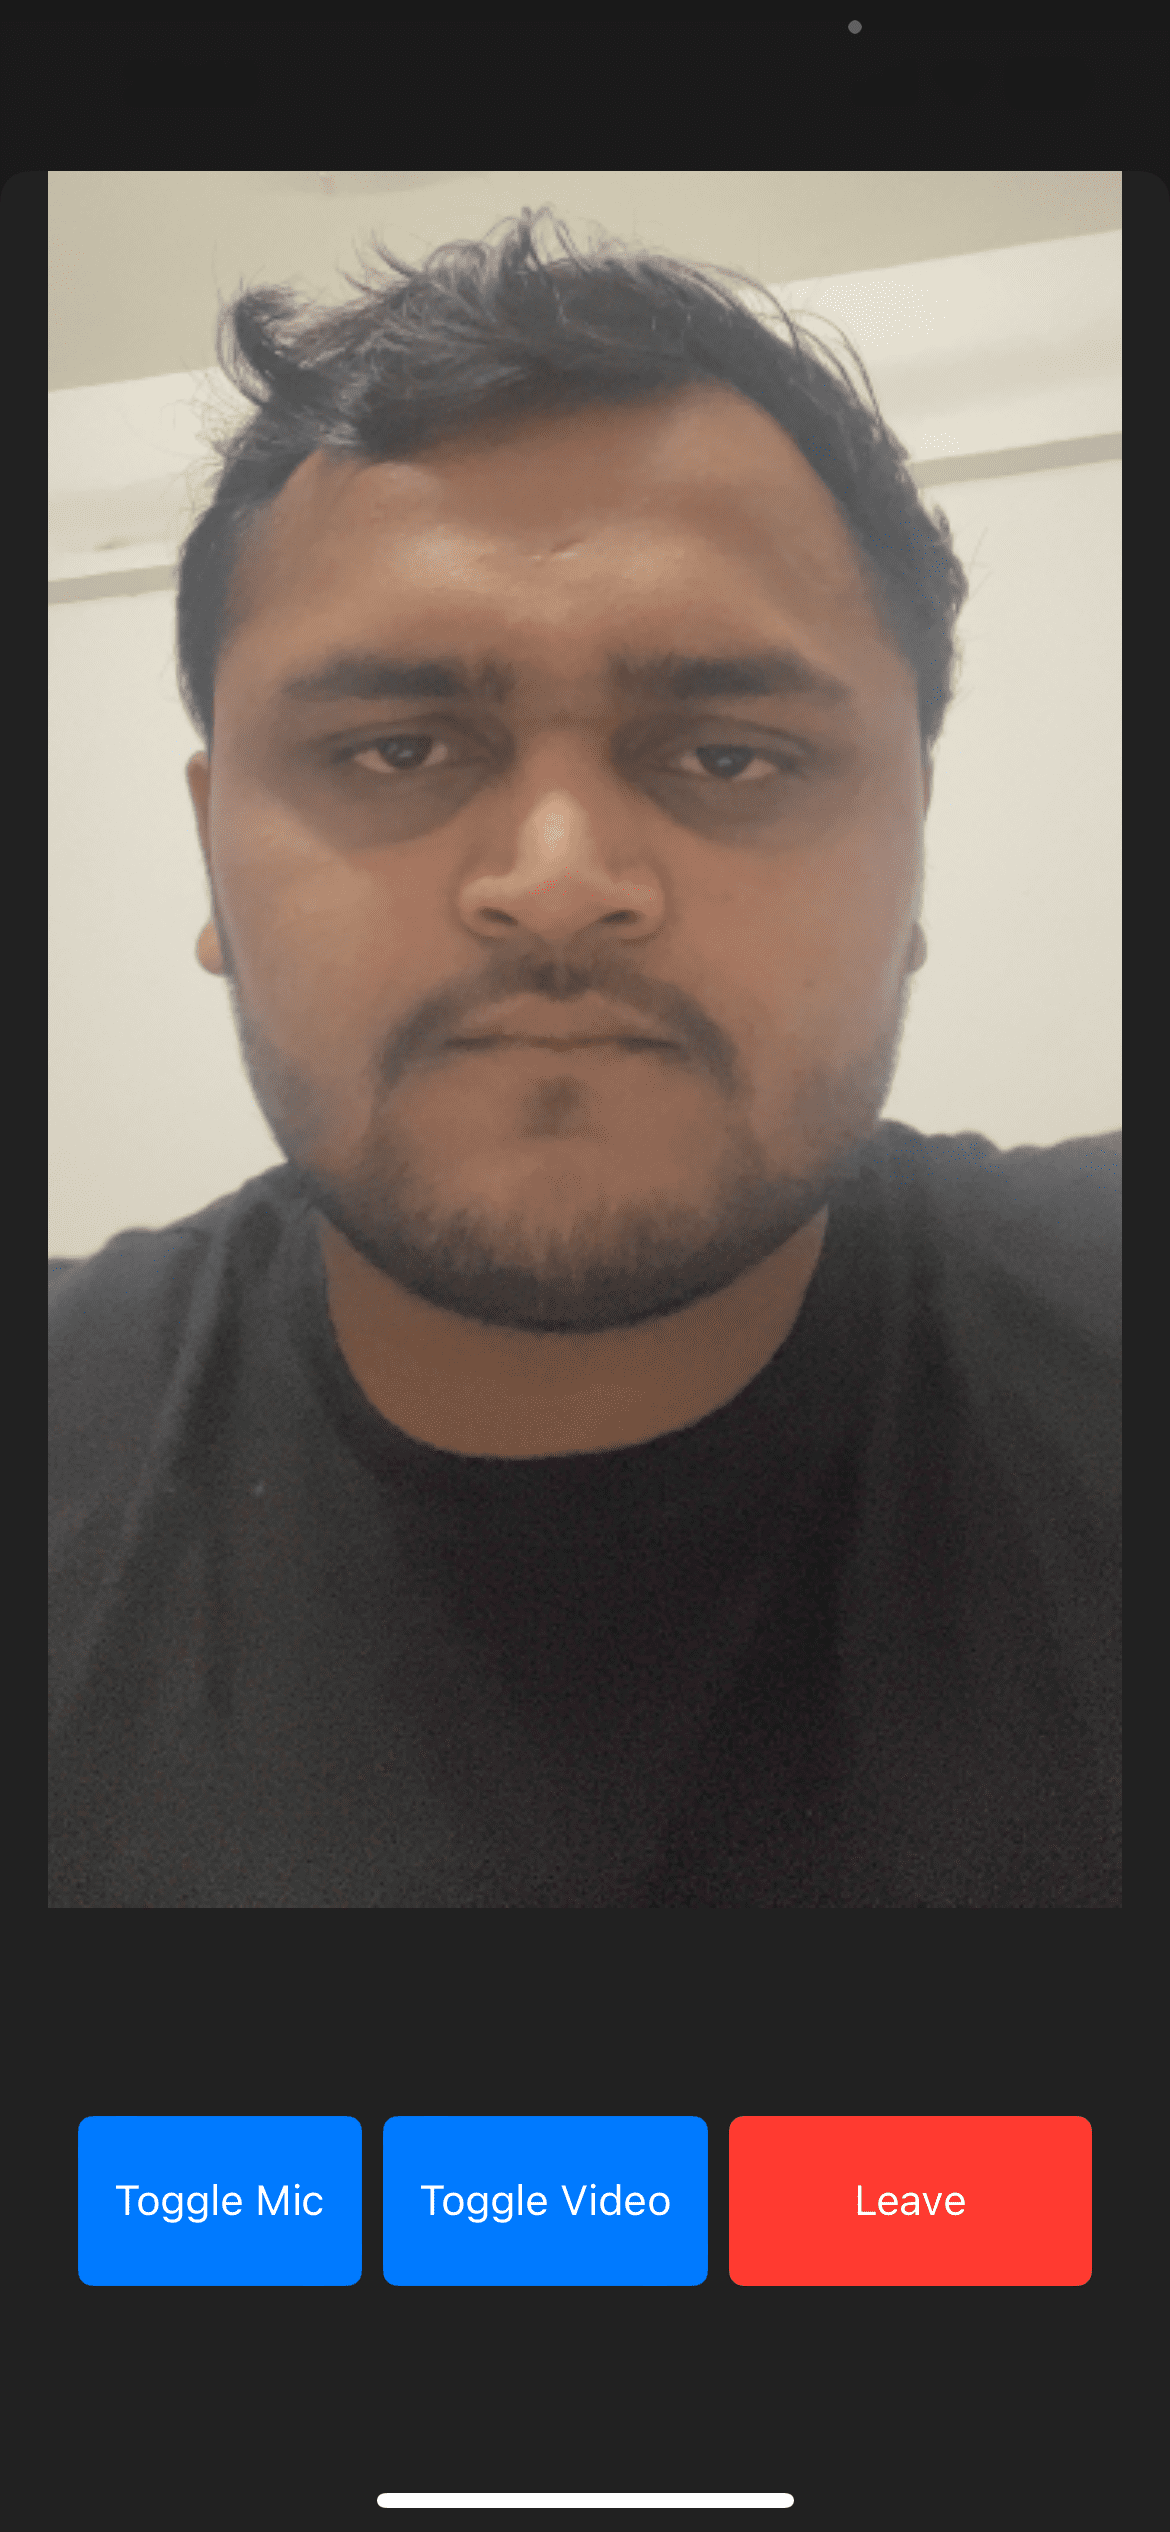
Known Issue
Please add the following line in the MeetingViewController.swift file's viewDidLoad method If you get your video out of the container view like below image.
1override func viewDidLoad() {
2
3localParticipantVideoView.frame = CGRect(x: 10, y: 0, width: localParticipantViewContainer.frame.width, height: localParticipantViewContainer.frame.height)
4
5localParticipantVideoView.bounds = CGRect(x: 10, y: 0, width: localParticipantViewContainer.frame.width, height: localParticipantViewContainer.frame.height)
6
7localParticipantVideoView.clipsToBounds = true
8
9remoteParticipantVideoView.frame = CGRect(x: 10, y: 0, width: remoteParticipantViewContainer.frame.width, height: remoteParticipantViewContainer.frame.height)
10remoteParticipantVideoView.bounds = CGRect(x: 10, y: 0, width: remoteParticipantViewContainer.frame.width, height: remoteParticipantViewContainer.frame.height)
11remoteParticipantVideoView.clipsToBounds = true
12}
Final Output
Build and run the app from Xcode, and allow camera and microphone access when iOS asks for permission.
To test the call:
- Create a meeting from the Join Screen on the first device.
- Copy the meeting ID shown in
lblMeetingIdon the Meeting Screen. - Run the app on a second device.
- Enter the same meeting ID on the Join Screen.
- Join the meeting.
- Allow camera and microphone permission on both devices.
Your completed iOS app can now:
- Create a new VideoSDK room
- Join an existing room by meeting ID
- Publish camera and microphone media
- Render local and remote participant video
- Show an active speaker indicator
- Show a red border when a participant's microphone is disabled
- Toggle the local microphone
- Toggle the local camera
- Leave the meeting and dismiss the meeting screen
Tip: Stuck anywhere? Check out this example code on GitHub. After the basic call works, explore recording, screen sharing, participant events, and other iOS SDK features in the VideoSDK documentation.


