
1Help me add video calling to my Flutter app with VideoSDK.
2
31. Run `flutter create videosdk_flutter_quickstart`.
4
52. Run `flutter pub add videosdk http`, then set `minSdkVersion 23` and Java 8
6
7   `compileOptions`, add the camera, mic, network and audio permissions to
8
9   `AndroidManifest.xml`, add `NSCameraUsageDescription` and
10
11   `NSMicrophoneUsageDescription` to `ios/Runner/Info.plist`, and uncomment
12
13   `platform :ios, '12.0'` in the Podfile.
14
153. Create `lib/api_call.dart` with `createMeeting()` POSTing to
16
17   `https://api.videosdk.live/v2/rooms`, then `lib/join_screen.dart`,
18
19   `lib/meeting_screen.dart`, `lib/meeting_controls.dart` and
20
21   `lib/participant_tile.dart` using `VideoSDK.createRoom(...)`, the `Events`
22
23   listeners (`roomJoined`, `participantJoined`, `participantLeft`, `streamEnabled`,
24
25   `streamDisabled`) and `RTCVideoView`.
26
274. Ask me for a token from app.videosdk.live/api-keys and set it as `token` in
28
29   `lib/api_call.dart`.
30
315. Run `flutter run` on a device or simulator.
32
33REFERENCE
34
35https://docs.videosdk.live/flutter/guide/video-and-audio-calling-api-sdk/quick-start.md
Prerequisites
Before proceeding, ensure that your development environment meets the following requirements:
- Video SDK Developer Account (Not having one, follow Video SDK Dashboard)
- The basic understanding of Flutter.
- Flutter Video SDK
- Have Flutter installed on your device.
Important: One should have a VideoSDK account to generate token. Visit VideoSDK dashboard to generate token
Getting Started with the Code!
Follow the steps to create the environment necessary to add video calls into your app. Also you can find the code sample for quickstart here.
Create a new Flutter project.
Create a new Flutter App using the below command.
1 flutter create videosdk_flutter_quickstartInstall Video SDK
Install the VideoSDK using the below-mentioned flutter command. Make sure you are in your flutter app directory before you run this command.
1 flutter pub add videosdk
2
3//run this command to add http library to perform network call to generate roomId
4 flutter pub add http
Video SDK Compatibility
Structure of the project
Your project structure should look like this.
1    root
2    ├── android
3    ├── ios
4    ├── lib
5         ├── api_call.dart
6         ├── join_screen.dart
7         ├── main.dart
8         ├── meeting_controls.dart
9         ├── meeting_screen.dart
10         ├── participant_tile.dart
We are going to create flutter widgets (JoinScreen, MeetingScreen, MeetingControls, ParticipantTile).
App Structure
App widget will contain JoinScreen and MeetingScreen widget. MeetingScreen will have MeetingControls and ParticipantTile widget.

Configure Project
For Android
- Update the
/android/app/src/main/AndroidManifest.xmlfor the permissions we will be using to implement the audio and video features.
1<uses-feature android:name="android.hardware.camera" />
2<uses-feature android:name="android.hardware.camera.autofocus" />
3<uses-permission android:name="android.permission.CAMERA" />
4<uses-permission android:name="android.permission.RECORD_AUDIO" />
5<uses-permission android:name="android.permission.ACCESS_NETWORK_STATE" />
6<uses-permission android:name="android.permission.CHANGE_NETWORK_STATE" />
7<uses-permission android:name="android.permission.MODIFY_AUDIO_SETTINGS" />
8<uses-permission android:name="android.permission.INTERNET"/>
9<uses-permission android:name="android.permission.FOREGROUND_SERVICE"/>
10<uses-permission android:name="android.permission.WAKE_LOCK" />- Also you will need to set your build settings to Java 8 because the official WebRTC jar now uses static methods in
EglBaseinterface. Just add this to your app-level/android/app/build.gradle.
1android {
2    //...
3    compileOptions {
4        sourceCompatibility JavaVersion.VERSION_1_8
5        targetCompatibility JavaVersion.VERSION_1_8
6    }
7}
If necessary, in the same
build.gradleyou will need to increaseminSdkVersionofdefaultConfigup to23(currently default Flutter generator set it to16).If necessary, in the same
build.gradleyou will need to increasecompileSdkVersionandtargetSdkVersionup to31(currently default Flutter generator set it to30).
For iOS
- Add the following entries which allow your app to access the camera and microphone to your
/ios/Runner/Info.plistfile :
1<key>NSCameraUsageDescription</key>
2<string>$(PRODUCT_NAME) Camera Usage!</string>
3<key>NSMicrophoneUsageDescription</key>
4<string>$(PRODUCT_NAME) Microphone Usage!</string>- Uncomment the following line to define a global platform for your project in
/ios/Podfile:
1# platform :ios, '12.0'For MacOS
- Add the following entries to your
/macos/Runner/Info.plistfile which allow your app to access the camera and microphone.
1<key>NSCameraUsageDescription</key>
2<string>$(PRODUCT_NAME) Camera Usage!</string>
3<key>NSMicrophoneUsageDescription</key>
4<string>$(PRODUCT_NAME) Microphone Usage!</string>- Add the following entries to your
/macos/Runner/DebugProfile.entitlementsfile which allow your app to access the camera, microphone and open outgoing network connections.
1<key>com.apple.security.network.client</key>
2<true/>
3<key>com.apple.security.device.camera</key>
4<true/>
5<key>com.apple.security.device.microphone</key>
6<true/>- Add the following entries to your
/macos/Runner/Release.entitlementsfile which allow your app to access the camera, microphone and open outgoing network connections.
1<key>com.apple.security.network.server</key>
2<true/>
3<key>com.apple.security.network.client</key>
4<true/>
5<key>com.apple.security.device.camera</key>
6<true/>
7<key>com.apple.security.device.microphone</key>
8<true/>
Step 1: Get started with api_call.dart
Before jumping to anything else, you will write a function to generate a unique meetingId. You will require auth token, you can generate it using either by using videosdk-rtc-api-server-examples or generate it from the Video SDK Dashboard for development.
1import 'dart:convert';
2import 'package:http/http.dart' as http;
3
4//Auth token we will use to generate a meeting and connect to it
5String token = "<Generated-from-dashboard>";
6
7// API call to create meeting
8Future<String> createMeeting() async {
9  final http.Response httpResponse = await http.post(
10    Uri.parse("https://api.videosdk.live/v2/rooms"),
11    headers: {'Authorization': token},
12  );
13
14//Destructuring the roomId from the response
15  return json.decode(httpResponse.body)['roomId'];
16}
Step 2: Creating the JoinScreen
Let's create join_screen.dart file in lib directory and create JoinScreen StatelessWidget.
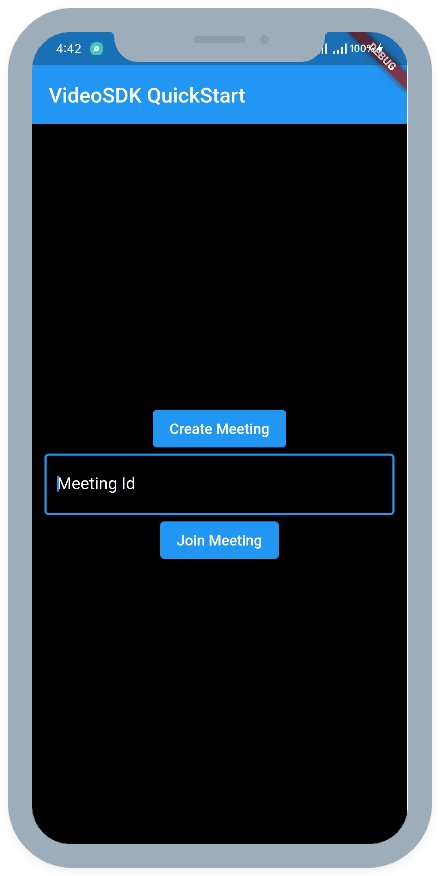
The JoinScreen will consist of:
- Create Meeting Button - This button will create a new meeting for you.
- Meeting ID TextField - This text field will contain the meeting ID, you want to join.
- Join Meeting Button - This button will join the meeting, which you have provided.
1import 'package:flutter/material.dart';
2import 'api_call.dart';
3import 'meeting_screen.dart';
4
5class JoinScreen extends StatelessWidget {
6 final _meetingIdController = TextEditingController();
7
8 JoinScreen({super.key});
9
10 void onCreateButtonPressed(BuildContext context) async {
11 // call api to create meeting and then navigate to MeetingScreen with meetingId,token
12 await createMeeting().then((meetingId) {
13 if (!context.mounted) return;
14 Navigator.of(context).push(
15 MaterialPageRoute(
16 builder: (context) => MeetingScreen(
17 meetingId: meetingId,
18 token: token,
19 ),
20 ),
21 );
22 });
23 }
24
25 void onJoinButtonPressed(BuildContext context) {
26 String meetingId = _meetingIdController.text;
27 var re = RegExp("\\w{4}\\-\\w{4}\\-\\w{4}");
28 // check meeting id is not null or invaild
29 // if meeting id is vaild then navigate to MeetingScreen with meetingId,token
30 if (meetingId.isNotEmpty && re.hasMatch(meetingId)) {
31 _meetingIdController.clear();
32 Navigator.of(context).push(
33 MaterialPageRoute(
34 builder: (context) => MeetingScreen(
35 meetingId: meetingId,
36 token: token,
37 ),
38 ),
39 );
40 } else {
41 ScaffoldMessenger.of(context).showSnackBar(const SnackBar(
42 content: Text("Please enter valid meeting id"),
43 ));
44 }
45 }
46
47
48 Widget build(BuildContext context) {
49 return Scaffold(
50 appBar: AppBar(
51 title: const Text('VideoSDK QuickStart'),
52 ),
53 body: Padding(
54 padding: const EdgeInsets.all(12.0),
55 child: Column(
56 mainAxisAlignment: MainAxisAlignment.center,
57 children: [
58 ElevatedButton(
59 onPressed: () => onCreateButtonPressed(context),
60 child: const Text('Create Meeting'),
61 ),
62 Container(
63 margin: const EdgeInsets.fromLTRB(0, 8.0, 0, 8.0),
64 child: TextField(
65 decoration: const InputDecoration(
66 hintText: 'Meeting Id',
67 border: OutlineInputBorder(),
68 ),
69 controller: _meetingIdController,
70 ),
71 ),
72 ElevatedButton(
73 onPressed: () => onJoinButtonPressed(context),
74 child: const Text('Join Meeting'),
75 ),
76 ],
77 ),
78 ),
79 );
80 }
81}Update the home screen of the app in the main.dart code
1import 'package:flutter/material.dart';
2import 'join_screen.dart';
3
4void main() {
5  runApp(const MyApp());
6}
7
8class MyApp extends StatelessWidget {
9  const MyApp({super.key});
10
11  // This widget is the root of your application.
12  @override
13  Widget build(BuildContext context) {
14    return MaterialApp(
15      title: 'VideoSDK QuickStart',
16      theme: ThemeData(
17        primarySwatch: Colors.blue,
18      ),
19      home: JoinScreen(),
20    );
21  }
22}
Output
Step 3: Creating the MeetingControls
Let's create meeting_controls.dart file and create MeetingControls StatelessWidget.
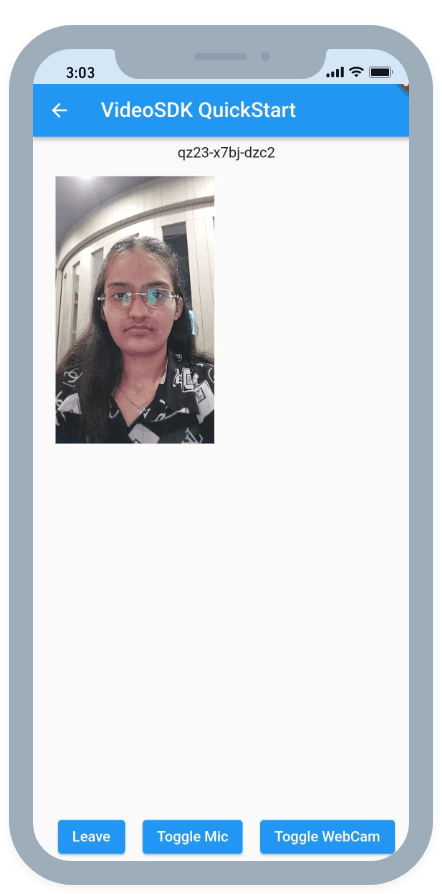
The MeetingControls will consist of:
- Leave Button - This button will leave the meeting.
- Toggle Mic Button - This button will unmute or mute mic.
- Toggle Camera Button - This button will enable or disable camera.
MeetingControls will accept 3 functions in constructor
- onLeaveButtonPressed - invoked when Leave button pressed
- onToggleMicButtonPressed - invoked when Toggle Mic button pressed
- onToggleCameraButtonPressed - invoked when Toggle Camera button pressed
1import 'package:flutter/material.dart';
2
3class MeetingControls extends StatelessWidget {
4  final void Function() onToggleMicButtonPressed;
5  final void Function() onToggleCameraButtonPressed;
6  final void Function() onLeaveButtonPressed;
7
8  const MeetingControls(
9      {super.key,
10      required this.onToggleMicButtonPressed,
11      required this.onToggleCameraButtonPressed,
12      required this.onLeaveButtonPressed});
13
14  @override
15  Widget build(BuildContext context) {
16    return Row(
17      mainAxisAlignment: MainAxisAlignment.spaceEvenly,
18      children: [
19        ElevatedButton(
20            onPressed: onLeaveButtonPressed, child: const Text('Leave')),
21        ElevatedButton(
22            onPressed: onToggleMicButtonPressed, child: const Text('Toggle Mic')),
23        ElevatedButton(
24            onPressed: onToggleCameraButtonPressed,
25            child: const Text('Toggle WebCam')),
26      ],
27    );
28  }
29}
Step 4: Creating ParticipantTile
Let's create participant_tile.dart file and create ParticipantTile StatefulWidget.
The ParticipantTile will consist of:
- RTCVideoView - This will show participant's video stream.
ParticipantTile will accept Participant in constructor
- participant - participant of the meeting.
1import 'package:flutter/material.dart';
2import 'package:videosdk/videosdk.dart';
3
4class ParticipantTile extends StatefulWidget {
5  final Participant participant;
6  const ParticipantTile({super.key, required this.participant});
7
8  @override
9  State<ParticipantTile> createState() => _ParticipantTileState();
10}
11
12class _ParticipantTileState extends State<ParticipantTile> {
13  Stream? videoStream;
14
15  @override
16  void initState() {
17    // initial video stream for the participant
18    widget.participant.streams.forEach((key, Stream stream) {
19      setState(() {
20        if (stream.kind == 'video') {
21          videoStream = stream;
22        }
23      });
24    });
25    _initStreamListeners();
26    super.initState();
27  }
28  @override
29  void setState(fn) {
30    if (mounted) {
31      super.setState(fn);
32    }
33  }
34
35  _initStreamListeners() {
36    widget.participant.on(Events.streamEnabled, (Stream stream) {
37      if (stream.kind == 'video') {
38        setState(() => videoStream = stream);
39      }
40    });
41
42    widget.participant.on(Events.streamDisabled, (Stream stream) {
43      if (stream.kind == 'video') {
44        setState(() => videoStream = null);
45      }
46    });
47  }
48
49  @override
50  Widget build(BuildContext context) {
51    return Padding(
52      padding: const EdgeInsets.all(8.0),
53      child: videoStream != null
54          ? RTCVideoView(
55              videoStream?.renderer as RTCVideoRenderer,
56              objectFit: RTCVideoViewObjectFit.RTCVideoViewObjectFitCover,
57            )
58          : Container(
59              color: Colors.grey.shade800,
60              child: const Center(
61                child: Icon(
62                  Icons.person,
63                  size: 100,
64                ),
65              ),
66            ),
67    );
68  }
69}
Step 5: Creating the MeetingScreen
Let's create meeting_screen.dart file and create MeetingScreen StatefulWidget.
MeetingScreen will accept meetingId and token in constructor
- meetingId - meetingId, you want to join
- token - VideoSdk Auth token
1import 'package:flutter/foundation.dart';
2import 'package:flutter/material.dart';
3import 'package:videosdk/videosdk.dart';
4import './participant_tile.dart';
5
6class MeetingScreen extends StatefulWidget {
7  final String meetingId;
8  final String token;
9
10  const MeetingScreen(
11      {super.key, required this.meetingId, required this.token});
12
13  @override
14  State<MeetingScreen> createState() => _MeetingScreenState();
15}
16
17class _MeetingScreenState extends State<MeetingScreen> {
18  late Room _room;
19  var micEnabled = true;
20  var camEnabled = true;
21
22  Map<String, Participant> participants = {};
23
24  @override
25  void initState() {
26    // create room
27    _room = VideoSDK.createRoom(
28      roomId: widget.meetingId,
29      token: widget.token,
30      displayName: "John Doe",
31      micEnabled: micEnabled,
32      camEnabled: camEnabled,
33      defaultCameraIndex: kIsWeb
34          ? 0
35          : 1  // Index of MediaDevices will be used to set default camera
36    );
37
38    setMeetingEventListener();
39
40    // Join room
41    _room.join();
42
43    super.initState();
44  }
45
46  @override
47  void setState(fn) {
48    if (mounted) {
49      super.setState(fn);
50    }
51  }
52
53  // listening to meeting events
54  void setMeetingEventListener() {
55    _room.on(Events.roomJoined, () {
56      setState(() {
57        participants.putIfAbsent(
58            _room.localParticipant.id, () => _room.localParticipant);
59      });
60    });
61
62    _room.on(
63      Events.participantJoined,
64      (Participant participant) {
65        setState(
66          () => participants.putIfAbsent(participant.id, () => participant),
67        );
68      },
69    );
70
71    _room.on(Events.participantLeft, (String participantId, Map<String,dynamic> reason) {
72      if (participants.containsKey(participantId)) {
73        setState(
74          () => participants.remove(participantId),
75        );
76      }
77    });
78
79    _room.on(Events.roomLeft, () {
80      participants.clear();
81      Navigator.popUntil(context, ModalRoute.withName('/'));
82    });
83  }
84
85  // onbackButton pressed leave the room
86  Future<bool> _onWillPop() async {
87    _room.leave();
88    return true;
89  }
90
91  // This widget is the root of your application.
92  @override
93  Widget build(BuildContext context) {
94    return WillPopScope(
95      onWillPop: () => _onWillPop(),
96      child: Scaffold(
97        appBar: AppBar(
98          title: const Text('VideoSDK QuickStart'),
99        ),
100        body: Padding(
101          padding: const EdgeInsets.all(8.0),
102          child: Column(
103            children: [
104              Text(widget.meetingId),
105              //render all participant
106              Expanded(
107                child: Padding(
108                  padding: const EdgeInsets.all(8.0),
109                  child: GridView.builder(
110                    gridDelegate: const SliverGridDelegateWithFixedCrossAxisCount(
111                      crossAxisCount: 2,
112                      crossAxisSpacing: 10,
113                      mainAxisSpacing: 10,
114                      mainAxisExtent: 300,
115                    ),
116                    itemBuilder: (context, index) {
117                      return ParticipantTile(
118                        key: Key(participants.values.elementAt(index).id),
119                          participant: participants.values.elementAt(index));
120                    },
121                    itemCount: participants.length,
122                  ),
123                ),
124              ),
125              MeetingControls(
126                onToggleMicButtonPressed: () {
127                  micEnabled ? _room.muteMic() : _room.unmuteMic();
128                  micEnabled = !micEnabled;
129                },
130                onToggleCameraButtonPressed: () {
131                  camEnabled ? _room.disableCam() : _room.enableCam();
132                  camEnabled = !camEnabled;
133                },
134                onLeaveButtonPressed: () {
135                  _room.leave();
136                },
137              ),
138            ],
139          ),
140        ),
141      ),
142    );
143  }
144}
Output
Run and Test
The app is all set to test. Make sure to update the token in api_call.dart
Your app should look like this after the implementation.
Caution: If you get
webrtc/webrtc.h file not founderror at a runtime in ios then check solution here.
Tip You can checkout the complete quick start example here.


