


WebRTC with React combines the browser's native real-time communication protocol with a component-based UI architecture. You use the getUserMedia API for media capture, RTCPeerConnection for network traversal, and React hooks for state management. For production applications, developers often choose a managed solution like VideoSDK to bypass the complexity of signaling servers and STUN/TURN infrastructure.
Real-time video is no longer a novelty feature. It is a core requirement for telehealth platforms, virtual event spaces, and collaborative hiring tools. When you set out to build this functionality, the browser gives you a powerful native toolset in the form of WebRTC. However, managing the asynchronous lifecycle of peer connections inside a declarative UI framework presents a unique challenge.
React is a natural fit for WebRTC because its component architecture lets you isolate media rendering from connection logic. By the end of this guide, you will understand the end-to-end flow of building a peer-to-peer video chat using WebRTC with React, covering media capture, signaling, and state management without relying on third-party communication SDKs.
Understanding WebRTC Basics
WebRTC is an open-source project that provides web browsers and mobile applications with real-time communication via simple application programming interfaces. It enables peer-to-peer audio, video, and data sharing directly between browsers without requiring an intermediary server to carry the media traffic. The protocol relies on three core APIs. The getUserMedia API handles media capture by requesting access to the user's camera and microphone. The RTCPeerConnection API manages the network connection, handling codec negotiation, bandwidth management, and secure media transmission. The RTCDataChannel API establishes a bidirectional data stream for sending arbitrary text or binary data.
Browsers handle media capture locally but must traverse complex network topologies to establish a direct connection. This is where network address translation (NAT) traversal comes in, requiring STUN and TURN servers to discover public IP addresses and relay traffic when direct connections fail. Before media can flow, browsers must exchange metadata through a process called signaling. Signaling is not part of the WebRTC standard. It is the mechanism browsers use to coordinate the connection by exchanging session description protocol (SDP) offers and answers, along with interactive connectivity establishment (ICE) candidates.
Setting Up a React Project for WebRTC
Setting up a React project for WebRTC requires a clean separation between your presentation layer and your communication logic. You can scaffold a new project using Vite or Create React App. Vite is generally preferred in 2026 for its faster build times and modern tooling. If you are using TypeScript, you gain type safety for your WebRTC objects, which helps catch common errors like passing an undefined media stream to a video element.
You do not need heavy dependencies for a basic WebRTC implementation. Your essential dependencies are just React and ReactDOM. You might add a UI library like Tailwind CSS for styling, but the core logic relies on native browser APIs. Your folder structure should separate UI components from custom hooks that manage the WebRTC lifecycle. For example, keep your video display components in a components directory and your connection logic in a hooks directory. This separation prevents unnecessary re-renders when connection state updates but the video stream remains stable.
Capturing Media Streams in React
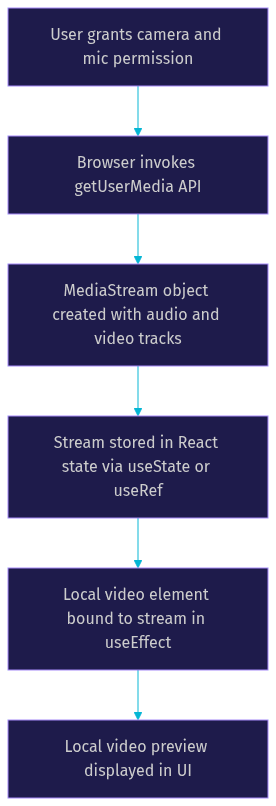
Capturing media in a React application involves asking the user for permission to access their hardware and then storing the resulting media stream in a way the component can access it. You use the browser's native getUserMedia API to prompt the user. This API returns a MediaStream object containing the audio and video tracks.
In React, you have two primary ways to store this stream. You can use the useState hook if the component needs to re-render when the stream becomes available, or you can use the useRef hook if you only need to reference the stream in event handlers without triggering a re-render. Most developers use a combination of both, storing the stream in a ref for direct manipulation and using state to toggle UI elements like a video preview window.
To display the local video, you bind the MediaStream to a video element in your component. You do this by setting the source object of the video element to the stream. This must happen inside a useEffect hook to ensure the video element has been mounted to the DOM before you attempt to bind the stream.
Building a Signaling Layer
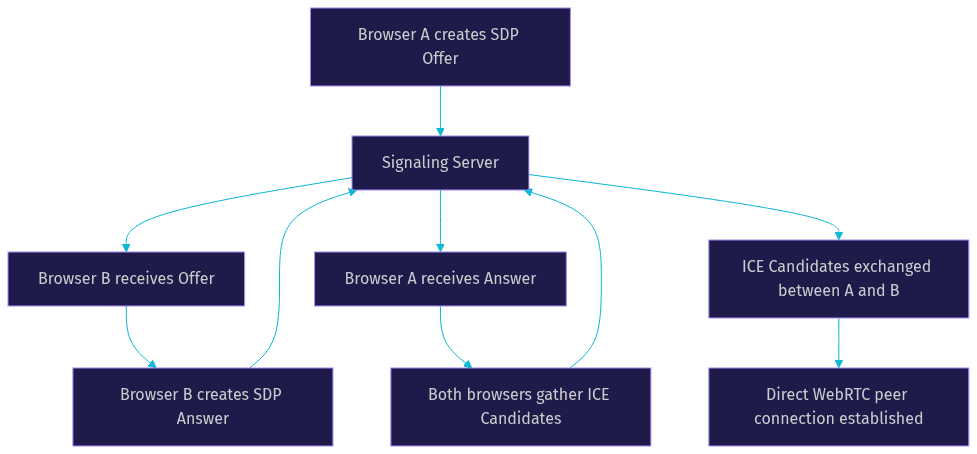
Because WebRTC does not dictate how signaling should occur, you must build this layer yourself. The signaling server's only job is to act as a relay between two peers who are trying to connect. It passes the SDP offer from the caller to the callee, returns the SDP answer, and relays ICE candidates between both parties until a direct connection is established.
Common approaches for building a signaling layer include using WebSockets, Firebase Realtime Database, or simple HTTP long-polling. WebSockets are the most common choice because they provide a persistent, low-latency connection ideal for real-time message exchange. You would typically run a lightweight Node.js server using a library like Socket.IO to handle the signaling messages.
In your React application, you manage signaling messages using React Context or a custom hook. This isolates the WebSocket connection logic from your UI components. When a user initiates a call, your React app generates an SDP offer, sends it through the signaling channel, and listens for the corresponding answer. The signaling layer must also handle ICE candidate exchange, which happens rapidly as the browsers discover available network paths.
Establishing the Peer Connection
The core of a WebRTC implementation is the RTCPeerConnection interface. In a React application, you create an instance of this interface inside a custom hook. This hook manages the lifecycle of the connection, ensuring it is properly closed when the component unmounts to prevent memory leaks.
Once you have a peer connection instance, you must add your local media tracks to it. This is a common pitfall for developers. You must add the audio and video tracks from your local MediaStream to the RTCPeerConnection before you create an SDP offer. If you create the offer first, the offer will not include the media descriptions for your tracks, and the remote peer will not know to expect audio and video.
To receive the remote user's media, you handle the ontrack event on the peer connection. When this event fires, it provides the remote MediaStream. You store this stream in React state and bind it to a second video element in your UI. Simultaneously, you are exchanging ICE candidates through your signaling layer. The connection is only fully established when both peers have successfully exchanged ICE candidates and found a viable network path.
Managing Connection State in React
WebRTC connections are highly asynchronous and subject to network fluctuations. Managing this state inside React requires careful use of the useEffect hook. When your component mounts, you initialize the peer connection and attach event listeners. When the component unmounts, you must close the peer connection and stop the media tracks on your local stream. Failing to do this will leave the camera light on and consume system resources.
You should update your UI based on the connection state of the RTCPeerConnection. The interface provides events for iceconnectionstatechange and connectionstatechange. You can map these states to a React state variable that controls what the user sees. For example, you might show a connecting spinner when the state is checking, display the video feed when the state is connected, and show a reconnection warning if the state is disconnected.
Providing clear user feedback is critical. Real-time connections can fail due to firewall restrictions or network drops. By surfacing the connection state in the UI, you give the user context about what is happening and prevent them from staring at a blank screen wondering if the application is broken.
Adding a Data Channel for Text Chat
A video call often needs a complementary text chat feature. WebRTC provides the RTCDataChannel API for sending arbitrary data directly between peers with the same low-latency characteristics as the media streams. You can create a reliable, ordered data channel for chat messages.
Creating a data channel involves calling the createDataChannel method on the RTCPeerConnection instance on the initiating peer. The receiving peer listens for the ondatachannel event. Once the channel is open, you can send text messages by calling the send method on the channel instance.
To integrate this into React, you maintain an array of messages in your component state. When a message is received over the data channel, you append it to the array. When a user sends a message, you add it to the local state and send it over the channel. This synchronizes your chat UI with your media call UI, providing a complete communication experience within a single React component tree.
Deploying and Testing Across Networks
Building a WebRTC app on localhost is deceptively easy. Deploying it to production introduces the reality of complex network topologies. Most users are behind NAT routers or strict firewalls, which prevents direct peer-to-peer connections. You must configure STUN and TURN servers on your RTCPeerConnection to handle NAT traversal.
For development, you can use Google's public STUN server. STUN servers help the browser discover its public IP address. However, if a direct connection fails due to a symmetric NAT or a strict firewall, you need a TURN server. TURN servers act as relays, routing media traffic through a server when a direct path is impossible. For production, you must provision a dedicated TURN service, as public STUN servers are not reliable for production traffic.
You must test your application across different browsers, network conditions, and mobile devices. A connection that works perfectly between two Chrome browsers on the same network might fail between Chrome and Safari on a mobile 4G network.
Production-Ready Considerations
Taking a WebRTC with React application to production requires addressing security, scaling, and performance. Your application must be served over HTTPS. Browsers will not grant camera and microphone permissions to insecure origins. Your signaling server must also implement token-based authentication to prevent unauthorized users from intercepting connection offers.
Scaling a signaling server is a common challenge. A single Node.js WebSocket server can handle a few thousand connections, but a large-scale application needs a horizontally scalable solution. You might move to a serverless WebSocket service or a managed real-time communication platform.
Performance monitoring is essential. You should measure the round-trip time of your data channel and monitor the bitrate of your video streams. WebRTC provides built-in statistics APIs that you can query to get metrics on packet loss, jitter, and available bandwidth. You also need to implement reconnection logic, automatically attempting to restart the ICE process if the connection drops.
Definitions Glossary
WebRTC: An open-source project that provides web browsers with real-time peer-to-peer communication capabilities for audio, video, and data transfer.
RTCPeerConnection: The primary WebRTC interface that manages the network connection, codec negotiation, and secure media transmission between two peers.
Signaling: The process of exchanging metadata, SDP offers and answers, and ICE candidates between two browsers to coordinate a WebRTC connection.
STUN Server: A server that helps a browser discover its public IP address to facilitate NAT traversal for a direct peer connection.
TURN Server: A server that relays media traffic between peers when a direct connection fails due to strict firewalls or symmetric NAT configurations.
MediaStream: A representation of a media stream, typically containing audio and video tracks, obtained via the browser's getUserMedia API.
Key Takeaways
- WebRTC with React requires mapping the asynchronous, event-driven nature of WebRTC to React's declarative component lifecycle using hooks.
- A custom signaling layer using WebSockets is necessary to exchange SDP offers and ICE candidates before a direct peer connection can be established.
- Local media tracks must be added to the RTCPeerConnection before creating an offer, or the remote peer will not receive the media.
- Production deployments require STUN and TURN servers for NAT traversal, HTTPS for secure media permissions, and robust reconnection logic.
- For developers who want to skip the infrastructure overhead, using a managed solution like VideoSDK provides pre-built signaling, TURN servers, and React components.
Conclusion
Building a peer-to-peer video chat with WebRTC and React involves a clear sequence of steps: capturing local media, exchanging signaling messages, establishing the peer connection, and binding the resulting streams to your UI. While building this from scratch is an excellent way to understand the protocol, the infrastructure requirements for production are demanding. You have to manage signaling server scaling, TURN server provisioning, and complex reconnection logic. If you want to ship a real-time communication feature quickly, consider using a managed solution. You can explore the VideoSDK React video calling quick-start to integrate robust video calling in minutes. What are you building with WebRTC? Drop a comment, I would love to hear what kind of real-time use case you are working on.
Conclusion and the Future of WebRTC in React
WebRTC and React together empower developers to build fast, interactive, and scalable communication apps. This guide has walked you through setting up the tech stack, writing core components, optimizing performance, and preparing your app for production.
As WebRTC matures and React continues to dominate the frontend ecosystem, building real-time applications has never been more approachable.
Free $20 Balance for AI Voice Agents & Video Calls
FAQ