


A voice chat guide is a structured walkthrough for setting up, configuring, and troubleshooting real-time voice communication in games and apps. It covers microphone setup, network transport, server architecture, permissions, and audio tuning. VideoSDK provides voice calling SDKs across ten-plus platforms, including Unity, so you can embed low-latency voice chat without building the transport layer yourself. Start with the setup steps below, then use the troubleshooting section when things break.
Reliable voice chat is now table stakes for multiplayer experiences. Players who cannot talk to teammates in Overwatch-style shooters, coordinate builds in Minecraft, or roleplay in Roblox communities will simply leave for a game that lets them. Discord solved part of the problem, but it lives outside your game, splits attention, and gives you zero control over the experience.
This voice chat guide covers everything you need: the core components of real-time voice communication, a step-by-step setup process that works across Minecraft mods, Roblox, and custom Unity or Unreal games, the most common failure modes and their fixes, and the best practices that separate a mediocre voice experience from a great one. By the end, you will know exactly how to get proximity voice chat running, keep latency low, and scale it for large communities.
What Is a Voice Chat Guide?
A voice chat guide is a practical reference that walks developers and server administrators through implementing real-time voice communication, from hardware and network configuration to permissions and audio tuning. For developers, it maps the technical decisions: transport protocol, server architecture, SDK selection, and integration points. For gamers and community managers, it covers the user-facing side: microphone setup, push-to-talk configuration, and moderation.
The key distinction is between in-game voice chat, which is embedded directly into the game client and server, and external services like Discord, which run in a separate app. In-game chat enables features Discord cannot, such as proximity voice chat where volume falls with distance, and it keeps players inside your experience instead of alt-tabbing out.
Core Components of Real-Time Voice Communication
Every voice chat system, from a Minecraft mod to a AAA shooter, is built from the same three layers: audio capture, network transport, and server architecture. Understanding these layers is what separates a developer who can debug voice issues from one who can only reinstall and hope.
Audio Capture and Microphone Setup
Voice chat quality starts at the microphone. A decent headset microphone positioned two to three fingers away from the corner of your mouth captures clear speech while avoiding breath noise. Cardioid-pattern mics reject background sound from behind, which matters in noisy rooms. Basic mic hygiene goes a long way: enable noise suppression, disable microphone boost if audio clips, and never let the mic sit directly in front of your mouth. For developers, the capture layer is where you apply pre-processing such as echo cancellation and de-noising before the audio ever touches the network.
Network Transport: UDP vs TCP
Real-time voice communication runs on UDP, not TCP. TCP guarantees delivery and ordering by retransmitting lost packets, but a voice stream is worthless if it arrives late. If a packet containing 20 milliseconds of speech is lost, retransmitting it two seconds later adds nothing. UDP simply sends packets and moves on, which keeps voice chat latency in the sub-300ms range that conversation requires. Jitter, the variation in packet arrival time, is handled with small de-jitter buffers on the receiving side. Any voice chat SDK worth using manages this for you, but you still need the correct UDP port open on your firewall.
Server Architecture: Client-Server vs Peer-to-Peer
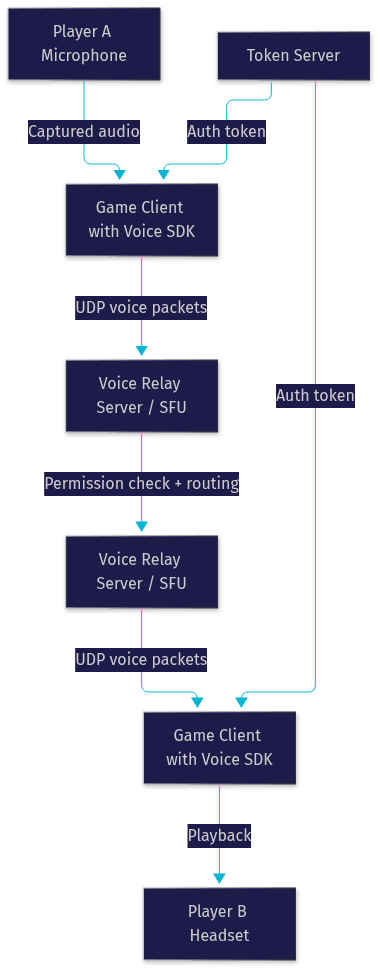
Voice chat uses one of two architectures. Peer-to-peer connects players directly to each other, which is cheap and fast for small groups but breaks behind strict NATs and makes moderation impossible. Client-server routing sends every voice packet through a relay server, typically an SFU (Selective Forwarding Unit), which forwards audio to the right listeners without decoding it. This is the model used by virtually all production voice systems, including VideoSDK's audio calling SDKs, because it solves NAT traversal, centralizes permissions, and scales predictably.
Step-by-Step Voice Chat Setup
This section is the heart of the voice chat guide. Follow the six steps in order, whether you are enabling a Minecraft proximity mod, activating Roblox voice, or integrating an SDK into a custom Unity build.
1. Choose the Right Platform or Engine
Your platform determines everything downstream. For Minecraft, the dominant option is a proximity voice chat mod that runs on a server-side mod loader, with a matching client mod players install manually. For Roblox, voice chat is a built-in native feature you enable through the creator dashboard after meeting the eligibility requirements, with no mod installation at all. For Overwatch and similar titles, voice chat ships with the game and needs no setup beyond in-game audio settings.
For custom games in Unity or Unreal, or any web or mobile app, you choose between building raw WebRTC infrastructure yourself or embedding a voice chat SDK. Building it yourself means handling signaling, STUN/TURN servers, codec selection, and reconnection logic. An SDK like VideoSDK's Unity video SDK handles the transport, rooms, and permissions so you focus on gameplay integration. In practice, teams that ship fast almost always pick the SDK route.
2. Install or Enable the Voice Chat Module
Installation has two sides: server and client. On the server side for a Minecraft setup, you install the proximity voice chat mod into your server's mod loader, restart the server, and confirm the mod initializes without errors in the server log. On the client side, every player installs the same mod version into their client mod folder. Version mismatch between server and client mods is the single most common cause of voice chat failing silently, so pin the version in your community documentation.
For Roblox, there is no client installation; you enable voice in the game settings and players opt in through their account privacy settings. For SDK-based games, you add the SDK to your project, initialize it when the player loads into a session, and join a voice room tied to the match or server instance. The SDK handles the handshake, and the player sees a microphone indicator once connected.
3. Configure Network Settings
Voice traffic needs a clear UDP path. For a self-hosted Minecraft voice mod, the default UDP port is 24454, and you must open it on both your server firewall and any router forwarding rules. If players connect but cannot hear each other, a blocked UDP port is the first thing to check. Your hosting provider's firewall is a separate layer from your operating system firewall, and both must allow the port.
NAT traversal is the deeper issue. Home routers block unsolicited inbound UDP by default, which is why peer-to-peer voice fails for some players. The standard solution is STUN for direct connections when possible and TURN as a relay fallback when it is not. If you are using a managed voice chat SDK, this is handled for you automatically, which is one of the strongest arguments for not building the transport layer yourself. For self-hosted setups, budget for a TURN server or accept that a percentage of your players will be unreachable.
4. Set Up Authentication and Permissions
Never run open voice chat. Token-based authentication ensures only players in your game can join your voice rooms, and it is how production systems prevent griefers from dropping into random channels. With an SDK approach, your backend generates a short-lived token using your API credentials and hands it to the client, which presents it when joining the voice room. The token should never be generated on the client, because that exposes your credentials.
Role-based voice groups are the moderation backbone. Define roles such as speaker, listener, and moderator, and map them to game state: only teammates hear each other in a competitive match, spectators are listeners only, and staff can mute individuals. Privacy toggles matter too. Players should be able to mute themselves globally, mute specific individuals, and opt out of voice entirely without losing access to the game.
5. Fine-Tune Audio Parameters
Once voice works, tune it. Proximity distance is the signature setting for spatial voice chat: set the radius where speech becomes audible and the curve at which volume falls off. Too large a radius turns your world into a noisy cafeteria; too small makes it feel dead. Most communities land somewhere between 25 and 50 blocks of equivalent distance, then adjust based on feedback.
Choose between voice activation and push-to-talk. Voice activation is more natural for social play but picks up keyboard noise and breathing; push-to-talk is cleaner for competitive play. Offer both. Enable echo cancellation so players using speakers instead of headsets do not feed game audio back into the channel, and enable noise suppression to cut fan hum and mechanical keyboards. If your SDK supports network-adaptive streaming, leave it on: it automatically reduces bitrate and resolution when a player's connection degrades, keeping speech intelligible instead of choppy.
6. Test the Voice Chat
Run a structured test before announcing voice chat to your community. Verify that two clients on the same network can hear each other, then test from a different network to catch NAT and firewall issues. Confirm the mute toggle actually stops transmission, not just local playback. Check that joining and leaving a session reconnects voice cleanly, and that a player who drops mid-session recovers without a full restart. Finally, test with three or more simultaneous speakers to confirm the server handles overlapping audio without distortion. Document what you tested and when, so future updates have a baseline.
Common Voice Chat Issues and Fixes
Even a perfect setup breaks in the field. These are the four failure categories you will encounter, ranked by how often they appear in community support channels.
Connection Failures
When players cannot connect to voice at all, work through the chain: client, firewall, port, NAT. Confirm the UDP port (24454 for the common Minecraft voice mod) is open on the server firewall, the OS firewall, and any router port forwarding. Check whether the hosting provider blocks the port at their network edge. If only some players fail, NAT traversal is the likely culprit, and the fix is a TURN relay or switching to an SDK that includes one. A quick diagnostic: if voice works on the same local network but not across the internet, it is almost certainly a port or NAT issue, not the mod.
Poor Audio Quality
Choppy or robotic audio usually means packet loss or jitter, not a bad microphone. Ask the affected player to test on a wired connection instead of Wi-Fi, since wireless packet loss is the most common cause of intermittent voice breakup. Echo means someone is using speakers without echo cancellation enabled; enable it server-side or ask them to use a headset. Constant background noise means noise suppression is off. High latency, where responses feel delayed by a second or more, points to a relay server that is geographically distant from your players; choose server regions close to your community.
Compatibility Problems
Version mismatches cause silent failures. A client running mod version 2.x against a server running 3.x may connect to the game but never transmit voice, with no visible error. The fix is discipline: pin the exact mod version in your install guide, and update server and client together. The same applies to SDK-based games, where an outdated SDK version can conflict with a newer server runtime. Check the release notes before upgrading, and test on a staging server before pushing to production.
Scaling for Large Communities
Voice chat bandwidth scales with speakers, not listeners, in an SFU architecture, but a self-hosted relay still has limits. For communities above roughly 50 concurrent speakers in one space, split voice into group channels: squad channels in competitive modes, local-area proximity zones in open worlds. Budget bandwidth per channel, monitor server CPU since encoding and forwarding costs add up, and consider a managed SDK infrastructure when self-hosting becomes your biggest operational burden. Moderation tooling, including the ability to mute channels and individuals, becomes essential at scale.
Best Practices for an Optimal Voice Chat Experience
Hardware first. A closed-back headset with a boom microphone beats a desk mic in almost every gaming context because it isolates speech from game audio. Position the mic at the corner of the mouth, not in front of it, to eliminate breath pops. For community-facing guidance, publish a short recommended hardware list so players stop blaming the game for a 10-dollar mic.
On the UI side, small choices compound. Give players per-individual volume sliders, a visible speaking indicator so they know their mic is live, and a one-key mute hotkey they can hit instantly. Nothing erodes trust faster than a player discovering their mic was hot the whole session. Show connection status for voice separately from game connection, so a voice outage is diagnosable at a glance.
On security and privacy, treat voice as sensitive data. Use end-to-end encryption where the SDK supports it, scope tokens to a single session so they expire quickly, and be transparent about whether voice is recorded and for how long it is retained. If you record for moderation purposes, say so in your privacy policy. Players forgive limitations; they do not forgive surprises.
Future Trends in Voice Chat Technology
Voice chat is absorbing AI capabilities fast. Real-time translation is the nearest-term shift: speech-to-text, translation, and text-to-speech pipelines now run fast enough to let a Portuguese and a Japanese player converse with sub-second delay, and SDK-level integrations are making this a configuration choice rather than a research project. AI voice filters and noise removal are already shipping in consumer headsets and moving into the SDK layer.
Spatial audio is maturing from a novelty into an expectation, with per-source positioning and distance attenuation becoming standard in open-world games. The most interesting frontier is conversational NPCs: AI voice agents driven by LLMs can now hold real-time spoken conversations inside game worlds, and deterministic flow engines like VideoSDK's Conversational Graph let developers script branching dialogue where the model handles language while the graph controls the story logic. In-game voice chat and AI-driven voice are converging on the same real-time infrastructure.
Quick Reference Checklist
- Choose your platform path: mod, built-in feature, or SDK integration.
- Install matching server and client versions, and pin them in documentation.
- Open the correct UDP port (24454 for the common Minecraft voice mod) on every firewall layer.
- Ensure NAT traversal with STUN, plus TURN fallback for strict networks.
- Generate auth tokens server-side and scope them to a single session.
- Define role-based voice groups and per-player privacy toggles.
- Enable echo cancellation and noise suppression; offer both push-to-talk and voice activation.
- Test across networks, with multiple speakers, and on reconnect scenarios.
- Publish recommended hardware and a moderation policy.
Definitions Glossary
Proximity voice chat: A voice chat mode where a speaker's volume attenuates with in-game distance, so only nearby players hear each other. It is the signature feature of Minecraft voice mods and open-world games.
UDP (User Datagram Protocol): A connectionless transport protocol that sends packets without retransmission guarantees. Real-time voice communication uses UDP because a late voice packet is worthless, making it preferable to TCP for latency-sensitive streams.
SFU (Selective Forwarding Unit): A media server that receives voice streams from participants and forwards them to the right listeners without decoding. It is the standard production architecture for scalable voice chat.
STUN and TURN: Protocols that solve NAT traversal. STUN helps clients discover their public address for direct connections; TURN relays media through a server when direct connection is impossible.
Push-to-talk: A voice activation mode where speech transmits only while a key is held, avoiding accidental background transmission. It contrasts with voice activation, which transmits whenever the mic detects sound above a threshold.
Meeting Token: A short-lived credential, generated server-side, that authenticates a participant's access to a voice or video room. VideoSDK uses token-based authentication to keep API secrets off client devices.
Key Takeaways
- Real-time voice communication runs on UDP through a relay server architecture, not TCP and not raw peer-to-peer, because latency and NAT traversal demand it.
- The most common voice chat failures are a blocked UDP port, a server-client version mismatch, and missing TURN fallback for strict NATs, in roughly that order.
- Token-based authentication generated server-side, plus role-based voice groups, is the minimum viable security and moderation setup for any community.
- Echo cancellation, noise suppression, and network-adaptive streaming are the three settings that most improve perceived voice quality for the least effort.
- VideoSDK's audio calling SDKs, available across ten-plus platforms including Unity, handle transport, rooms, permissions, and adaptive quality so you can embed voice chat without building the infrastructure.
Conclusion
This voice chat guide walked the full path: choosing your platform, installing matched server and client modules, opening the right UDP port, securing access with tokens and roles, tuning audio, and fixing the failures that inevitably follow. The difference between a frustrating voice experience and a great one is rarely the codec; it is disciplined configuration and testing.
If you are building a custom game or app, start with the VideoSDK quickstart documentation and the code samples, or join the VideoSDK Discord community to compare notes with other developers. You can create a free account at app.videosdk.live/login and have voice running in a session today.
What are you building with voice chat? Drop a comment, I'd love to hear whether you are running a Minecraft proximity server, a Roblox community, or something entirely custom.
Free $20 Balance for AI Voice Agents & Video Calls
FAQ