


To develop a React Native app, you set up a JavaScript-based development environment, choose between Expo and a bare workflow, structure your project with clear separation of concerns, wire up navigation and state management, integrate native modules when needed, optimize performance, test thoroughly, and ship release binaries to the Google Play and Apple App Store. VideoSDK provides a React Native SDK that lets you add real-time video and audio calling to your app without writing native bridge code yourself. This guide walks through every step from planning to deployment so you can ship a production-ready cross-platform mobile app in 2026.
Building a cross-platform mobile app used to mean maintaining two separate codebases, one in Swift for iOS and one in Kotlin for Android. That doubled your engineering effort, your bug count, and your release coordination overhead. React Native collapsed that problem into a single JavaScript codebase that compiles to native UI components on both platforms, and in 2026 it remains the most popular cross-platform framework with an active community and deep ecosystem support.
Whether you are building a telemedicine app, a social platform, or an internal enterprise tool, the roadmap to develop a React Native app follows a predictable arc. You plan your architecture, set up your toolchain, structure your codebase, handle navigation and state, integrate any native capabilities you need, optimize for speed, test everything, and ship to the app stores. By the end of this guide you will have a clear mental model of each phase and the decisions you need to make along the way.
Why Develop a React Native App?
React Native lets you write one codebase that runs on both iOS and Android, which immediately cuts development time and maintenance burden compared to maintaining two native projects. The framework does not render web views. It bridges your JavaScript logic to actual native UI components, so users get platform-native scrolling, animations, and gesture handling without the performance penalties of a hybrid web shell.
Code reuse is the headline benefit, but the deeper advantage is ecosystem access. React Native exposes platform APIs through a well-documented bridge mechanism, meaning you can tap into device capabilities like the camera, geolocation, push notifications, and biometric authentication without leaving JavaScript. When a community package does not exist for a specific capability, you can write a custom native module in Swift or Kotlin and expose it to your JS layer.
The community factor matters more than people realize. With over 2,000 contributors on the core repository and a vast library of third-party packages, you are rarely the first person to encounter a given problem. Stack Overflow answers, GitHub issues, and conference talks abound. For teams building real-time communication features, VideoSDK offers a dedicated React Native SDK that handles WebRTC video and audio calling without requiring you to understand the underlying native media stack.
Planning Your React Native App Development
Before you write a single line of code, you need to make several architectural decisions that will shape every subsequent step. Skipping this phase is the most common reason teams end up refactoring midway through a project.
First, identify your target platforms. Most teams target iOS and Android simultaneously, but you should confirm whether you also need web support, tablet-optimized layouts, or support for older OS versions. Each target adds constraints on your minimum SDK versions and available APIs.
Second, define your core feature set. List the screens, user flows, and platform capabilities your app requires. If your app needs real-time video calling, screen sharing, or live audio rooms, note those early because they influence your SDK choices and native dependency list. VideoSDK's React Native SDK covers video calling, interactive live streaming, and audio-only rooms, so you can plan around a single communication provider.
Third, decide on your UI and UX approach. Will you use a shared design system across both platforms, or will you platform-customize certain screens? Shared designs ship faster but can feel less native. Platform-customized designs feel more polished but require conditional rendering and additional testing.
Fourth, choose your state management strategy up front. Small apps can survive on React Context API, but apps with complex async flows benefit from Redux Toolkit or Zustand. Switching state management libraries mid-project is painful, so make this call during planning.
Choosing Expo or a Bare React Native Setup
Expo provides a managed development environment that abstracts away native build configuration. You write JavaScript and Expo handles the native toolchain, build process, and even over-the-air updates. Expo is ideal for teams that want to move fast, avoid Xcode and Android Studio configuration, and do not need custom native modules that Expo does not already support.
A bare React Native workflow gives you full control over the native iOS and Android projects. You open them in Xcode and Android Studio, configure gradle and CocoaPods manually, and write custom native modules freely. Choose the bare workflow when your app requires native dependencies that conflict with Expo's managed restrictions, when you need to modify native build scripts, or when you have team members comfortable with native iOS and Android development.
In 2026, Expo's custom dev client has narrowed the gap significantly, allowing you to use native modules while still benefiting from Expo's tooling. For most new projects, starting with Expo and ejecting to a bare workflow only when necessary is the pragmatic path.
Setting Up the Development Environment
Your development environment is the foundation of your entire workflow. Getting it right the first time saves you from hours of debugging cryptic build failures later.
Start by ensuring your operating system meets the baseline requirements. iOS development requires macOS because Xcode only runs on Apple hardware. Android development works on macOS, Windows, and Linux. Install Node.js at the current LTS version, which provides the JavaScript runtime that React Native depends on. On macOS, install Watchman, a file-watching service from Meta that significantly improves hot reload performance.
For Android development, install Android Studio, which bundles the Android SDK, platform tools, and an emulator. You will need to configure environment variables so your terminal can locate the Android SDK. Accept the SDK licenses through Android Studio's SDK Manager and install the platform and build tools matching your target API level.
For iOS development, install Xcode from the Mac App Store. Xcode includes the iOS SDK, Simulator, and all build tools. Install CocoaPods for native dependency management, since most React Native libraries with iOS components distribute through CocoaPods. You will also need a valid Apple Developer account if you plan to test on physical devices or submit to the App Store.
The following diagram illustrates how the pieces of your React Native toolchain fit together:
After installing the core tools, create your project using your chosen workflow. With Expo, you initialize through the Expo CLI, which scaffolds a project with sensible defaults. With the bare workflow, the React Native CLI generates a project containing separate iOS and Android native folders that you can open and modify directly.
Verify your setup by running the app on a simulator or emulator. If the app launches and displays the default welcome screen, your environment is correctly configured. If you encounter errors at this stage, they are almost always related to environment variables, SDK paths, or missing CocoaPods dependencies.
Structuring Your Project
A well-structured project scales with your team and keeps onboarding fast. The goal is separation of concerns: each folder should have a single, clear responsibility.
Place all reusable UI components in a components directory. These are presentational elements like buttons, cards, and input fields that do not know about your business logic. Put full-screen views in a screens or pages directory. Each screen composes components and connects to your state layer.
Create a services directory for API calls, authentication logic, and third-party SDK integrations. For example, your VideoSDK token generation and room creation logic belongs here, kept separate from your UI components. Use a navigation directory to centralize your route definitions and navigation configuration.
Store static assets like images, fonts, and icons in an assets directory. Keep utility functions, constants, and configuration files in their own directories. Use a hooks directory for custom React hooks that encapsulate reusable logic.
Naming conventions matter. Use PascalCase for component files, camelCase for utility and service files, and kebab-case for asset filenames. Consistent naming reduces cognitive load when navigating a large codebase and makes grep-based searches more predictable.
Managing Navigation and State
Navigation and state management are the two architectural pillars of any React Native app. Get these right and your app feels smooth and predictable. Get them wrong and you spend months fighting re-render bugs and broken back-button behavior.
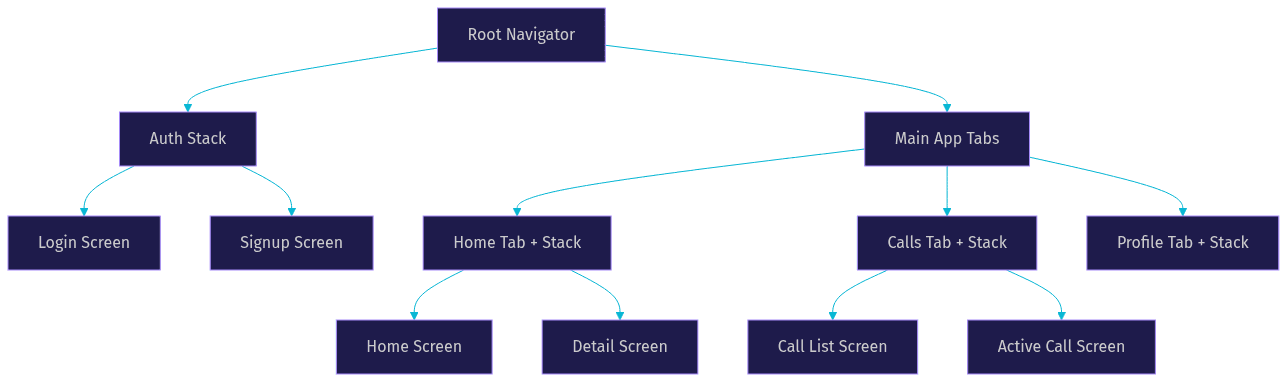
React Navigation is the de facto navigation library for React Native. It supports stack, tab, and drawer navigators, and you can nest them to build complex navigation hierarchies. Define your routes in a central configuration file, and use nested navigators to model your app's information architecture. For example, an authentication flow might use a stack navigator with login and signup screens, while the main app uses a tab navigator with nested stacks for each tab.
The following diagram shows a typical navigation hierarchy for a React Native app with authentication and a main app area:
For state management, start simple. React's built-in Context API handles global state like theme preferences and user authentication without adding dependencies. When your state becomes complex with frequent async operations, interdependent slices, or middleware requirements, move to Redux Toolkit or Zustand.
Redux Toolkit provides a structured, opinionated approach with devtools integration and middleware support. Zustand offers a lighter, hook-based API that many developers find more ergonomic for small to medium apps. Both work well with React Native. The key is to avoid premature complexity. Do not install Redux for an app with three screens and no async data fetching.
Integrating Native Modules and APIs
React Native's bridge architecture lets your JavaScript code communicate with native platform APIs. Most of the time, you will use community packages from the npm registry that wrap native functionality in a JavaScript interface. Popular examples include camera access, geolocation, push notifications, and biometric authentication.
Before adding a community package, check its maintenance status. Look at the last commit date, open issue count, and whether it supports your target React Native version. Abandoned packages are a leading cause of build failures in React Native projects.
When no community package exists for a capability you need, you can write a custom native module. This involves implementing the native code in Swift or Kotlin and exposing it to JavaScript through React Native's bridge. The bridge serializes data between the JavaScript thread and the native thread, so be mindful of payload size and frequency when designing your module's API.
For real-time video and audio, you do not need to write a custom native module. VideoSDK's React Native SDK handles the entire WebRTC stack, including peer connections, media capture, codec negotiation, and network adaptation. You initialize the SDK with a token, join a room, and receive participant streams through hooks. The native WebRTC layer is managed entirely by VideoSDK, so you focus on your app's UI and logic.
Optimizing Performance and Bundle Size
Performance is where junior React Native projects fall apart and senior ones shine. The framework is fast when used correctly, but several common patterns silently degrade your app's responsiveness.
Enable Hermes, the JavaScript engine optimized for React Native. Hermes reduces memory usage, improves startup time, and produces smaller bundle sizes compared to the default JavaScriptCore engine. In 2026, Hermes is the default for most new React Native projects, but if you are working with an older codebase, verify it is enabled.
Lazy-load your screens and heavy components. Instead of importing every screen at app startup, use dynamic imports so that only the initial screen's code loads immediately. Subsequent screens load on demand when the user navigates to them. This cuts your initial bundle size and improves cold-start time.
Optimize images aggressively. Use modern formats like WebP where supported, and resize images to the dimensions they will actually be displayed at rather than shipping oversized assets. Consider using a library that handles image caching and progressive loading to prevent jank during scrolling.
Profile your app using Flipper or React DevTools. Look for unnecessary re-renders, long-running JavaScript tasks on the main thread, and slow list rendering. Replace flat lists with virtualized lists for large datasets, and memoize expensive components to prevent redundant renders when parent state changes.
For apps using VideoSDK, the SDK's network-adaptive streaming automatically adjusts video bitrate and resolution based on available bandwidth, so you do not need to manually implement quality degradation logic for poor network conditions.
Testing and Continuous Integration
Testing in React Native follows the same principles as web React testing, with added considerations for platform-specific behavior. Write unit tests for your utility functions, state management logic, and service layer using Jest. Test your components with React Native Testing Library, which renders components in a native-like environment and lets you query by text, accessibility labels, and test IDs.
For end-to-end testing, consider Detox, a gray-box testing framework specifically designed for React Native. Detox simulates real user interactions like taps, scrolls, and text input, and runs your tests against a real simulator or emulator.
Set up a CI pipeline using GitHub Actions, Bitrise, or EAS Build. Your pipeline should run linting, type checking, unit tests, and build verification on every pull request. For release builds, automate the creation of signed binaries and distribute them to testing platforms like TestFlight and Google Play Internal Testing before promoting to production.
Preparing for App Store Release
Releasing your app requires building production binaries, signing them with the correct certificates, and submitting them through each platform's developer portal.
For Android, generate a signing key, configure your gradle build to use it, and produce an Android App Bundle. Google Play requires the AAB format for new submissions. Upload the bundle through the Google Play Console, fill in your store listing with screenshots and descriptions, and submit for review.
For iOS, configure your app in App Store Connect, create an archive in Xcode with a distribution provisioning profile, and upload the archive. Apple reviews each submission manually, and common rejection reasons include missing privacy policies, broken links, and UI that does not follow Apple's Human Interface Guidelines.
If you are using Expo, EAS Submit can automate both upload processes from your terminal, significantly reducing the manual steps involved in release distribution.
Common Pitfalls and How to Avoid Them
React Native development has several well-known traps that catch teams repeatedly. Mismatched SDK versions between your React Native project and a third-party native dependency cause build failures that are notoriously hard to debug. Always check a package's peer dependency requirements before installing it, and lock your versions in your package manifest.
Native dependency conflicts occur when two packages require different versions of the same underlying native library. CocoaPods on iOS and gradle on Android both struggle with this. When it happens, you may need to patch one package or find an alternative.
Cache corruption is another frequent culprit. If you see inexplicable build errors after pulling new code, clearing your Metro bundler cache, Watchman cache, and gradle or CocoaPods caches often resolves the issue. Make this your first troubleshooting step before diving into logs.
Finally, do not test only on simulators. Simulators run on your development machine's CPU and do not accurately represent real device performance. Test on physical devices early and often, especially for features involving the camera, microphone, or network-intensive operations like video calling.
Quick Recap and Next Steps
You now have a complete roadmap to develop a React Native app from an empty directory to a published product. The key phases are planning your architecture, setting up your environment, structuring your project, wiring navigation and state, integrating native capabilities, optimizing performance, testing, and shipping. Each phase has its own decision points, and the choices you make early compound throughout the project.
For your next step, identify one real feature you want to build and work through the phases with that feature as your anchor. If your app needs real-time communication, explore the VideoSDK React Native quickstart and the code samples to see working integration patterns. Join the VideoSDK Discord community to ask questions and share what you are building.
Definitions Glossary
React Native: An open-source framework from Meta that lets you build iOS and Android apps using JavaScript and React, rendering to native UI components rather than web views.
Expo: A set of tools and services that simplify React Native development by managing the native build configuration, providing a managed workflow, and offering over-the-air updates.
Bare Workflow: A React Native project setup where you maintain full control over the native iOS and Android projects, configuring them directly in Xcode and Android Studio.
Hermes: A JavaScript engine optimized for React Native that reduces memory usage, improves startup time, and produces smaller bundle sizes compared to JavaScriptCore.
Native Module: A bridge between JavaScript and native platform code, allowing your React Native app to access device capabilities like the camera, sensors, or platform-specific APIs that are not exposed through community packages.
React Navigation: The standard navigation library for React Native, supporting stack, tab, and drawer navigators that can be nested to model complex app hierarchies.
Key Takeaways
- To develop a React Native app successfully, plan your architecture, state management, and platform targets before writing any code.
- Expo is the right starting point for most new projects in 2026, with the option to eject to a bare workflow when custom native modules are required.
- Project structure with clear separation of concerns scales with your team and reduces onboarding friction.
- Navigation and state management are architectural pillars that should be chosen deliberately during planning, not improvised mid-project.
- Performance optimization through Hermes, lazy loading, image optimization, and profiling keeps your app responsive on real devices.
- VideoSDK's React Native SDK handles the entire WebRTC stack for video and audio calling, eliminating the need to write custom native bridge code for real-time communication.
Conclusion
Developing a React Native app in 2026 is a well-trodden path with mature tooling, a vast ecosystem, and clear best practices at every stage. The framework's single-codebase approach, native rendering, and bridge architecture make it a pragmatic choice for teams that need to ship cross-platform mobile apps without maintaining two separate native codebases. By following the roadmap in this guide, from environment setup through app store release, you can avoid the common pitfalls that derail React Native projects and deliver a polished product. If your app includes real-time video or audio features, VideoSDK's React Native SDK gives you production-ready calling capabilities without the complexity of managing WebRTC infrastructure yourself. You can start building for free with VideoSDK's free tier. What are you building with React Native? Drop a comment below, I would love to hear what kind of cross-platform app you are working on.
Free $20 Balance for AI Voice Agents & Video Calls
FAQ