


RTMP streaming in HTML5 without Flash works by placing a translation layer between the RTMP source and the browser: a server-side proxy (WebSocket bridge, HTTP-FLV transmux, or WebRTC gateway) converts the RTMP feed into a format the browser can ingest, and a client-side API (Media Source Extensions or WebCodecs) renders it in a standard video or canvas element. Flash has been dead since 2020, but RTMP ingest is still everywhere, so this proxy-plus-player pattern is the modern answer. For teams that want low-latency interactive playback without building the bridge themselves, VideoSDK's interactive live streaming handles the pipeline end to end.
Introduction
Adobe ended support for Flash Player on December 31, 2020, and every major browser removed the plugin shortly after. That killed the one mechanism developers had relied on for years to play raw RTMP streams inside a web page. The awkward part is that RTMP itself never died. OBS Studio, FFmpeg, hardware encoders, and most live production rigs still push video over RTMP because it is simple, widely supported on the ingest side, and delivers low latency from the encoder to a media server.
So developers face a real gap: the protocol that most encoders speak is not a protocol that any modern browser speaks. You cannot point an HTML5 video element at an RTMP URL and expect anything to happen. The browser has no native RTMP stack, and it never will.
Closing that gap takes two pieces. On the server, you need a translation layer that pulls the RTMP stream and re-exposes it in a browser-friendly form, typically a WebSocket stream, an HTTP-FLV feed, or a WebRTC session. On the client, you need a playback API that can consume that translated feed, which in practice means Media Source Extensions (MSE) or the newer WebCodecs API. This article walks through both sides of that architecture, compares the options, and gives you a step-by-step implementation path with no Flash anywhere in sight.
RTMP Streaming HTML5 Play Embed Without Flash: Core Concepts
RTMP streaming in an HTML5 page without Flash is defined as the practice of delivering a live RTMP feed into a modern browser by converting it, at some point in the pipeline, into a container and transport the browser natively understands. RTMP works by carrying audio and video (usually H.264 and AAC) over a persistent TCP connection, splitting media into messages and chunks that a media server can multiplex to many viewers. Its main advantage is latency: an RTMP push from encoder to server typically lands in the one-to-three second range, far below the ten-to-thirty seconds common with traditional HLS.
The challenge is that browsers only play media over HTTP-family protocols (progressive download, HLS, DASH) or via real-time APIs like WebRTC. RTMP's chunked binary framing, its handcrafted signaling, and its lack of browser sandboxing mean no browser vendor will ever implement it natively. Every flash-free solution therefore inserts a translation layer.
Three building blocks dominate that layer. A WebSocket RTMP proxy forwards the raw media data over a secure WebSocket so JavaScript can process it in the page. HTTP-FLV rewrites the RTMP stream into fragmented FLV served over plain HTTP, which JavaScript can feed into MSE. And WebCodecs is the modern browser API that lets JavaScript decode raw H.264 frames directly, enabling sub-second rendering without any container gymnastics.
What is RTMP and why it matters
RTMP (Real-Time Messaging Protocol) is a TCP-based protocol originally designed by Macromedia for Flash communication. It maintains a persistent connection and pushes media chunks as they are encoded, which is why latency stays low. Today its primary role is ingest: encoders like OBS and FFmpeg push a single stream to a media server (SRS, Nginx with the RTMP module, Ant Media, or a cloud service), and that server fans the stream out to viewers over other protocols. RTMP matters because it is the lingua franca of live production hardware and software, and replacing it on the ingest side is often harder than translating it on the playback side.
Browser limitations for RTMP
No modern browser implements RTMP. The reasons are structural, not political. RTMP expects a raw TCP socket, which browser JavaScript cannot open. Its chunk stream format has no standard parser in any browser engine. And its security model predates the browser sandbox era, with no built-in encryption in its base form (RTMPS adds TLS, but that does not help playback). The practical consequence: any RTMP-to-HTML5 solution must convert the stream into something delivered over HTTP, WebSocket, or WebRTC data channels, and then decode it with a browser-sanctioned API. That is exactly what the architectures below do.
Architecture Diagram
The full flash-free pipeline has four stages: the encoder pushes RTMP, a proxy translates it, the browser ingests it over WebSocket or HTTP, and a playback API renders it. The diagram below shows both the MSE path (top) and the WebCodecs path (bottom), which share the same server-side translation layer.
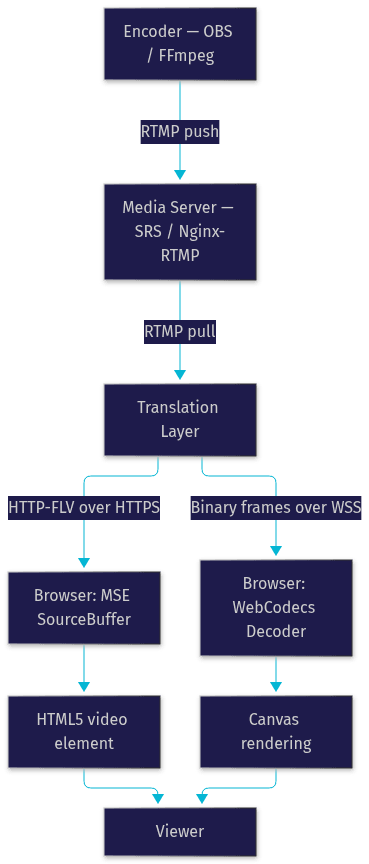
The key insight from this flow: the encoder and media server never change. Only the translation layer and the client-side playback API are new. That means you can keep your existing RTMP ingest infrastructure and bolt on HTML5 playback, rather than re-architecting your whole streaming stack.
Server-Side Proxy Options
The translation layer is where the real engineering happens. Three proxy strategies cover nearly every production deployment, and they differ mainly in transport, latency, and how much client-side work they create.
WebSocket RTMP Bridge
A WebSocket bridge is a lightweight service, typically written in Node.js or Go, that connects to the RTMP source as a client, receives the raw audio and video chunks, and forwards them over a secure WebSocket to the browser. Because WebSockets run over TLS (WSS) and pass through firewalls like normal HTTPS traffic, this approach works in restrictive networks. The bridge does minimal processing, usually just demuxing the RTMP framing and forwarding H.264 NAL units, so server CPU cost stays low. The trade-off is that all the demuxing, buffering, and decoding logic lives in your JavaScript player, which you either build or adopt from an open-source project.
HTTP-FLV Transmux
HTTP-FLV takes the opposite division of labor. The server converts the RTMP stream into fragmented FLV, a container format closely related to what RTMP already carries, and serves it as a long-lived HTTP response. Because the conversion is a transmux (repackaging) rather than a re-encode, it costs very little CPU. On the client, JavaScript fetches the FLV fragments and feeds them into an MSE SourceBuffer attached to a standard video element. This is the approach popularized by projects like flv.js, and it is the most battle-tested path to RTMP playback in HTML5. Latency typically lands in the one-to-three second range, close to raw RTMP.
WebRTC Gateway
The third option skips browser-side media plumbing entirely. A WebRTC gateway, such as Ant Media Server or SRS in WebRTC mode, pulls the RTMP stream and re-publishes it as a WebRTC session. The browser then plays it with a standard WebRTC player, and you get sub-second latency with built-in congestion control, jitter buffering, and adaptive bitrate. The cost is server-side complexity: WebRTC gateways are heavier to run than simple proxies, and each viewer connection consumes more server resources. For large audiences, this scales worse than HTTP-FLV unless you add cascading or an SFU. VideoSDK's real-time communication SDKs take this model further by managing the room, participant, and stream lifecycle for you.
Client-Side Playback Techniques
Once the proxy delivers media to the browser, one of two APIs does the rendering. Both are standard web platform features, no plugins required.
Media Source Extensions (MSE)
MSE is the older and more widely supported API. It works by letting JavaScript append media segments into a SourceBuffer, which is then attached to a normal HTML5 video element. The browser's built-in demuxer and decoder handle the actual decoding, so you get hardware acceleration and broad codec support for free. In the RTMP context, the flow is: fetch HTTP-FLV fragments from the proxy, parse the FLV tags in JavaScript to extract H.264 and AAC frames, convert them into fragmented MP4 segments (which is what MSE actually requires), and append those segments to the SourceBuffer. The video element plays them as if they came from a normal file. MSE is supported in every current browser, including Safari, which makes it the safe default. Its weakness is latency: the SourceBuffer needs a small cushion of buffered data to play smoothly, which adds roughly one to three seconds that you cannot fully eliminate.
WebCodecs API
WebCodecs is the newer, lower-level alternative. It exposes the browser's native video and audio decoders directly to JavaScript, handing you decoded frames as they arrive. In an RTMP pipeline, the WebSocket proxy sends H.264 NAL units to the page, JavaScript parses them into access units, passes each to the VideoDecoder, and receives decoded frames that you render to a canvas element. Because there is no SourceBuffer cushion and no container overhead, end-to-end latency can drop below half a second, approaching what WebRTC delivers. Audio goes through the AudioDecoder and typically plays via a Web Audio API graph, which means you also own audio-video synchronization logic. WebCodecs is available in Chrome and Edge and has landed in Safari and Firefox in recent releases, but you should verify current support for your target audience before committing to it.
Choosing Between MSE and WebCodecs
Use MSE when you need maximum browser compatibility and can tolerate one to three seconds of latency, such as surveillance dashboards or standard live pages. Use WebCodecs when sub-second latency is a hard requirement and your audience is on modern Chromium-based browsers, such as live auctions, trading feeds, or interactive broadcasts. If in doubt, ship MSE first and treat WebCodecs as a progressive enhancement.
Step-by-Step Implementation Walkthrough
Here is the full path from a raw RTMP source to a working HTML5 player, described in natural language so you can map it onto any stack.
Step 1: Set up an RTMP source
Install OBS Studio or FFmpeg on the machine that will generate the stream. Configure it to push H.264 video and AAC audio over RTMP to your media server's ingest URL, using a stream key you control. Keep the encoder settings conservative at first: a common starting point is 1080p at 30 frames per second with a bitrate around 4 Mbps, keyframe interval of two seconds. Short keyframe intervals matter because every client-side player needs to join the stream at a keyframe; longer intervals increase initial join time.
Step 2: Deploy the media server and proxy
Stand up a media server that accepts RTMP ingest, such as SRS or an Nginx build with the RTMP module. Then deploy the translation layer on the same host or a nearby one to avoid extra hop latency. If you chose the HTTP-FLV route, most modern media servers expose the FLV endpoint natively, so the proxy is effectively built in. If you chose the WebSocket route, pick a mature open-source bridge project rather than writing the RTMP parser yourself; RTMP handshaking and chunk parsing are subtle, and the established projects have already fixed the edge cases.
Step 3: Expose a secure playback URL
Configure the proxy to serve the stream at a predictable HTTPS or WSS address, for example a secure WebSocket path under your domain. Serve everything over TLS: browsers block mixed content, so an HTTPS page cannot open a plain WebSocket or HTTP stream endpoint. Set appropriate CORS headers on the proxy responses so your player page is allowed to fetch the stream, and add token-based authentication so the endpoint is not open to the public. A simple approach is a short-lived signed token appended to the playback URL, validated by the proxy before the stream starts.
Step 4: Add the player element to your page
In your HTML page, place a standard video element for the MSE path, or a canvas element for the WebCodecs path. Give it sensible dimensions and a poster frame so the layout does not jump when the stream arrives. The video element route means all standard HTML5 controls, fullscreen, and picture-in-picture work for free, which is a genuine advantage over canvas rendering.
Step 5: Connect and feed the playback API
When the page loads, your JavaScript opens the WebSocket or HTTP connection to the proxy URL. As binary data arrives, it parses the framing (FLV tags or raw NAL units), and feeds the extracted media into the chosen API: FLV fragments get converted and appended to the MSE SourceBuffer, while raw H.264 access units go straight to the WebCodecs decoder with rendered frames drawn to the canvas. The expected result is a live picture within one to three seconds (MSE) or under one second (WebCodecs) of the encoder pushing the stream.
Step 6: Handle reconnection, buffering, and latency
Live streams fail, so plan for it. Implement automatic reconnection with exponential backoff when the WebSocket or HTTP connection drops, and re-join at the next keyframe. For MSE, monitor the buffered range behind the playhead: if the buffer grows, viewers are falling behind, and you should seek forward to the live edge periodically. For WebCodecs, drop stale frames rather than queueing them, because in a live context an old frame is worthless. Tune the player's internal target latency to your use case: a surveillance feed can tolerate three seconds for stability, while an interactive stream should target well under one second even at the cost of occasional stutter.
Common Pitfalls and Troubleshooting
Mixed-content errors are the most frequent first-day failure: an HTTPS page trying to open a plain WebSocket or HTTP-FLV endpoint gets blocked silently by the browser. Fix it by serving the proxy strictly over TLS and using the secure URL scheme everywhere.
Missing codec support bites when the encoder uses a profile the browser cannot decode, typically H.264 High Profile level above what the target device supports, or HEVC, which remains inconsistent across browsers. Constrain the encoder to H.264 Baseline or Main profile for maximum compatibility.
Packet loss and stalls over WebSocket usually show up as frozen video with audio continuing, or vice versa. The remedy is a jitter buffer on the client (hold a few hundred milliseconds of frames before rendering) and verifying the proxy's TCP connection to the media server is healthy, since WebSocket inherits TCP's head-of-line blocking.
Audio-video synchronization glitches appear most often in WebCodecs players where you manage both clocks yourself. Anchor playback to the audio clock and adjust video frame presentation times against it, rather than trying to drive both independently.
Security and Performance Considerations
Treat the playback endpoint as a public API. Require token authentication on every stream request, expire tokens quickly, and bind them to the session so a leaked URL cannot be replayed. Rate-limit connections at the proxy so a single viewer cannot open dozens of parallel streams, and cap concurrent connections per token. On the performance side, monitor CPU on both ends: the proxy spends cycles on transmuxing (cheap but nonzero at scale), and WebCodecs decoding moves real decode work onto the client device, which matters for viewers on low-end phones. Track decode queue depth in your player telemetry; a persistently deep queue means the device cannot keep up and you should offer a lower-bitrate variant. Finally, keep an eye on memory: MSE SourceBuffers grow if you never evict old data, so trim buffered ranges behind the playhead on long-running sessions.
When to Use RTMP vs. HLS/DASH vs. WebRTC
The protocol choice depends on latency needs, audience size, and compatibility requirements. The matrix below maps the decision.
| Protocol | Typical latency | Best for | Not ideal for |
|---|---|---|---|
| RTMP (via proxy to HTML5) | 1–3 seconds | Ingest from existing encoders, small-to-mid audiences, keeping current infrastructure | Massive audiences, mobile-first playback |
| HLS / DASH | 6–30 seconds | VOD, huge audiences, maximum device compatibility, CDNs | Anything interactive or latency-sensitive |
| WebRTC | Under 1 second | Interactive live streaming, auctions, live shopping, calls | Thousands of viewers per server without an SFU |
Use RTMP-with-proxy when you already have RTMP infrastructure and need moderate latency without a rebuild. Use HLS or DASH when scale and compatibility matter more than responsiveness. Use WebRTC when the audience must react in real time. If you want WebRTC-grade latency with room management, chat, and recording handled for you, VideoSDK's interactive live streaming wraps that entire layer, and its REST APIs let you orchestrate streams server-side.
Definitions Glossary
RTMP: Real-Time Messaging Protocol, a TCP-based protocol that carries live audio and video over a persistent connection. It remains the dominant ingest protocol for encoders like OBS and FFmpeg, even though no browser can play it natively.
HTTP-FLV: A technique for serving RTMP-carried media as fragmented FLV over a long-lived HTTP response. Browsers cannot play FLV directly, but JavaScript can parse it and feed the frames into Media Source Extensions.
WebSocket RTMP proxy: A server-side bridge that connects to an RTMP source and forwards the raw media data to the browser over a secure WebSocket, enabling custom low-latency playback via WebCodecs or MSE.
Media Source Extensions (MSE): A browser API that lets JavaScript append media segments into a buffer attached to a standard HTML5 video element, enabling live streaming playback without plugins.
WebCodecs: A modern browser API exposing native video and audio decoders to JavaScript, allowing raw H.264 frames received over a WebSocket to be decoded and rendered to a canvas with sub-second latency.
Interactive Live Streaming (ILS): A streaming mode, such as the one VideoSDK provides, where viewers experience sub-second latency and can be promoted to active participants, unlike one-way HLS delivery.
Key Takeaways
- Flash is gone for good, but RTMP playback in HTML5 is fully achievable with a server-side translation layer plus MSE or WebCodecs on the client.
- HTTP-FLV with MSE is the most compatible path (one-to-three second latency, all modern browsers), while a WebSocket bridge with WebCodecs delivers sub-second latency on Chromium-based browsers.
- A WebRTC gateway offers the lowest latency with the least client-side code, at the cost of heavier server infrastructure per viewer.
- Always serve the proxy over HTTPS/WSS, require token authentication, and rate-limit connections before exposing any playback endpoint publicly.
- For interactive use cases where the audience must respond in real time, VideoSDK's interactive live streaming provides WebRTC-grade latency with built-in room, chat, and recording management.
Conclusion
Playing and embedding an RTMP stream in an HTML5 page without Flash comes down to one pattern: translate on the server, render in the browser. Whether you pick an HTTP-FLV transmux with Media Source Extensions for maximum compatibility, or a WebSocket bridge with WebCodecs for sub-second latency, the encoder side of your pipeline stays untouched. Start with MSE if you are unsure, add WebCodecs as a progressive enhancement, and harden the proxy with TLS, tokens, and rate limiting before you ship. If you would rather not build and operate the bridge yourself, VideoSDK's live streaming SDKs handle the low-latency pipeline end to end, and you can try them free at app.videosdk.live/login. What are you building with RTMP or low-latency streaming? Drop a comment, I'd love to hear what kind of live use case you're working on.
Free $20 Balance for AI Voice Agents & Video Calls
FAQ