


React Native WebRTC combines the cross-platform power of React Native with the real-time media capabilities of WebRTC to enable audio and video calling in mobile apps. Developers use the react-native-webrtc package to access native RTCPeerConnection APIs, manage media streams, and establish peer-to-peer connections through a signaling server. For a faster path to production, VideoSDK offers a React Native SDK that handles signaling, TURN infrastructure, and network adaptation out of the box.
Real-time video is no longer a nice-to-have feature for mobile apps. Telehealth platforms, tutoring services, social apps, and customer support tools all depend on sub-second audio and video to function. If your app ships without reliable real-time communication, users notice immediately.
React Native has become the go-to framework for teams that need to target both iOS and Android from a single codebase. Pairing it with WebRTC gives you a foundation for building peer-to-peer video chat without relying on a proprietary black box. But WebRTC is a complex protocol with many moving parts, and getting it right on mobile requires understanding signaling, ICE negotiation, media stream handling, and platform-specific permissions.
By the end of this guide, you will understand the core concepts of React Native WebRTC, how to prepare your development environment, how peers connect through signaling, and what production-ready optimizations matter most. If you want to skip the low-level plumbing, VideoSDK's React Native SDK wraps all of this into a rooms-based architecture with built-in recording, transcription, and network-adaptive streaming.
What Is WebRTC?
WebRTC is defined as a free, open-source project that provides web browsers and mobile applications with real-time communications via simple application programming interfaces. It enables peer-to-peer audio, video, and data sharing without requiring users to install plugins or third-party software.
WebRTC works by establishing a direct connection between two peers using three core components. The first is the RTCPeerConnection, which handles the negotiation and maintenance of the connection between browsers or mobile devices. The second is the media stream API, which captures audio and video from device cameras and microphones. The third is the data channel API, which allows bidirectional text and binary data transfer between peers.
What makes WebRTC different from traditional streaming is its peer-to-peer architecture. Traditional streaming protocols like HLS or RTMP send media through a central server, introducing latency that can reach 10 to 30 seconds. WebRTC establishes a direct UDP connection between participants, achieving sub-300 millisecond latency when network conditions are favorable.
For mobile development, WebRTC is particularly relevant because it runs natively on both iOS and Android. The react-native-webrtc package bridges these native implementations to JavaScript, giving React Native developers access to the same real-time communication capabilities available in web browsers.
React Native WebRTC Landscape
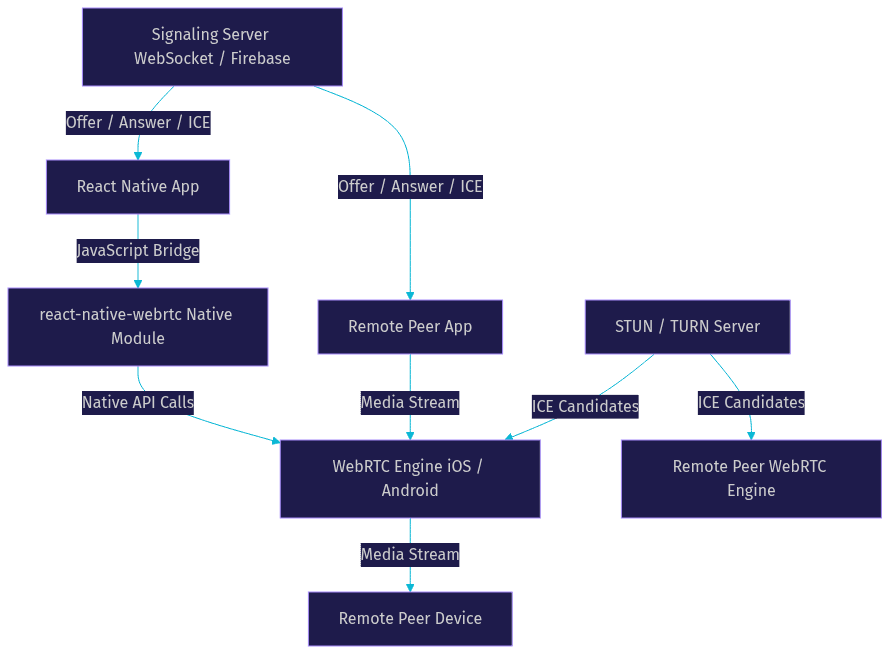
The React Native WebRTC ecosystem centers on the react-native-webrtc package, an open-source library that wraps native WebRTC implementations for iOS and Android. This package exposes JavaScript APIs that mirror the browser WebRTC specification, including RTCPeerConnection, MediaStream, and RTCDataChannel.
Platform support has matured significantly. The package supports iOS through a native WebRTC framework bundled with the library, Android through a precompiled WebRTC binary, and web through a shim that maps React Native WebRTC calls to standard browser APIs. Expo support requires a custom development client because the library includes native code that cannot run in Expo Go.
Recent updates have brought the package closer to feature parity with browser-based WebRTC. Unified Plan support replaced the older Plan-B SDP format, aligning with the current WebRTC specification. Simulcast support allows sending multiple video layers at different resolutions, enabling receivers to pick the best quality for their bandwidth. Screen capture is now available on both iOS and Android, though platform-specific limitations apply.
Here is a high-level architecture showing how a React Native app connects to the WebRTC engine and signaling server:
Core Features Supported
The react-native-webrtc package supports the full range of WebRTC capabilities needed for production video calling. Audio and video calling works through getUserMedia, which captures device camera and microphone input as media streams that can be attached to a peer connection.
Data channels enable real-time text messaging, file transfer, and application state synchronization during a call. Screen capture allows users to share their device screen with remote participants, though iOS requires a broadcast extension for full screen sharing. Unified Plan support ensures compatibility with modern WebRTC endpoints, and simulcast support allows adaptive video quality across participants with different network conditions.
Preparing Your Development Environment
Setting up a React Native WebRTC project requires careful attention to native build tooling. You need the React Native CLI, Xcode for iOS builds, and Android Studio for Android builds. Ensure your iOS deployment target and Android SDK versions meet the minimum requirements specified by the react-native-webrtc package documentation.
If you are using Expo, you cannot rely on Expo Go because it does not include the native WebRTC binaries. You need to create a custom development client using Expo's development build feature. This compiles a custom version of the Expo runtime that includes your native dependencies, allowing you to run and debug the WebRTC module on a physical device or simulator.
Camera and microphone permissions are mandatory and must be configured at the native level. On iOS, you add permission description strings to your Info.plist file for camera and microphone access. On Android, you declare the camera, record audio, and modify audio settings permissions in your AndroidManifest.xml file. You also need to request these permissions at runtime using a permissions library, as Android requires explicit user consent for dangerous permissions.
Failing to configure permissions correctly is the most common reason developers see black screens or silent audio on their first run. Both platforms will silently deny media access if the permission strings are missing or improperly formatted.
Signaling: Connecting Peers
WebRTC does not define how peers find each other. That is the job of a signaling server, which acts as an intermediary that helps two devices exchange the information needed to establish a direct peer connection. The signaling server is not part of the WebRTC specification, so you can build it using any technology that supports real-time message delivery.
Common signaling server options include WebSocket servers built with Node.js, Firebase Realtime Database for quick prototyping, or a custom backend using your existing infrastructure. The signaling server relays three types of messages between peers. The first is the SDP offer, which one peer creates to describe its media capabilities and preferred codecs. The second is the SDP answer, which the receiving peer sends back to accept the offer and describe its own capabilities. The third is ICE candidates, which contain network connectivity information that helps peers determine the best path for media delivery.
A typical connection flow works as follows. Peer A creates an offer and sends it through the signaling server to Peer B. Peer B receives the offer, creates an answer, and sends it back through the signaling server. Both peers then exchange ICE candidates through the signaling channel until a viable network path is found and the direct media connection is established.
For secure signaling, always use HTTPS or WSS (WebSocket Secure) connections. Implement authentication tokens to verify that only authorized users can join signaling sessions. Avoid sending media through the signaling server, as its sole purpose is connection negotiation. Once the peer connection is established, media flows directly between devices or through a TURN server if direct connectivity fails.
Choosing STUN/TURN Services
STUN servers help devices discover their public IP address so they can attempt direct peer-to-peer connections. Google provides free public STUN servers, which work well for development and testing. However, free STUN servers are not reliable for production use because they offer no uptime guarantees.
TURN servers relay media traffic when direct peer-to-peer connectivity fails, which happens frequently on mobile networks behind strict NATs and corporate firewalls. TURN is essential for mobile WebRTC because cellular networks and enterprise WiFi often block the UDP ports that WebRTC prefers. Paid TURN providers like Twilio, Xirsys, and Metered offer managed TURN infrastructure with global coverage. Budget for TURN relay costs in production, as relayed traffic consumes bandwidth on the TURN server.
Establishing a Peer Connection
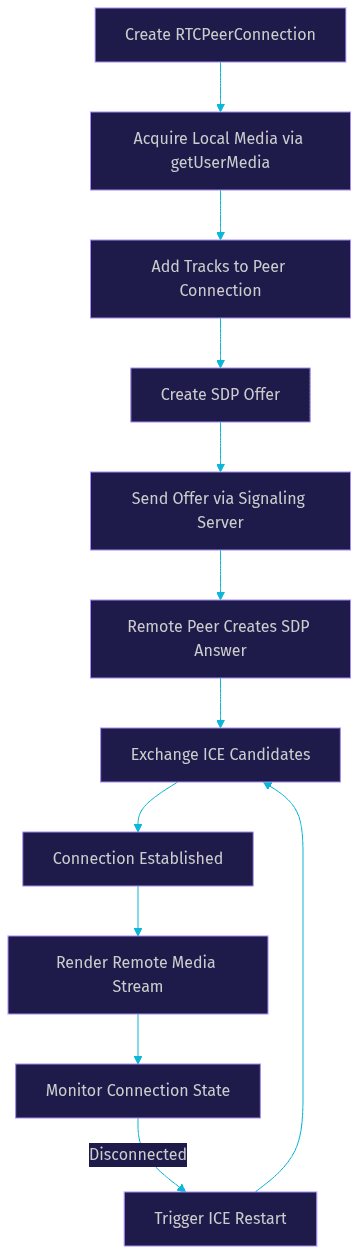
Creating a peer connection in React Native WebRTC involves instantiating an RTCPeerConnection object with a configuration object that specifies your ICE servers. The configuration includes an array of STUN and TURN server URLs, along with credentials for authenticated TURN access.
Once the peer connection is created, you acquire local media using getUserMedia, which returns a media stream containing audio and video tracks. You add these tracks to the peer connection so they can be negotiated and sent to the remote peer. The peer connection then handles encoding, packetization, and transmission of the media over the network.
Connection state management is critical for a smooth user experience. The RTCPeerConnection emits state changes that tell you whether the connection is connecting, connected, disconnected, or failed. Your application should listen for these states and update the UI accordingly. When the connection state transitions to disconnected, you can attempt reconnection by renegotiating the session or restarting ICE gathering.
Mobile networks are inherently unstable. Users move between WiFi and cellular networks, enter elevators, and experience momentary signal drops. Your reconnection logic should detect network changes using React Native's NetInfo API and trigger an ICE restart when connectivity is restored. An ICE restart forces the peer connection to gather new ICE candidates, which can re-establish the media path without requiring a full session renegotiation.
Here is a flow diagram showing the peer connection lifecycle:
Media Stream Management
Media stream management begins with getUserMedia, which prompts the user for camera and microphone permission and returns a MediaStream object. This object contains track objects for audio and video that you add to the peer connection for transmission.
On the receiving side, the peer connection fires an event when a remote track arrives. You extract the remote media stream and render it using a React Native view component provided by the react-native-webrtc package. This component handles the native rendering of video frames on iOS and Android, displaying the remote participant's video feed.
Managing local and remote streams correctly is essential for features like muting, camera switching, and video quality adjustments. Each track can be enabled or disabled independently, giving you control over what media is sent to remote participants.
Data Channels for Real-Time Messaging
Data channels provide a bidirectional data path between peers that runs alongside the audio and video streams. They use the same peer connection infrastructure, meaning data flows with the same low latency as media without requiring a separate server connection.
Use data channels for in-call text chat, file transfer, game state synchronization, or any application-specific data exchange that needs to happen during a call. Data channels support two reliability modes. Ordered and reliable mode guarantees message delivery in sequence, which is ideal for chat messages and critical state updates. Unordered and unreliable mode skips retransmissions, which is better for high-frequency data like game positions where stale messages are useless.
Creating a data channel requires specifying it during the initial offer creation. The receiving peer detects the data channel through an event handler and can immediately begin sending and receiving messages.
Advanced Topics
Unified Plan vs Plan-B Migration
Unified Plan is the modern SDP format for WebRTC, replacing the older Plan-B format. Plan-B allowed multiple media descriptions in a single SDP m-line, which created ambiguity and interoperability issues. Unified Plan assigns each media track its own m-line, aligning with the current WebRTC specification and improving compatibility with browser-based WebRTC endpoints. The react-native-webrtc package now defaults to Unified Plan, but if you are maintaining an older codebase, you may need to update your SDP parsing logic.
Enabling Simulcast
Simulcast allows a sender to transmit multiple versions of the same video stream at different resolutions and bitrates. The receiving peer or a media server selects the appropriate layer based on available bandwidth and display size. This is particularly valuable in group calls where participants have varying network conditions. Enabling simulcast in react-native-webrtc requires configuring the RTP sender with multiple encoding parameters.
Screen Sharing Implementation
Screen sharing on iOS requires a broadcast extension, which is a separate target in your Xcode project that handles screen capture at the OS level. Android screen sharing uses the MediaProjection API, which prompts the user for permission to capture their screen. Both platforms have quirks around audio capture during screen share, so test thoroughly on real devices.
Using the Web Shim
If you need to run your React Native WebRTC app on the web, the package provides a shim that maps its API to standard browser WebRTC. This allows you to share most of your WebRTC logic across mobile and web targets, though you should test the web shim separately because some mobile-specific behaviors differ.
Testing and Debugging
Debugging React Native WebRTC requires a combination of tools. Chrome's webrtc-internals page (accessible at chrome://webrtc-internals) provides detailed graphs of packet loss, jitter, bitrate, and ICE candidate selection. While this tool is designed for browser WebRTC, it can help you understand the protocol behavior even when debugging mobile issues.
React Native Debugger is useful for inspecting JavaScript-side state, including peer connection objects and media stream tracks. For native-level debugging, use Xcode's console for iOS and Android Studio's Logcat for Android to capture native WebRTC engine logs.
Common pitfalls include permission errors that silently deny media access, ICE gathering delays caused by unreachable STUN servers, and mismatched SDP descriptions when peers use different WebRTC versions. To reproduce issues reliably, test on real devices over both WiFi and cellular networks. Simulators often behave differently from physical hardware, especially for camera capture and network simulation.
Production-Ready Tips
Optimizing video quality for varying network conditions means implementing adaptive bitrate strategies. Monitor the peer connection's stats API for packet loss and round-trip time, and adjust video resolution and bitrate accordingly. The react-native-webrtc package exposes getStats, which returns detailed metrics about each track's performance.
Battery consumption is a real concern for mobile WebRTC. Video encoding is computationally expensive, and continuous camera usage drains battery quickly. Consider lowering the default video resolution, using hardware-accelerated codecs, and pausing video when the app goes to the background.
Security best practices include using encrypted media (WebRTC encrypts all media by default using SRTP), implementing token-based authentication for signaling, and validating all SDP offers before processing them. Never expose TURN server credentials in client-side code without using short-lived credential rotation.
For monitoring and analytics, log connection state transitions, ICE candidate types used, and media quality metrics. This data helps you diagnose production issues and understand how users experience your app across different network conditions.
If managing all of this feels overwhelming, VideoSDK's React Native video calling SDK abstracts away signaling, TURN management, network adaptation, and recording. You can also explore the Prebuilt UI Kit for a zero-code embedding option, or browse code samples for integration examples.
Definitions Glossary
RTCPeerConnection: The core WebRTC interface that manages the connection between two peers, handling negotiation, media transmission, and state management.
Signaling Server: An intermediary server that helps peers exchange SDP offers, answers, and ICE candidates before a direct peer connection is established. WebRTC does not specify a signaling protocol.
STUN Server: A server that helps a device discover its public IP address and NAT type so it can attempt direct peer-to-peer connectivity.
TURN Server: A relay server that forwards media traffic between peers when direct connectivity fails, essential for mobile networks behind restrictive NATs.
ICE Candidate: A network connectivity path discovered through STUN or TURN that a peer connection can use to establish media flow.
Simulcast: A WebRTC technique where a sender transmits multiple video layers at different resolutions and bitrates, allowing receivers to select the best quality for their bandwidth.
Unified Plan: The modern SDP format for WebRTC that assigns each media track its own m-line, replacing the older Plan-B format for better interoperability.
Key Takeaways
- React Native WebRTC bridges native WebRTC implementations to JavaScript, enabling cross-platform real-time audio and video calling from a single codebase.
- A signaling server is mandatory for peers to exchange SDP offers, answers, and ICE candidates before a direct connection can be established.
- TURN servers are essential for production mobile WebRTC because cellular networks and corporate firewalls frequently block direct peer-to-peer UDP connections.
- Managing connection states and implementing ICE restart logic is critical for handling mobile network transitions between WiFi and cellular.
- For teams that want to skip low-level WebRTC plumbing, VideoSDK's React Native SDK provides a rooms-based architecture with built-in signaling, TURN infrastructure, network-adaptive streaming, and recording.
Conclusion
Building a React Native WebRTC application requires understanding peer connections, signaling, ICE negotiation, media stream handling, and platform-specific permissions. The react-native-webrtc package gives you the tools to implement all of this, but the complexity of production-grade real-time communication should not be underestimated. Network adaptation, reconnection logic, and cross-platform testing all demand significant engineering effort.
If you want to ship video calling faster, VideoSDK's React Native SDK handles the infrastructure layer so you can focus on your application logic. You can sign up for free at app.videosdk.live/login and start building with the VideoSDK documentation. Join the VideoSDK Discord community to connect with other developers building real-time communication apps.
What are you building with React Native WebRTC? Drop a comment below, I would love to hear what kind of real-time communication use case you are working on.
Conclusion
In this article, we've explored the integration of WebRTC with React-Native to build robust real-time communication applications. Starting from setting up the development environment, we moved on to integrating WebRTC, implementing basic and advanced features, and optimizing performance. By combining the power of WebRTC for peer-to-peer communication with the flexibility of React-Native for mobile app development, you can create sophisticated applications that support audio, video, and data sharing in real-time.
For more advanced implementations and real-world examples, consider exploring the Jellyfish GitHub repository, which offers a comprehensive collection of resources and tools.
FAQ