


Kamailio WebRTC integration involves using the Kamailio SIP server as a signaling gateway between WebRTC browsers and legacy SIP networks. By leveraging the Kamailio WebSocket module for SIP over WSS and RTPEngine for media translation, developers can bridge SRTP browser media with standard RTP phone traffic. This architecture enables modern web applications to seamlessly communicate with existing VoIP infrastructure.
Connecting a standard SIP softphone to a browser-based WebRTC client presents a unique challenge. SIP typically relies on UDP or TCP for signaling and RTP for media, while WebRTC mandates secure WebSocket (WSS) for signaling and Secure Real-time Transport Protocol (SRTP) for encrypted media. Kamailio, a highly customizable open-source SIP server, has become a popular choice for bridging this gap. By acting as a SIP-WebRTC gateway, Kamailio handles the signaling translation while delegating media bridging to RTPEngine. This guide walks through the architecture, configuration steps, and troubleshooting strategies for deploying a Kamailio WebRTC gateway in 2026.
What is Kamailio WebRTC?
Kamailio WebRTC refers to the architectural pattern where the Kamailio SIP server is configured to accept and process SIP signaling from WebRTC clients. WebRTC applications cannot communicate using raw SIP over UDP. Instead, they encapsulate SIP messages inside WebSocket frames and transmit them over a secure TLS channel. Kamailio handles this through its WebSocket and XHTTP modules, which intercept HTTP upgrade requests and establish persistent WebSocket connections.
In this setup, Kamailio acts purely as a signaling gateway. It receives a SIP INVITE from a browser, processes it, and forwards it to a legacy SIP endpoint. However, signaling is only half the equation. The media path must also be bridged. WebRTC mandates SRTP, while legacy SIP devices typically expect plain RTP. Kamailio itself does not process media packets. It relies on an external media relay, most commonly RTPEngine, to handle the SRTP-to-RTP conversion. By combining Kamailio for SIP routing and RTPEngine for media translation, developers can build a robust SIP-WebRTC gateway that connects modern web applications to traditional telephony infrastructure.
Architecture Overview
A functional Kamailio WebRTC deployment requires several distinct components working in tandem. The signaling path and the media path are handled by different servers to ensure scalability and performance. Understanding how these components interact is critical before attempting any configuration.
The primary components include the WebRTC browser client, the Kamailio SIP server, the RTPEngine media relay, and optionally a TURN/STUN server for NAT traversal. The browser client runs a JavaScript SIP library like sip.js or JsSIP. This library generates SIP messages and sends them over a secure WebSocket connection to Kamailio. Kamailio evaluates the SIP routing logic, performs security checks, and forwards the signaling to the legacy SIP endpoint.
Simultaneously, the browser generates SRTP media packets. These packets are sent to RTPEngine, which decrypts the SRTP stream, converts it to standard RTP, and forwards it to the legacy SIP phone. The reverse flow works the same way, with RTPEngine encrypting the RTP stream from the SIP phone into SRTP for the browser. A TURN server may be required if the browser is behind a strict symmetric NAT, providing a fallback path for media traversal.
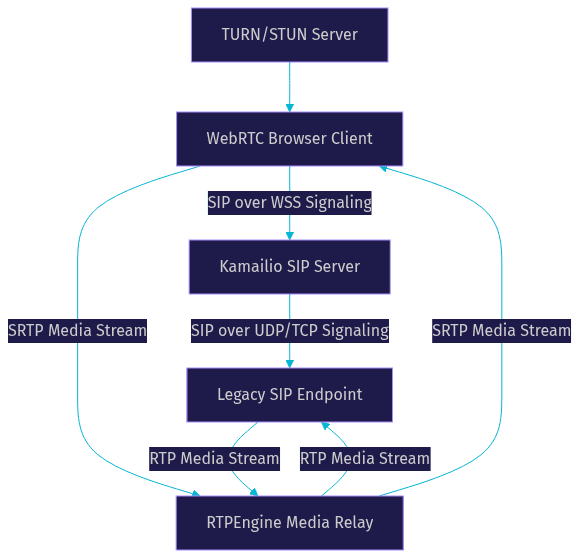
This separation of signaling and media is a core concept in WebRTC SIP gateway performance. It allows Kamailio to handle thousands of concurrent signaling transactions without being burdened by media processing, while RTPEngine scales horizontally to manage the heavy lifting of media encryption and decryption.
Setting Up the Kamailio WebSocket Module
To accept WebRTC connections, Kamailio must be configured to listen for WebSocket traffic. This requires loading three essential modules: xhttp, websocket, and tls. The xhttp module allows Kamailio to handle HTTP requests, which is necessary because a WebSocket connection begins as an HTTP upgrade request. The websocket module manages the persistent connection after the upgrade, and the tls module provides the encryption layer required for secure WebSockets (WSS).
You must instruct Kamailio to listen on a specific IP address and port for WebSocket traffic. Typically, this is port 443 or a custom high port. The WebSocket module requires configuration of several key parameters. The keepalive mechanism ensures that idle connections are not dropped by intermediate proxies. You can choose between ping, pong, or a combination of both to maintain the connection state. The sub-protocols parameter must explicitly list SIP to ensure the server only accepts WebSocket connections intending to carry SIP traffic.
Another critical parameter is the CORS mode. Cross-Origin Resource Sharing settings dictate which domains are permitted to establish WebSocket connections to your server. Proper Origin validation is a mandatory security step. If you fail to validate the Origin header, your SIP server becomes an open relay, vulnerable to cross-site WebSocket hijacking attacks. You should explicitly check the Origin header in your Kamailio routing logic and reject connections from untrusted domains.
Enabling TLS for Secure WebSockets
WebRTC mandates encryption, which means your WebSocket connection must use WSS. This requires a valid TLS certificate. For public-facing deployments, you can obtain a free certificate from Let's Encrypt. You must configure the Kamailio TLS module with the paths to your certificate and private key files.
The TLS configuration should mandate secure protocols and ciphers. Disable older protocols like SSLv3 and TLS 1.0, and require TLS 1.2 or higher. When a browser attempts to connect, it will verify the certificate chain. If you use a self-signed certificate for testing, the browser will block the connection unless the user manually bypasses the warning. For production, a valid certificate from a trusted certificate authority is non-negotiable. Mismatched certificates or incorrect domain names in the certificate's Common Name or Subject Alternative Name will cause the WebSocket handshake to fail silently in the browser.
Integrating RTPEngine for Media Bridging
While Kamailio handles SIP signaling, it cannot process media. WebRTC clients send audio and video using SRTP, which is encrypted. Legacy SIP phones expect unencrypted RTP. To bridge this gap, you must integrate RTPEngine. RTPEngine is a high-performance media relay that specializes in translating between SRTP and RTP, handling codec transcoding if necessary, and managing NAT traversal for media streams.
The integration involves Kamailio sending control commands to RTPEngine via a UDP control socket. When Kamailio receives a SIP INVITE from a WebRTC client, it extracts the Session Description Protocol (SDP) body. Kamailio then sends a command to RTPEngine, passing the SDP and instructing it to prepare for a media session. RTPEngine responds with a modified SDP, which Kamailio inserts back into the SIP message before forwarding it to the legacy endpoint.
Several RTPEngine configuration flags are essential for WebRTC bridging. The replace-origin and replace-session-connection flags are critical for NAT traversal. They instruct RTPEngine to rewrite the SDP origin and connection fields with its own public IP address. This ensures that the legacy SIP phone sends its media to RTPEngine, not directly to the browser's private IP. The direction flag controls the media flow direction, which is necessary for symmetric RTP handling and firewall traversal.
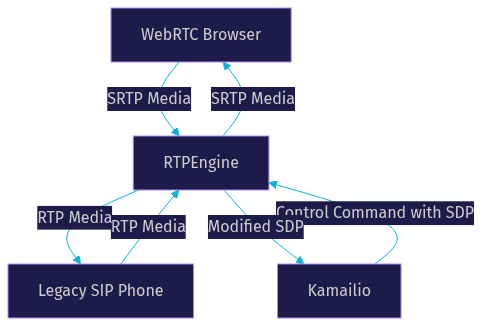
RTPEngine must be installed on a server with a public IP address, or at least a IP address reachable by both the WebRTC client and the legacy SIP endpoint. If RTPEngine sits behind a NAT, the configuration becomes significantly more complex and is generally not recommended for production WebRTC gateways.
NAT Traversal and ICE Handling
Network Address Translation remains one of the most complex aspects of WebRTC integration. When a WebRTC client generates an SDP offer, it includes ICE candidates. These candidates represent potential paths for the media stream, including host candidates (local IPs), server reflexive candidates (public IPs mapped by STUN), and relay candidates (TURN servers).
Kamailio must detect WebRTC traffic and manipulate the SDP to ensure media flows through RTPEngine. When Kamailio receives an INVITE over a WebSocket connection, it knows the client is a WebRTC endpoint. It then uses the RTPEngine module to rewrite the SDP. RTPEngine strips the browser's ICE candidates and replaces them with its own IP address. This forces the legacy SIP phone to send media directly to RTPEngine, which then forwards it to the browser.
A critical checklist for NAT handling involves verifying public IP versus private IP usage. The legacy SIP phone must be able to route traffic to the IP address advertised in the modified SDP. If RTPEngine advertises a private IP, the media flow will fail. You must ensure RTPEngine is configured with its public IP address. Additionally, you must verify that the Kamailio configuration properly identifies WebSocket traffic and applies the RTPEngine flags only to WebRTC sessions. Applying WebRTC-specific SDP manipulation to standard SIP traffic will break those calls.
ICE candidate leakage is a common issue. If Kamailio fails to properly rewrite the SDP, the legacy SIP phone might attempt to send media to the browser's local IP address, which is unreachable. The RTPEngine flags must explicitly mandate IP rewriting to prevent this.
Testing the SIP-WebRTC Bridge
After configuring Kamailio and RTPEngine, you must test the bridge thoroughly. Start by verifying SIP registration. Use a browser-based SIP client like sip.js or JsSIP to register against your Kamailio server. Check the Kamailio logs to confirm the REGISTER message was received over the WebSocket connection and processed successfully.
Next, test call setup. Initiate a call from the browser to a legacy SIP softphone. Verify that the INVITE reaches the softphone and that the 200 OK response is relayed back to the browser. Finally, verify media flow. Speak into the browser microphone and confirm audio is heard on the softphone, and vice versa. If signaling succeeds but media fails, the issue is almost certainly related to RTPEngine configuration or NAT traversal. Use network monitoring tools to confirm that RTP packets are flowing between the softphone and RTPEngine, and that SRTP packets are flowing between the browser and RTPEngine.
Common Pitfalls and Troubleshooting
Several frequent issues arise when deploying a Kamailio WebRTC gateway. The most common is a missing or invalid Origin header. Browsers strictly enforce CORS for WebSocket connections. If your Kamailio configuration does not explicitly trust the domain serving your web application, the browser will block the connection. Always log the Origin header during testing to verify it matches your expectations.
Mismatched TLS certificates are another major pitfall. If the certificate presented by Kamailio does not match the domain name in the WebSocket URL, the browser will refuse the connection. This often happens when developers test with self-signed certificates or move from a staging environment to production without updating the certificate configuration. Ensure your certificate includes all necessary Subject Alternative Names.
ICE candidate leakage occurs when RTPEngine fails to properly rewrite the SDP. This results in the legacy SIP phone attempting to send media to an unreachable browser IP. Verify that your Kamailio routing logic applies the correct RTPEngine flags to all WebRTC sessions.
Finally, RTPEngine permission errors can occur if the Kamailio process does not have network access to the RTPEngine control socket, or if RTPEngine lacks the necessary system permissions to bind to its media ports. Check firewall rules and process permissions to resolve these issues.
Best-Practice Recommendations
For a production Kamailio WebRTC deployment, security and performance must be prioritized. Always use TLS for WebSocket connections and enforce strict CORS policies. Never expose your Kamailio server without Origin validation. Use a valid certificate from a trusted authority and disable legacy TLS protocols.
Performance optimization involves tuning WebSocket keepalive settings to match your network environment. Aggressive keepalive intervals can generate unnecessary traffic, while long intervals can cause connections to drop. A 30-second interval is a common starting point.
Maintainability is crucial for complex Kamailio configurations. Use a modular configuration approach, separating routing logic, NAT handling, and WebRTC specific rules into different files. Keep your configuration under version control. This allows you to track changes and roll back if a new configuration breaks call flows. Regularly consult the official Kamailio documentation and the VideoSDK blog for updates on WebRTC best practices.
Definitions Glossary
Kamailio: An open-source SIP server used for routing and signaling in large-scale VoIP and WebRTC deployments.
RTPEngine: A media relay application that bridges media between WebRTC (SRTP) and legacy SIP (RTP) networks by performing real-time protocol conversion.
SIP over WebSocket (WSS): The transport method where SIP signaling messages are encapsulated within secure WebSocket frames, enabling browsers to participate in SIP networks.
ICE (Interactive Connectivity Establishment): A framework used by WebRTC to find the best network path for media traffic by gathering and testing potential candidates.
SRTP (Secure Real-time Transport Protocol): An extension of RTP that provides encryption, message authentication, and integrity for media streams in WebRTC.
Key Takeaways
- Kamailio serves as a powerful SIP-WebRTC gateway by using its WebSocket and TLS modules to accept secure signaling from browsers.
- RTPEngine is mandatory for media bridging, handling the complex translation between encrypted SRTP and standard RTP.
- Proper NAT traversal requires Kamailio to detect WebRTC traffic and instruct RTPEngine to rewrite SDP with public IP addresses.
- Security depends on strict Origin validation and valid TLS certificates to prevent cross-site hijacking and browser connection failures.
- A modular Kamailio configuration under version control is essential for maintaining a stable production gateway.
Conclusion
Building a Kamailio WebRTC gateway allows developers to connect modern web applications to legacy SIP infrastructure without abandoning existing telephony investments. By combining Kamailio's flexible SIP routing with RTPEngine's robust media translation, you can create a scalable bridge that handles the strict requirements of WebRTC signaling and media. While the configuration involves careful attention to TLS, WebSocket origins, and NAT traversal, the resulting architecture is highly effective. If you are looking to build real-time communication applications without managing the complexities of raw WebRTC and SIP bridging, consider exploring VideoSDK for a streamlined developer experience. What are you building with Kamailio or WebRTC? Drop a comment below, I would love to hear about your SIP gateway use cases.
Step 5: Implementing Participant View
The participant view is a crucial feature in any WebRTC application, allowing users to see and manage other participants in a call. This involves displaying participant information, handling real-time updates, and managing media streams effectively. This section guides you through implementing the participant view in your Kamailio WebRTC application.
Displaying Participants
To display participants, you need to fetch participant information and render it in the user interface. Here’s how to implement this functionality using JavaScript:
[a] HTML Structure for Participant View
HTML
1<!DOCTYPE html>
2<html lang="en">
3<head>
4    <meta charset="UTF-8">
5    <meta name="viewport" content="width=device-width, initial-scale=1.0">
6    <title>Participant View</title>
7    <link rel="stylesheet" href="styles.css">
8</head>
9<body>
10    <div class="participant-view">
11        <h1>Participants</h1>
12        <div id="participants"></div>
13    </div>
14
15    <script src="app.js"></script>
16</body>
17</html>
[b] CSS for Participant View
CSS
1body {
2    display: flex;
3    flex-direction: column;
4    align-items: center;
5    font-family: Arial, sans-serif;
6}
7
8.participant-view {
9    width: 80%;
10    max-width: 1200px;
11    margin: 20px auto;
12}
13
14.participant-view h1 {
15    text-align: center;
16    margin-bottom: 20px;
17}
18
19#participants {
20    display: flex;
21    flex-wrap: wrap;
22    gap: 10px;
23    justify-content: center;
24}
25
26.participant {
27    width: 200px;
28    border: 1px solid #ccc;
29    border-radius: 8px;
30    padding: 10px;
31    text-align: center;
32}
33
34.participant video {
35    width: 100%;
36    border-radius: 8px;
37}
[c] JavaScript for Fetching and Displaying Participants
JavaScript
1let localStream;
2let peerConnections = {};
3const participantsContainer = document.getElementById('participants');
4
5// Function to add a participant
6function addParticipant(stream, participantId) {
7    const participantElement = document.createElement('div');
8    participantElement.className = 'participant';
9    participantElement.id = participantId;
10
11    const videoElement = document.createElement('video');
12    videoElement.srcObject = stream;
13    videoElement.autoplay = true;
14
15    participantElement.appendChild(videoElement);
16    participantsContainer.appendChild(participantElement);
17}
18
19// Function to remove a participant
20function removeParticipant(participantId) {
21    const participantElement = document.getElementById(participantId);
22    if (participantElement) {
23        participantElement.remove();
24    }
25}
26
27// Setting up local stream
28navigator.mediaDevices.getUserMedia({ audio: true, video: true })
29    .then(stream => {
30        localStream = stream;
31        addParticipant(stream, 'local');
32    })
33    .catch(error => {
34        console.error('Error accessing media devices.', error);
35    });
36
37// Example function to handle new participant connection
38function handleNewParticipant(participantId) {
39    const configuration = { iceServers: [{ urls: 'stun:stun.l.google.com:19302' }] };
40    const peerConnection = new RTCPeerConnection(configuration);
41
42    peerConnection.addStream(localStream);
43
44    peerConnection.onaddstream = event => {
45        addParticipant(event.stream, participantId);
46    };
47
48    peerConnection.onicecandidate = event => {
49        if (event.candidate) {
50            // Send the candidate to the remote peer
51            sendMessage({
52                type: 'candidate',
53                candidate: event.candidate,
54                participantId
55            });
56        }
57    };
58
59    peerConnections[participantId] = peerConnection;
60
61    // Create an offer and send it to the new participant
62    peerConnection.createOffer()
63        .then(offer => {
64            return peerConnection.setLocalDescription(offer);
65        })
66        .then(() => {
67            sendMessage({
68                type: 'offer',
69                offer: peerConnection.localDescription,
70                participantId
71            });
72        })
73        .catch(error => {
74            console.error('Error creating offer.', error);
75        });
76}
77
78// Example function to handle incoming messages
79function handleMessage(message) {
80    const { type, participantId, offer, answer, candidate } = message;
81
82    const peerConnection = peerConnections[participantId];
83
84    switch (type) {
85        case 'offer':
86            peerConnection.setRemoteDescription(new RTCSessionDescription(offer))
87                .then(() => {
88                    return peerConnection.createAnswer();
89                })
90                .then(answer => {
91                    return peerConnection.setLocalDescription(answer);
92                })
93                .then(() => {
94                    sendMessage({
95                        type: 'answer',
96                        answer: peerConnection.localDescription,
97                        participantId
98                    });
99                })
100                .catch(error => {
101                    console.error('Error handling offer.', error);
102                });
103            break;
104
105        case 'answer':
106            peerConnection.setRemoteDescription(new RTCSessionDescription(answer))
107                .catch(error => {
108                    console.error('Error setting remote description.', error);
109                });
110            break;
111
112        case 'candidate':
113            peerConnection.addIceCandidate(new RTCIceCandidate(candidate))
114                .catch(error => {
115                    console.error('Error adding received ice candidate.', error);
116                });
117            break;
118
119        default:
120            break;
121    }
122}
123
124// Function to send messages (to be implemented according to your signaling server)
125function sendMessage(message) {
126    // Implement your signaling server communication here
127}
Managing Participant States
Managing participant states involves handling their active or inactive status, muting/unmuting their audio, and starting/stopping their video streams.
Handling Participant States
JavaScript
1function toggleParticipantMute(participantId) {
2    const participantElement = document.getElementById(participantId);
3    if (participantElement) {
4        const videoElement = participantElement.querySelector('video');
5        const audioTracks = videoElement.srcObject.getAudioTracks();
6        audioTracks.forEach(track => {
7            track.enabled = !track.enabled;
8        });
9    }
10}
11
12function toggleParticipantVideo(participantId) {
13    const participantElement = document.getElementById(participantId);
14    if (participantElement) {
15        const videoElement = participantElement.querySelector('video');
16        const videoTracks = videoElement.srcObject.getVideoTracks();
17        videoTracks.forEach(track => {
18            track.enabled = !track.enabled;
19        });
20    }
21}
Real-Time Updates using WebRTC
Handling real-time updates involves managing participant connections and disconnections. Ensure your signaling server is set up to broadcast these events to all participants.
Signaling Server Communication (Node.js)
JavaScript
1const WebSocket = require('ws');
2const wss = new WebSocket.Server({ port: 8080 });
3
4let participants = {};
5
6wss.on('connection', ws => {
7    const participantId = generateUniqueId();
8    participants[participantId] = ws;
9
10    ws.on('message', message => {
11        const parsedMessage = JSON.parse(message);
12        handleSignalingMessage(participantId, parsedMessage);
13    });
14
15    ws.on('close', () => {
16        delete participants[participantId];
17        broadcastMessage({ type: 'participantDisconnected', participantId });
18    });
19
20    broadcastMessage({ type: 'participantConnected', participantId });
21});
22
23function handleSignalingMessage(participantId, message) {
24    const { type, targetParticipantId } = message;
25
26    if (type === 'offer' || type === 'answer' || type === 'candidate') {
27        const targetWs = participants[targetParticipantId];
28        if (targetWs) {
29            targetWs.send(JSON.stringify({ ...message, participantId }));
30        }
31    }
32}
33
34function broadcastMessage(message) {
35    Object.values(participants).forEach(ws => {
36        ws.send(JSON.stringify(message));
37    });
38}
39
40function generateUniqueId() {
41    return 'xxxxxxxx-xxxx-4xxx-yxxx-xxxxxxxxxxxx'.replace(/[xy]/g, c => {
42        const r = Math.random() * 16 | 0;
43        const v = c === 'x' ? r : (r & 0x3 | 0x8);
44        return v.toString(16);
45    });
46}
Implementing the participant view in your Kamailio WebRTC application enhances the user experience by allowing users to see and manage other participants in real-time. By fetching participant information, handling real-time updates, and managing media streams, you create a dynamic and interactive communication environment. This step ensures that users can effectively engage in WebRTC sessions, making your application more robust and user-friendly.
Step 6: Run Your Code Now
Now that you have set up your Kamailio WebRTC application with the necessary configurations, user interfaces, and controls, it's time to run and test your application. This step involves compiling your code, starting the necessary services, and performing tests to ensure everything works as expected.
Compiling and Running the Application
To run your Kamailio WebRTC application, follow these steps:
Start Kamailio SIP Server
Ensure your
kamailio.cfg file is correctly configured.Start the Kamailio server using the following command:
sh
1 sudo kamailio -f /usr/local/etc/kamailio/kamailio.cfg -DD -EThe
-DD flag runs Kamailio in debug mode, and the -E flag logs all messages to the console, which is useful for debugging.Start the RTPengine (if used for media handling):
Make sure RTPengine is installed and configured correctly.
Start the RTPengine service:
sh
1 sudo systemctl start rtpengineStart the Signaling Server
If you have a custom signaling server (like the WebSocket server example provided earlier), start it:
sh
1 node signalingServer.jsServe the Web Application**:
Ensure your web application files (HTML, CSS, JavaScript) are served by a web server.
You can use a simple HTTP server like
http-server for testing:sh
1 npx http-server ./path-to-your-webappOpen your browser and navigate to the local server URL (e.g.,
http://localhost:8080) to access the join screen and participant view.Testing and Debugging
Testing your application is crucial to ensure that all components work together seamlessly. Here are some tips for testing and debugging your Kamailio WebRTC application:
Test User Registration and Login
- Open the join screen and attempt to log in with different user credentials.
- Ensure that the authentication backend and Kamailio handle the registration process correctly.
Test Call Setup and Controls
- After logging in, initiate a call and test the basic controls (mute, hold, transfer).
- Verify that the call setup, signaling, and media streams function as expected.
Test Participant View
- Join the call with multiple participants and check that all participant views are displayed correctly.
- Ensure that participant states (active, inactive) are updated in real-time.
Monitor Logs for Errors
- Keep an eye on the Kamailio console logs for any errors or warnings.
- Check the browser console for any JavaScript errors.
Debugging Common Issues
- Connection Issues: Ensure that WebSocket and WSS configurations are correct and that there are no firewall or network issues blocking connections.
- Media Issues: Verify that media streams are correctly negotiated and handled by RTPengine (if used). Check for any errors in the media server logs.
- Signaling Issues: Ensure that your signaling server correctly handles and relays messages between participants.
By following these steps, you can compile and run your Kamailio WebRTC application, ensuring all components are correctly configured and working together. Thorough testing and debugging help identify and resolve any issues, providing a robust and reliable real-time communication solution. Now you are ready to deploy your application and provide users with a seamless WebRTC experience.
Conclusion
Integrating Kamailio with WebRTC creates a powerful, scalable, and flexible communication solution that can handle high call volumes and real-time media streams. Throughout this guide, we covered the essential steps to set up Kamailio for WebRTC, including creating the necessary configuration files, wireframing components, implementing the join screen, adding call controls, and managing participant views. By following these steps, you can build a robust WebRTC application that leverages the strengths of Kamailio to provide seamless and efficient communication.
Free $20 Balance for AI Voice Agents & Video Calls
FAQ