


Laravel WebSocket broadcasting lets your server push real-time events to connected browsers instantly, instead of relying on polling. Laravel abstracts the WebSocket layer through its broadcasting system and pluggable drivers, including the first-party Reverb server, hosted options like Pusher and Ably, and self-hosted packages. This guide walks through the full architecture, driver selection, setup, security, and scaling, all explained in plain prose.
Introduction
Modern Laravel applications rarely live in a request-response vacuum. A chat message, a live dashboard update, a notification badge, a collaborative editor cursor: users now expect changes to appear the moment they happen. The old approach, polling the server every few seconds, burns bandwidth, adds latency, and hammers your database for nothing. A Laravel WebSocket setup solves this by keeping a persistent, bidirectional connection open between the browser and your server, so events flow the instant they occur.
Laravel makes this practical through its broadcasting layer. You fire a normal Laravel event, the framework serializes it, hands it to a broadcasting driver, and the driver pushes it to every connected client over a WebSocket connection. You never hand-roll the protocol handling yourself.
This guide covers the whole picture: how the architecture fits together, which driver to choose in 2026, how to stand up a self-hosted Laravel WebSocket server, how the client side works with Echo and Livewire, and how to secure, scale, and debug the whole system. Everything is explained in natural language, so you understand the mechanics before touching a single line of configuration.
What Is a Laravel WebSocket and How Does Broadcasting Work?
A WebSocket is a persistent, full-duplex communication channel that starts as an HTTP handshake and then upgrades to a long-lived TCP connection. Once established, both the server and the browser can send messages at any time without the overhead of repeated HTTP requests. That is what makes it the standard transport for real-time events in web applications.
Laravel WebSocket functionality is not a single feature but an abstraction built on three pieces. First, server-side Laravel events: any event can be marked as broadcastable, meaning Laravel will automatically serialize it when it fires. Second, the broadcasting configuration: a central place where you declare which driver carries your events, whether that is Laravel Reverb, Pusher, Ably, or a self-hosted WebSocket server. Third, the client side: Laravel Echo, a JavaScript library that subscribes to channels on your behalf and triggers callbacks when events arrive.
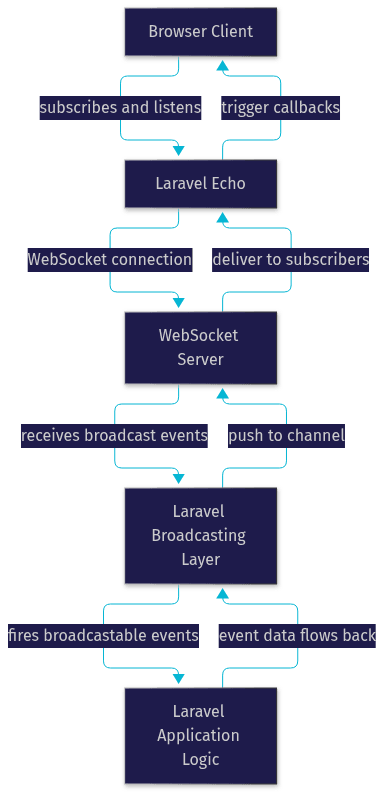
The flow is simple from the developer's perspective. Your application logic fires an event, the broadcasting layer delivers it to the WebSocket server, and every browser listening on the relevant channel receives it through Echo. Laravel handles the serialization, channel naming, and delivery; the WebSocket server handles the connection management.
Broadcasting Architecture in Laravel
The Laravel broadcasting architecture is a pipeline with clearly separated responsibilities, and understanding each stage is what separates a working integration from a fragile one.
It starts with an event. Any Laravel event class can be marked as broadcastable, which tells the framework to serialize it automatically when dispatched. The event declares which channel, or channels, it should be broadcast on: a public channel anyone can join, a private channel requiring authorization, or a presence channel that also tracks who is currently subscribed.
Next comes the queue. By default, broadcastable events are pushed through your queue system rather than sent inline, so broadcasting never blocks the HTTP request that triggered the event. This is a detail many tutorials skip, and it matters: if your queue worker is stalled, your real-time events stall with it, even though the WebSocket server itself is perfectly healthy.
The broadcasting configuration then hands the serialized event to the configured driver. The driver is the bridge between Laravel and the actual WebSocket infrastructure. It speaks the protocol of your chosen server, whether that is the Pusher-compatible protocol used by Reverb and the Laravel WebSockets package, or a vendor-specific API like Ably's.
Finally, the WebSocket server fans the event out to every client subscribed to the target channel, and Echo on the client side fires the corresponding callback.

Two supporting pieces complete the picture. Channel authorization callbacks live on your server and decide whether a given user may join a given private or presence channel; the WebSocket server consults them whenever a client attempts to subscribe. And the broadcasting configuration file is where you declare credentials, cluster settings, and driver selection per environment, so development can run on a local server while production uses a managed one.
Choosing a Laravel WebSocket Driver
The driver decision shapes your cost profile, operational burden, and scaling ceiling, so it deserves deliberate attention rather than a default choice.
Laravel Reverb is the first-party option introduced by the Laravel team, a managed WebSocket server designed to integrate tightly with the rest of the framework. It speaks the Pusher-compatible protocol, which means Echo works with it out of the box, and it is built to handle large volumes of concurrent connections. For most new Laravel projects in 2026, Reverb is the sensible starting point.
Pusher Channels is the long-standing hosted service that originally inspired Laravel's broadcasting API. You pay for capacity, and in exchange you never operate a server, never worry about connection limits during traffic spikes, and get a vendor dashboard for monitoring. Ably is another strong hosted option, known for its global edge network and message delivery guarantees, which makes it attractive for applications with geographically distributed users.
Self-hosted solutions include the community Laravel WebSockets package, which implements the Pusher protocol inside a PHP process, and Swoole-based servers that run on a high-performance PHP extension for dramatically better concurrency. Self-hosting trades money for responsibility: you control the infrastructure and the data path, but you own uptime, scaling, and security patching.
| Driver | Hosting Model | Pricing | Scalability | Setup Complexity |
|---|---|---|---|---|
| Laravel Reverb | Managed or self-hosted | Included with Laravel ecosystem | High, built for many concurrent connections | Low |
| Pusher Channels | Fully hosted | Usage-based tiers | Very high, vendor-managed | Very low |
| Ably | Fully hosted | Usage-based tiers | Very high, global edge network | Low |
| Laravel WebSockets package | Self-hosted | Free, infrastructure costs only | Medium, limited by PHP process model | Medium |
| Swoole-based server | Self-hosted | Free, infrastructure costs only | High, event-driven PHP extension | High |
Use a hosted driver when you want zero operational overhead and predictable costs at moderate scale. Use Reverb when you want first-party integration with the option to scale within the Laravel ecosystem. Self-host when data residency, cost control at very high message volume, or full ownership of the transport layer outweighs the operational burden.
Setting Up a Self-Hosted Laravel WebSocket Server
Self-hosting a Laravel WebSocket server follows a predictable sequence, and knowing the intent behind each step keeps you oriented when something misbehaves.
The first step is installing the server package through Composer, Laravel's dependency manager. This pulls the WebSocket server implementation into your project alongside its dependencies. After installation, you publish the package's configuration into your application's config directory, which gives you a file where you declare the host, the port, the application identifier, and the allowed origins for connections.
Next, you wire up your environment variables. This is where you point the broadcasting configuration at your self-hosted server instead of a hosted provider, and where you supply the credentials the server will use to authenticate broadcasting requests from your Laravel application. Because the popular self-hosted packages implement the Pusher protocol, your application treats the local server exactly as it would treat Pusher, just with your own host and port in place of the vendor's.
Then you start the server process. It listens on its configured port, accepts incoming WebSocket connections, and waits for broadcast events from your application. In production, this process should run under a supervisor so it restarts automatically after crashes or deployments. Finally, you verify connectivity: open your application in a browser, confirm that Echo establishes a connection, fire a test event from your application, and watch it arrive on the client.

Two self-hosted options dominate the conversation. The Laravel WebSockets package runs inside a normal PHP process, which makes it approachable and easy to debug, but its concurrency ceiling is bounded by PHP's traditional process model. Swoole-based servers run on a compiled PHP extension with an event-driven architecture, handling far more simultaneous connections per machine, at the cost of a more demanding installation and some behavioral differences from standard PHP. Choose the former for simplicity and moderate traffic, the latter when connection counts are the bottleneck.
Integrating Laravel WebSocket with Echo and Livewire
The client side of a Laravel WebSocket setup is where your users actually experience the real-time behavior, and Laravel gives you two complementary tools for it.
Laravel Echo is the JavaScript library that manages subscriptions and event handling in the browser. You configure it once with your WebSocket server's host, port, and authentication details, and from then on you declare what to listen for: a public channel by name, a private channel scoped to a specific model, or a presence channel that also reports who else is present. When an event arrives, Echo invokes the callback you attached, and your interface updates. For private and presence channels, Echo automatically calls back to your Laravel application to request authorization before subscribing, which is why channel authorization callbacks on the server are mandatory, not optional.
Livewire, Laravel's full-stack framework for dynamic interfaces without hand-written JavaScript, integrates with broadcasting at a deeper level. A Livewire component can be marked to listen for broadcasted events, and when a matching event arrives over the WebSocket connection, Livewire re-renders the component automatically. This means a live dashboard or a chat feed can stay current without you writing a single line of client-side event wiring, because Livewire treats the broadcast as a trigger for a server-side re-render.
Presence channels deserve special mention because they unlock user-list features: showing who is currently viewing a page, who is in a chat room, or who is editing a document. The WebSocket server tracks join and leave events on the channel, and Echo exposes that membership information to every subscriber.
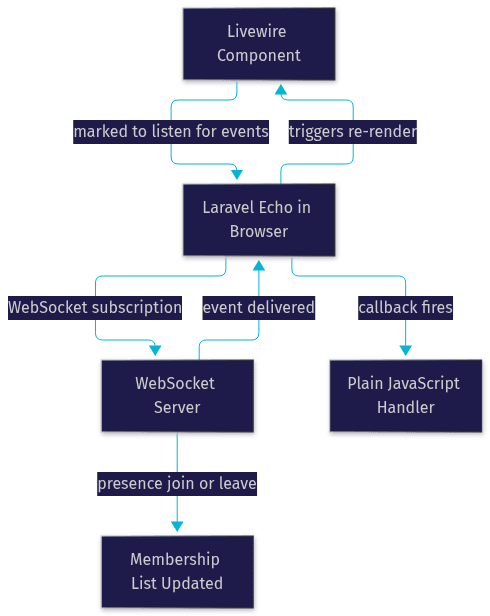
The practical setup sequence is: configure Echo with your server details, define your channel authorization callbacks on the Laravel side, declare your listeners either in JavaScript or through Livewire's event attributes, and test each channel type in isolation before combining them.
Security and Authentication for Laravel WebSocket Channels
A Laravel WebSocket server is a public entry point into your application, and it deserves the same security discipline as your HTTP layer.
The first line of defense is channel authorization. Every attempt to subscribe to a private or presence channel triggers a callback to your Laravel application, where you decide whether the authenticated user is permitted to join. These callbacks receive the current user and the channel name, including any model identifiers embedded in it, so you can enforce real ownership rules: only members of a conversation may join its private channel, only participants of an order may watch its updates. Never leave a private channel without an explicit authorization rule, because the default behavior is to deny, but a missing rule is a gap waiting to be exploited.
The second defense is transport security. In production, WebSocket connections should run over the encrypted variant, WSS, the same way your HTTP traffic runs over HTTPS. This means terminating TLS at your reverse proxy or load balancer and forwarding plain connections to the WebSocket server internally. It also means your channel authorization endpoint, which Echo calls over HTTP, must itself be served over HTTPS so credentials and session cookies are never exposed in transit.
Third, restrict origins. Your WebSocket server should reject connection attempts from domains other than your application, which prevents other sites from embedding your real-time infrastructure. Fourth, rate-limit both connection attempts and event delivery, so a misbehaving client cannot flood your channels. Finally, keep broadcasting credentials out of your frontend bundle: the client needs connection details, but the secrets that authorize your server to publish events belong only in your server environment.
Scaling and Performance Tips for Laravel WebSocket Servers
Scaling a Laravel WebSocket setup is fundamentally about scaling two things independently: the WebSocket connections themselves, and the pipeline that feeds events to them.
On the connection side, the ceiling depends on your driver. Hosted services and Reverb absorb concurrency for you. Self-hosted servers need deliberate work: a single PHP process will eventually saturate, so you run multiple server instances behind a load balancer. The catch is that clients connected to different instances cannot hear each other's events unless the instances share state, which is where Redis comes in. A Redis-backed pub/sub layer lets every server instance receive every event and fan it out to its own subscribers, making the fleet behave as one logical server.
On the event pipeline side, remember that broadcastable events travel through your queue. Under load, a slow queue means delayed real-time updates, which users perceive as a broken feature. Run dedicated queue workers for broadcasting, monitor their depth, and use Laravel Horizon to visualize and manage those workers. Horizon gives you throughput, failure, and retry metrics per queue, which turns vague "events seem delayed" reports into a diagnosable bottleneck.
For monitoring the WebSocket layer itself, the options depend on your driver: Reverb exposes operational metrics, the Laravel WebSockets package ships a built-in statistics dashboard showing current connections and message rates, and hosted vendors provide their own dashboards. Whichever you use, track concurrent connections, messages per second, and authentication failures as your core health signals, and alert before users notice.
Monitoring, Debugging, and Troubleshooting Laravel WebSockets
Most Laravel WebSocket problems fall into three recognizable patterns, and knowing them shortens diagnosis dramatically.
The first pattern is stale connections: the client believes it is subscribed, but the server dropped the connection during a network change or deploy. Echo handles reconnection automatically, but a server-side restart during a long-lived page session can leave events silently missed. The fix is verifying that your server sends heartbeat pings and that your client configuration enables reconnection with sensible retry intervals.
The second pattern is failed channel authentication: the client subscribes, the authorization callback rejects it, and events never arrive. Check your application logs for the authorization request, confirm the callback logic accepts the user in question, and verify that the authentication endpoint is reachable over HTTPS with valid credentials.
The third pattern is queue bottlenecks: the WebSocket server is healthy, but events arrive late or not at all because queue workers are backed up or crashed. Horizon's dashboard or your queue driver's metrics will show the backlog immediately. When in doubt, test each stage in isolation: fire an event and confirm it reaches the queue, confirm the worker processes it, confirm the driver delivers it, and confirm the client receives it. The stage where the chain breaks is your problem.
Best-Practice Checklist Before Shipping Laravel WebSockets
Before your Laravel WebSocket feature goes to production, verify each of these:
- Broadcasting configuration differs correctly per environment, with development pointing at a local server and production at its real target.
- All private and presence channels have explicit authorization callbacks enforcing real ownership rules.
- Production serves the WebSocket over WSS with TLS terminated at your proxy, and the auth endpoint runs over HTTPS.
- The WebSocket server process runs under a supervisor and restarts automatically after crashes and deploys.
- Queue workers dedicated to broadcasting are monitored, with alerting on backlog depth.
- A scaling plan exists for connection growth, including Redis-backed pub/sub if you run multiple server instances.
- Allowed origins are restricted to your application domains, and connection rates are limited.
- The full event flow has been tested on a production-like network, including reconnect behavior after a server restart.
Definitions Glossary
Laravel WebSocket: A persistent, bidirectional connection between a Laravel application's server and connected browsers, used to push real-time events without polling.
Laravel Broadcasting: Laravel's server-side abstraction that serializes events and delivers them to a configured WebSocket driver for fan-out to clients.
Laravel Echo: The client-side JavaScript library that subscribes to broadcasting channels and executes callbacks when events arrive in the browser.
Laravel Reverb: The first-party, Pusher-protocol-compatible WebSocket server from the Laravel team, usable managed or self-hosted.
Private Channel: A broadcasting channel that requires per-user authorization through a server-side callback before a client may subscribe.
Presence Channel: A broadcasting channel that, in addition to authorization, tracks and exposes the list of currently subscribed members.
Broadcasting Driver: The configurable bridge, such as Reverb, Pusher, Ably, or a self-hosted server, that carries events from Laravel to the WebSocket infrastructure.
Key Takeaways
- Laravel WebSocket broadcasting delivers real-time events through a clean pipeline: broadcastable event, queue, driver, WebSocket server, and Echo on the client.
- Driver choice is a trade-off: hosted services like Pusher and Ably remove operations, Reverb offers first-party integration, and self-hosting gives full control at the cost of operational burden.
- Self-hosted setup follows a fixed sequence: install the package, publish configuration, set environment variables, run the server under a supervisor, and verify the full event flow.
- Security rests on explicit channel authorization callbacks, WSS in production, restricted origins, and rate limiting.
- Scaling means handling connections with multiple server instances plus Redis-backed pub/sub, and keeping the broadcasting queue healthy with Horizon.
Conclusion
A Laravel WebSocket setup is no longer an exotic addition to a Laravel application; it is the standard way to deliver the instant, live behavior users expect. The broadcasting architecture keeps responsibilities cleanly separated, the driver ecosystem lets you match your hosting appetite to your project, and Echo and Livewire make the client side straightforward. Start with a driver that fits your team's operational comfort, verify the full event pipeline end to end, and scale deliberately when connection counts demand it. The official Laravel broadcasting documentation is the authoritative reference for every driver and channel type covered here. What are you building with Laravel WebSockets? Drop a comment, I'd love to hear what kind of real-time feature you're working on.
Troubleshooting and Debugging Websocket Issues
Common issues with Laravel Websockets include connection problems and event broadcasting failures. Here are some troubleshooting tips:
Check your Websocket server status
Ensure the Websocket server is running and accessible.
Verify configurations
Double-check your
.env file and configuration settings for accuracy.Use browser developer tools
Inspect Websocket connections and network activity in your browser’s developer tools.
Log Websocket events
Use Laravel’s logging capabilities to monitor Websocket events and diagnose issues.
By following these troubleshooting steps, you can identify and resolve common Websocket issues efficiently.
Conclusion
Laravel Websockets provide an efficient and powerful way to implement real-time communication in web applications. By following this guide, you should have a solid understanding of setting up and using Websockets in your Laravel projects. From configuring the Websocket server to broadcasting and listening for events, you can now create dynamic and responsive applications that enhance user experience. Remember to implement security measures to protect your Websocket connections and utilize troubleshooting tips to resolve common issues. Explore further and experiment with different use cases to fully leverage the potential of Laravel Websockets.
Free $20 Balance for AI Voice Agents & Video Calls
FAQ