


WebRTC React intro explains that WebRTC is a browser API for peer-to-peer audio/video, and React provides the declarative UI layer to render streams and manage call state. Use React hooks to encapsulate connections, store MediaStream objects in refs, and update UI via state. Start with a simple two-person video call and expand to group rooms.
Real-time web applications have shifted from a novelty to an expectation. Users now demand sub-second latency for video calls, live collaboration, and interactive streaming. React has become the default choice for building these interactive user interfaces due to its component-based architecture and predictable state management. However, React alone cannot handle the complexities of peer-to-peer media transmission. This is where WebRTC comes in. WebRTC provides the low-level browser APIs necessary to capture media and establish direct peer connections. This article provides a clear, code-free mental model of WebRTC React architecture. You will learn the core building blocks of WebRTC, how to integrate them with React using hooks and refs, and the exact steps needed to conceptualize a basic video call. By the end, you will understand how to bridge the gap between React's declarative UI and WebRTC's imperative media APIs.
What Is WebRTC React?
WebRTC React refers to the architectural pattern of combining the WebRTC protocol with the React JavaScript library to build real-time communication applications. To understand this combination, we must look at both technologies separately.
WebRTC is a free, open-source project that provides web browsers and mobile applications with real-time communication via simple application programming interfaces. It allows audio and video communication to work inside web pages by allowing direct peer-to-peer connections, eliminating the need to install plugins or download native applications. WebRTC handles the complex tasks of capturing media from cameras and microphones, negotiating network paths through firewalls, and transmitting encrypted media streams.
React is a declarative JavaScript library for building user interfaces. It lets developers compose complex UIs from small, isolated pieces of code called components. React manages a virtual DOM to efficiently update and render the right components when data changes. React's component lifecycle aligns well with WebRTC's connection lifecycle. The mounting phase is perfect for requesting media and establishing connections, while the unmounting phase is ideal for cleaning up resources.
When combined, WebRTC and React complement each other by strictly separating responsibilities. WebRTC handles the heavy lifting of media capture, peer connection management, network traversal, and data channel operations. React handles rendering the video elements, displaying connection statuses, and managing user interactions like mute and unmute buttons. WebRTC operates imperatively, meaning you explicitly tell it to create connections and add tracks. React operates declaratively, meaning you define what the UI should look like based on the current state. The challenge of a WebRTC React integration is bridging the imperative world of WebRTC with the declarative world of React without letting frequent re-renders interfere with the stability of media objects.
Core WebRTC Building Blocks
Before integrating WebRTC into a React application, developers must understand the four foundational building blocks of the protocol. These components work together to capture, negotiate, and transmit real-time media.
Media Capture with getUserMedia
The first step in any WebRTC application is accessing the user's local media devices. Browsers provide a method to request access to the camera and microphone. When called, the browser prompts the user for permission. If granted, the browser returns a MediaStream object. This object represents a real-time stream of media content, containing individual audio and video tracks. In a React application, this stream needs to be attached to a video element to display the local preview. Managing this stream requires careful handling of browser permissions and device availability.
RTCPeerConnection
The RTCPeerConnection is the core API that connects two peers. It represents the direct peer-to-peer pipe through which media flows. Creating a peer connection involves a complex negotiation process called Interactive Connectivity Establishment (ICE). ICE is responsible for finding the best network path between two peers, which often involves traversing Network Address Translation (NAT) firewalls. ICE gathers all possible paths a connection can take. It collects host candidates (local IP addresses), server reflexive candidates (public IP addresses discovered via STUN), and relay candidates (addresses on a TURN server). The peers then test these candidates in pairs to find the one with the lowest latency and highest reliability.
RTCDataChannel
While audio and video are the most common use cases, WebRTC also supports bidirectional text and binary data transfer through RTCDataChannel. This API allows developers to send arbitrary data over the same peer connection. Common use cases include in-call chat messaging, file transfers, and sharing application state like cursor positions. Data channels offer low latency and reliable delivery, making them ideal for interactive features that run alongside media streams.
Signaling (outside WebRTC)
WebRTC does not define how peers find each other. This process is called signaling, and it is left entirely to the developer. Signaling is the application-level exchange of session descriptions (SDP) and ICE candidates between peers before a direct connection is established. Developers typically implement signaling using a separate communication channel, such as WebSockets, Firebase, or any real-time database. One peer creates an offer, sends it through the signaling server, the other peer receives it, creates an answer, and sends it back. Once the connection is established, signaling is no longer required, and media flows directly between peers.
React Integration Patterns
Integrating WebRTC into React requires specific patterns to handle the mismatch between WebRTC's imperative API and React's declarative rendering model. Mismanaging WebRTC objects in React state is a common source of bugs and performance issues.
Using Refs for Persistent Objects
React state is designed for data that, when changed, should trigger a re-render. WebRTC objects like RTCPeerConnection and MediaStream are mutable, persistent objects that do not fit this model. Storing a MediaStream in React state will cause unnecessary re-renders and can lead to memory leaks. Instead, these objects should be stored in React refs. Refs act as persistent containers that survive component re-renders. By keeping the peer connection and media streams in refs, you maintain direct access to the imperative APIs without triggering React's reconciliation cycle. You only use React state to trigger UI updates when the status of these objects changes.
Custom Hook: useWebRTC (conceptual)
To keep React components clean, all WebRTC logic should be encapsulated in a custom hook. A conceptual useWebRTC hook centralizes the responsibilities of managing the connection. This hook initializes the peer connection, attaches event listeners for incoming tracks and ICE candidates, and handles cleanup when the component unmounts. The hook acts as the bridge. It translates the imperative events fired by WebRTC into declarative state updates that React understands. For instance, when WebRTC fires an event indicating a new track has arrived, the hook intercepts this, stores the track in a ref, and updates a boolean state variable. This state update tells React to render the remote video component.
State-Driven UI
While the WebRTC objects live in refs, the UI must still react to changes in the connection. This is where React state comes in. Flags indicating whether the remote video is ready, whether the user is muted, or whether an error occurred belong in state. When the WebRTC layer detects a new remote track, it updates a state variable. This state change triggers React to re-render the component, displaying the remote video element. This pattern ensures that the UI always reflects the current state of the peer connection without manually manipulating the DOM.
Component Layout
A typical WebRTC React application follows a hierarchical component structure. At the top is a VideoContainer component that manages the overall call state and utilizes the useWebRTC hook. This container renders child components like LocalVideo, RemoteVideo, and Controls. LocalVideo and RemoteVideo receive the media streams from the container and attach them to video elements. The Controls component handles user interactions, such as muting the microphone or ending the call, by calling methods exposed by the useWebRTC hook. This modular architecture keeps responsibilities isolated and components reusable.
Architecture Overview
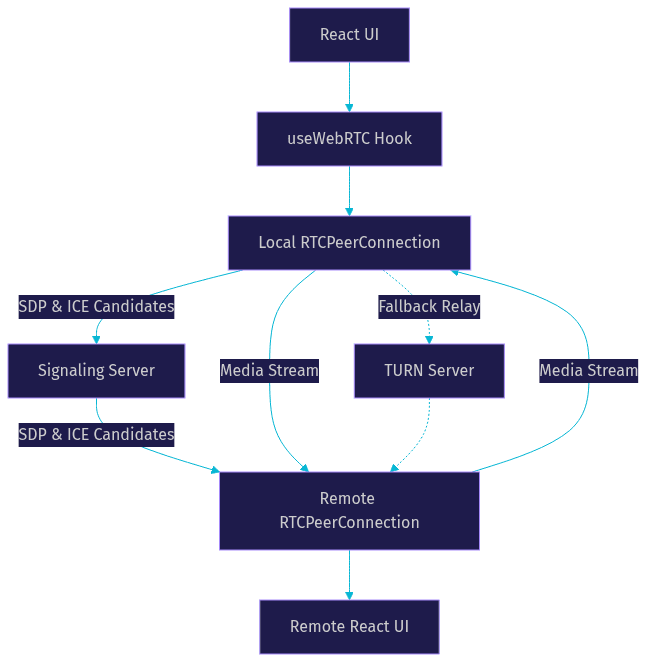
Visualizing the flow of data in a WebRTC React application clarifies how the different layers interact. The React UI sits at the top, rendering the interface based on state. When a user initiates a call, the UI calls a method from the useWebRTC hook. The hook interacts with the local RTCPeerConnection, which generates session descriptions and ICE candidates. These are sent through a signaling server to the remote peer. The remote peer's RTCPeerConnection processes this information and establishes the direct connection. Media then flows directly between the two peers, bypassing the signaling server. If the direct connection fails, TURN servers relay the media.
Step-by-Step Conceptual Walkthrough
Building a basic two-person video call requires a sequence of carefully orchestrated steps. Here is a conceptual walkthrough of the entire process from initialization to cleanup.
1. Initialize the App
Start by creating a standard React application. You will need a signaling mechanism to exchange connection data between peers. This typically involves setting up a WebSocket server or using a real-time database service. The React app connects to this signaling server upon loading. No WebRTC connections are established yet; the app is simply ready to initiate or receive a call.
2. Request Media
When the user decides to join a call, the application requests access to their camera and microphone. The browser presents a permission prompt. Once the user grants access, a local MediaStream is created. This stream is stored in a React ref to prevent unnecessary re-renders. The stream is then attached to a local video element using the srcObject property, allowing the user to see their own camera feed before connecting to anyone else.
3. Create the Peer Connection
Next, the application instantiates an RTCPeerConnection. The local media tracks from the MediaStream are added to this connection. The application then sets up event listeners on the connection. One listener waits for incoming remote tracks. Another listener listens for ICE candidates, which are network path possibilities. A third listener monitors the overall connection state to detect when the call connects, disconnects, or fails.
4. Exchange Signaling Data
To connect two peers, they must exchange connection information. The initiating peer creates an SDP offer describing its media capabilities. This offer is sent through the signaling server to the remote peer. The remote peer receives the offer, generates an SDP answer, and sends it back. Once both peers have each other's SDP, they begin exchanging ICE candidates through the signaling server. This exchange is asynchronous and happens rapidly. The signaling server acts merely as a relay, passing messages back and forth. It does not process the media or the connection logic. Once the ICE candidates are exchanged and a successful path is found, the signaling server steps out of the media path entirely.
5. Render Remote Streams
As ICE candidates are tested and a connection is established, the remote peer's media tracks begin arriving. The event listener for incoming tracks fires. The incoming MediaStream is captured and stored in a ref. A state flag is updated to indicate that the remote video is ready. This state change triggers React to render the remote video element, attaching the incoming stream. The two-person video call is now active.
6. Handle Cleanup
When the user ends the call or navigates away from the component, proper cleanup is essential. The application must close the RTCPeerConnection to stop all media transmission. All local media tracks must be explicitly stopped to release the camera and microphone hardware. Finally, the application disconnects from the signaling server. React's unmount lifecycle ensures these cleanup steps run automatically when the video call component is destroyed.
Common Pitfalls and How to Avoid Them
Integrating WebRTC with React presents several common challenges. Being aware of these pitfalls can save hours of debugging.
Leaking Media Devices
One of the most frequent issues is failing to stop media tracks when a component unmounts. If tracks are not stopped, the camera indicator light remains on, and the hardware stays locked. Always ensure that the cleanup function in your useWebRTC hook explicitly stops all tracks in the local MediaStream before closing the connection.
Stale Connections
Another issue arises from improper event listener management. If event listeners are not removed when the component unmounts, they can continue to fire on a closed connection. This leads to memory leaks and attempts to update state on unmounted components. Always remove event listeners from the RTCPeerConnection during cleanup.
State-Synchronisation Bugs
Mixing refs and state for the same piece of data causes synchronization bugs. For example, storing the connection status in a ref but trying to render it in the UI will result in a stale display. Keep persistent objects in refs and UI-facing flags in state. Never duplicate the same logical flag between the two.
Network Traversal Failures
Many developers test WebRTC locally and find it works perfectly, only to fail in production. Local testing usually does not require TURN servers because peers are on the same network. Production environments involve complex firewalls and NATs. Always configure a public TURN server in your RTCPeerConnection settings to ensure media can be relayed when direct connections fail.
Browser Compatibility
WebRTC behavior varies across browsers. Safari, in particular, has strict autoplay policies. It will block video playback if there is no user interaction. Always prompt the user to interact with the UI, such as clicking a join button, before attaching streams to video elements. This ensures the browser allows the media to play.
Scaling Beyond Two Participants
A direct peer-to-peer mesh works well for a two-person call. However, mesh topology does not scale. In a mesh network, every participant sends their media directly to every other participant. For three people, each user sends two streams and receives two. For ten people, each user sends nine streams and receives nine. This quickly overwhelms client bandwidth and CPU.
To scale beyond two participants, applications use a Selective Forwarding Unit (SFU). An SFU is a media server that receives all participant streams and selectively forwards them to each participant. Instead of sending media to nine peers, a participant sends one stream to the SFU and receives nine streams from the SFU. This drastically reduces client-side upload bandwidth.
An SFU also enables server-side features like recording, transcription, and custom layouts. By centralizing the media flow, an SFU architecture provides a single point for compliance, analytics, and quality control. VideoSDK provides a cloud SFU that handles this complexity. When using VideoSDK with React, the same integration patterns apply. Your custom hook still manages streams in refs and updates state for the UI. The difference is that the hook now manages multiple remote streams instead of one. VideoSDK handles the media routing, network traversal, and room management, allowing developers to focus on the React UI. You can explore the VideoSDK React SDK to see how this architecture simplifies group video calls.
Best Practices Checklist
To ensure a robust WebRTC React application, follow these best practices:
- Request media permissions early and handle denial gracefully with clear UI messaging.
- Store RTCPeerConnection and MediaStream objects in refs, never in React state.
- Use a custom hook to encapsulate all WebRTC connection logic and lifecycle management.
- Clean up on component unmount to free camera and microphone hardware resources.
- Test your application with both STUN and TURN servers configured to ensure production reliability.
- Monitor the connection state change events to implement automatic reconnection logic when networks drop.
Definitions Glossary
MediaStream: The object representing a collection of audio and/or video tracks captured from the user's device.
RTCPeerConnection: The core WebRTC API that creates a direct peer-to-peer link, handling ICE negotiation and media routing.
Signaling: The application-level exchange of session descriptions (SDP) and ICE candidates, typically via WebSocket or a similar channel.
STUN/TURN: Servers that assist peers in discovering each other's network addresses (STUN) or relay media when direct connections fail (TURN).
React Hook: A reusable function that encapsulates stateful logic, such as initializing a WebRTC connection, for use inside functional components.
Key Takeaways
- WebRTC provides the low-latency media layer; React provides the declarative UI layer.
- Keep persistent WebRTC objects in refs and expose only stateful flags to the UI.
- A custom useWebRTC hook centralises connection logic and cleanup.
- Proper signaling and TURN configuration are essential for reliable connections.
- For group calls, consider an SFU like VideoSDK to avoid mesh scalability limits.
Conclusion
Understanding the separation of concerns between WebRTC and React is the key to building robust real-time video experiences. WebRTC handles the complex media capture and peer-to-peer networking, while React manages the declarative UI and user interactions. By keeping persistent objects in refs, using a custom hook for logic, and managing UI through state, developers can bridge these two technologies effectively. Start by prototyping a simple two-person call to grasp the fundamentals. When you are ready to scale to production-grade group calls, explore the VideoSDK Prebuilt UI Kit or the VideoSDK SFU to handle the heavy lifting. What are you building with WebRTC and React? Drop a comment and share your real-time communication use case.
Free $20 Balance for AI Voice Agents & Video Calls
FAQ