Understanding the WebRTC API
What is WebRTC?
WebRTC (Web Real-Time Communication) is a free, open-source project that provides web browsers and mobile applications with real-time communication (RTC) capabilities via simple APIs. It allows audio and video communication to work inside web pages by allowing direct peer-to-peer communication, eliminating the need for plugins or native apps.
Core Components of the WebRTC API
The WebRTC API is built upon several core components that enable peer-to-peer communication. Understanding these components is crucial for working with WebRTC effectively.
RTCPeerConnection: This interface enables real-time communication between two peers. It handles the complex process of connecting to a remote peer, negotiating media formats, and maintaining the connection.MediaStream: Represents a stream of media data. This could be audio, video, or both.MediaStreamobjects are often obtained from the user's camera or microphone using thegetUserMediaAPI.RTCDataChannel: Provides a channel for arbitrary data transfer between peers. This allows you to send text, files, or any other type of data directly between browsers.
Browser Compatibility
WebRTC enjoys wide browser support across modern browsers, including Chrome, Firefox, Safari, and Edge. However, it's essential to test your WebRTC applications across different browsers to ensure compatibility and address any browser-specific issues. You should also consult browser compatibility charts and polyfills if you need to support older browsers.
Basic WebRTC Example: Establishing a Peer-to-Peer Connection
This example demonstrates a basic WebRTC connection between two peers using JavaScript.
Setting up the HTML
Create a simple HTML file with video elements to display local and remote video streams:
index.html
1<!DOCTYPE html>
2<html>
3<head>
4    <title>Basic WebRTC Example</title>
5</head>
6<body>
7    <h1>WebRTC Example</h1>
8    <video id="localVideo" autoplay muted playsinline></video>
9    <video id="remoteVideo" autoplay playsinline></video>
10    <script src="script.js"></script>
11</body>
12</html>
13
JavaScript Implementation
The JavaScript code handles the WebRTC signaling and peer connection logic.
- Setting up Media Constraints
Define constraints to specify the desired audio and video settings:
javascript
1const mediaConstraints = {
2    audio: true,
3    video: { width: 640, height: 480 }
4};
5- Creating
RTCPeerConnectionobjects
Create two
RTCPeerConnection objects, one for each peer:javascript
1const localVideo = document.getElementById('localVideo');
2const remoteVideo = document.getElementById('remoteVideo');
3
4let localStream;
5let peerConnection;
6
7async function init() {
8  try {
9    localStream = await navigator.mediaDevices.getUserMedia(mediaConstraints);
10    localVideo.srcObject = localStream;
11
12    peerConnection = new RTCPeerConnection();
13
14    localStream.getTracks().forEach(track => {
15      peerConnection.addTrack(track, localStream);
16    });
17
18    peerConnection.ontrack = event => {
19      remoteVideo.srcObject = event.streams[0];
20    };
21  } catch (error) {
22    console.error('Error accessing media devices.', error);
23  }
24}
25
26init();
27
28- Handling offer and answer
Implement the signaling process to exchange SDP (Session Description Protocol) offers and answers between the peers. This requires a signaling server (e.g., using WebSockets) to facilitate the exchange. This example assumes the existence of a signaling server to transmit the offer and answer.
javascript
1// Example (simplified) - requires a signaling server to transmit the offer/answer.
2// This example does *not* include the signaling server implementation.
3
4async function createOffer() {
5    const offer = await peerConnection.createOffer();
6    await peerConnection.setLocalDescription(offer);
7
8    // Send the offer to the remote peer via the signaling server
9    sendOffer(offer);
10}
11
12async function handleOffer(offer) {
13    await peerConnection.setRemoteDescription(new RTCSessionDescription(offer));
14    const answer = await peerConnection.createAnswer();
15    await peerConnection.setLocalDescription(answer);
16
17    // Send the answer back to the remote peer via the signaling server
18    sendAnswer(answer);
19}
20
21async function handleAnswer(answer) {
22    await peerConnection.setRemoteDescription(new RTCSessionDescription(answer));
23}
24
25peerConnection.onicecandidate = event => {
26    if (event.candidate) {
27        // Send the ICE candidate to the remote peer via the signaling server
28        sendIceCandidate(event.candidate);
29    }
30};
31
32async function handleIceCandidate(candidate) {
33    try {
34        await peerConnection.addIceCandidate(candidate);
35    } catch (e) {
36        console.error('Error adding received ice candidate', e);
37    }
38}
39
40//Dummy functions
41function sendOffer(offer){}
42function sendAnswer(answer){}
43function sendIceCandidate(candidate){}
44- Adding streams
Attach the local media stream to the
RTCPeerConnection object:javascript
1localStream.getTracks().forEach(track => peerConnection.addTrack(track, localStream));
2- Error Handling
Implement error handling to catch any exceptions during the WebRTC process:
javascript
1peerConnection.addEventListener('iceconnectionstatechange', () => {
2  if (peerConnection.iceConnectionState === 'failed') {
3    console.error('ICE connection failed.');
4  }
5});
6
javascript
1// Complete example (requires signaling server implementation):
2
3const localVideo = document.getElementById('localVideo');
4const remoteVideo = document.getElementById('remoteVideo');
5
6let localStream;
7let peerConnection;
8
9const configuration = {
10    iceServers: [
11        { urls: 'stun:stun.l.google.com:19302' }
12    ]
13};
14
15async function init() {
16    try {
17        localStream = await navigator.mediaDevices.getUserMedia({ video: true, audio: true });
18        localVideo.srcObject = localStream;
19
20        peerConnection = new RTCPeerConnection(configuration);
21
22        localStream.getTracks().forEach(track => {
23            peerConnection.addTrack(track, localStream);
24        });
25
26        peerConnection.ontrack = event => {
27            remoteVideo.srcObject = event.streams[0];
28        };
29
30        peerConnection.onicecandidate = event => {
31            if (event.candidate) {
32                sendMessage({ 'ice': event.candidate });
33            }
34        };
35
36
37        // Create an offer if this is the initiator
38        if (isInitiator) {
39            createOffer();
40        }
41
42    } catch (e) {
43        alert('getUserMedia() error: ' + e.name);
44    }
45}
46
47
48async function createOffer() {
49    try {
50        const offer = await peerConnection.createOffer();
51        await peerConnection.setLocalDescription(offer);
52        sendMessage({ 'offer': offer });
53    } catch (e) {
54        alert('createOffer() error: ' + e.name);
55    }
56}
57
58async function handleOffer(offer) {
59    try {
60        await peerConnection.setRemoteDescription(new RTCSessionDescription(offer));
61        const answer = await peerConnection.createAnswer();
62        await peerConnection.setLocalDescription(answer);
63        sendMessage({ 'answer': answer });
64    } catch (e) {
65        alert('setRemoteDescription() error: ' + e.name);
66    }
67}
68
69async function handleAnswer(answer) {
70    try {
71        await peerConnection.setRemoteDescription(new RTCSessionDescription(answer));
72    } catch (e) {
73        alert('setRemoteDescription() error: ' + e.name);
74    }
75}
76
77async function handleIceCandidate(candidate) {
78    try {
79        await peerConnection.addIceCandidate(new RTCIceCandidate(candidate));
80    } catch (e) {
81        alert('addIceCandidate() error: ' + e.name);
82    }
83}
84
85// Signaling logic (replace with your actual signaling server implementation)
86let isInitiator = true; // Set to true for the peer initiating the call
87
88function sendMessage(message) {
89    // In a real application, you would send this message to your signaling server.
90    console.log('Sending message:', message);
91    // Pretend we're sending the message...
92    setTimeout(() => {
93        // Simulate receiving a message from the other peer
94        if (message.offer) {
95            if (!isInitiator) {
96                handleOffer(message.offer);
97            }
98        } else if (message.answer) {
99            handleAnswer(message.answer);
100        } else if (message.ice) {
101            handleIceCandidate(message.ice);
102        }
103    }, 1000);
104}
105
106
107init();
108
109Advanced WebRTC Examples: Adding Functionality
These examples demonstrate how to add more advanced functionality to your WebRTC applications.
Video Chat Implementation
To enable video chat, ensure that the
mediaConstraints include video:javascript
1const mediaConstraints = {
2    audio: true,
3    video: true
4};
5
javascript
1// Add video to the HTML
2<video id="localVideo" autoplay muted playsinline style="width:300px;"></video>
3<video id="remoteVideo" autoplay playsinline style="width:300px;"></video>
4
Audio Chat Implementation
To create an audio-only chat application, set the video constraint to false:
javascript
1const mediaConstraints = {
2    audio: true,
3    video: false
4};
5
javascript
1// No video element needed in HTML
2<audio id="localAudio" autoplay muted playsinline></audio>
3<audio id="remoteAudio" autoplay playsinline></audio>
4
Screen Sharing
To implement screen sharing, use the
getDisplayMedia API:javascript
1async function startScreenShare() {
2  try {
3    const stream = await navigator.mediaDevices.getDisplayMedia({
4      video: true,
5      audio: true //optional
6    });
7
8    localVideo.srcObject = stream;
9
10     stream.getTracks().forEach(track => {
11            peerConnection.addTrack(track, localStream);
12        });
13
14  } catch (err) {
15    console.error("Error: " + err);
16  }
17}
18
Data Channels for Text Communication
Create a data channel to send text messages between peers:
javascript
1const dataChannel = peerConnection.createDataChannel('chat');
2
3dataChannel.onopen = () => console.log('Data channel opened');
4dataChannel.onmessage = event => console.log('Received message:', event.data);
5
6dataChannel.send('Hello from Peer 1!');
7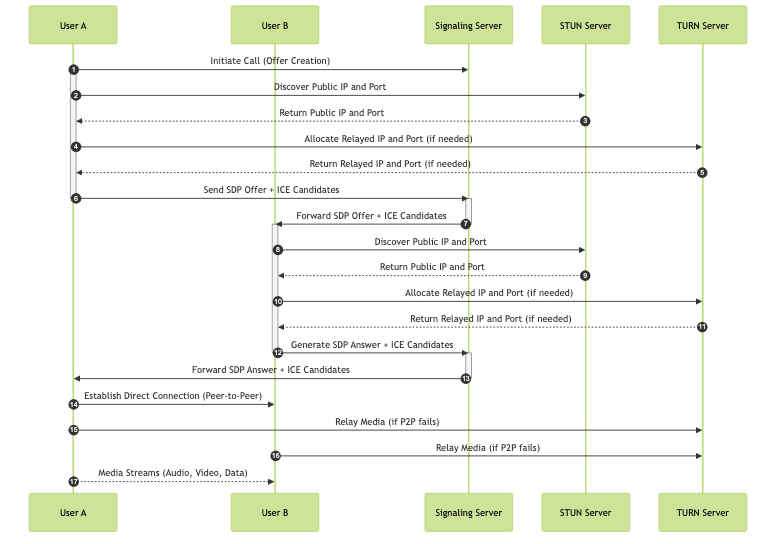
Handling WebRTC Challenges and Best Practices
Signaling
Signaling is the process of exchanging metadata between peers to establish a WebRTC connection. This typically involves exchanging SDP offers and answers, as well as ICE candidates. A separate signaling server is needed to coordinate this process. Common signaling methods include WebSockets, Socket.IO, or REST APIs.
STUN and TURN Servers
STUN (Session Traversal Utilities for NAT) and TURN (Traversal Using Relays around NAT) servers are essential for WebRTC to work behind Network Address Translation (NAT) firewalls. STUN servers help peers discover their public IP address and port, while TURN servers provide a relay service when direct peer-to-peer connections are not possible. Public STUN servers are available, and you can set up your own TURN server if needed for higher reliability.
Error Handling and Robustness
Implement robust error handling to gracefully handle exceptions and network issues. Listen for
iceconnectionstatechange events to detect connection failures. Implement retry mechanisms and user-friendly error messages to improve the user experience.Security Considerations
WebRTC uses DTLS (Datagram Transport Layer Security) to encrypt media streams and data channels. Ensure that your signaling channel is also secured using HTTPS or WSS (WebSocket Secure). Be mindful of potential security vulnerabilities and follow best practices for securing your WebRTC applications.
Optimizing WebRTC Performance
Choosing Appropriate Media Constraints
Optimize media constraints to balance video quality and bandwidth usage. Lowering the resolution or frame rate can significantly reduce bandwidth consumption. Use appropriate codecs that are widely supported.
Bandwidth Management
Implement adaptive bitrate streaming to dynamically adjust the video quality based on the available bandwidth. Monitor network conditions and adjust the media constraints accordingly. Consider using techniques such as Simulcast to send multiple streams at different quality levels.
Reducing Latency
Minimize latency by optimizing network configurations and reducing processing overhead. Use low-latency codecs and prioritize real-time traffic. Choose a signaling server geographically close to your users.
Conclusion: Expanding your WebRTC Knowledge
WebRTC is a powerful technology for building real-time communication applications. By understanding the core components and implementing best practices, you can create high-quality, reliable WebRTC experiences. Continue to explore advanced features and optimization techniques to further enhance your WebRTC skills.
- Learn more about WebRTC:
WebRTC official website
- WebRTC API Reference:
MDN Web Docs
Want to level-up your learning? Subscribe now
Subscribe to our newsletter for more tech based insights
FAQ