Setting Up a Real-time iOS App with Socket.IO
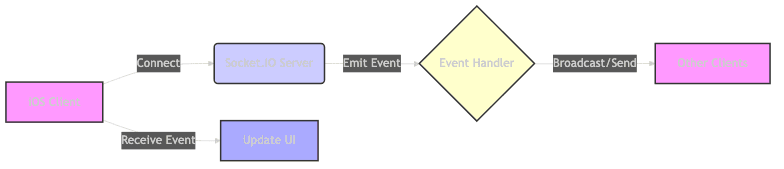
Socket.IO is a library that enables real-time, bidirectional and event-based communication between a client and a server. It's built on top of the WebSocket protocol and provides additional features like automatic reconnection, fallback to HTTP long-polling, and multiplexing. This makes it a powerful tool for building real-time applications such as chat apps, live dashboards, and multiplayer games on iOS.
Introduction to Socket.IO and its benefits in iOS Development
Socket.IO simplifies the development of real-time applications by providing a high-level API for handling complex network communication. Instead of dealing directly with WebSocket frames or HTTP requests, you can use Socket.IO's event-based system to send and receive data in a structured and reliable way. The bidirectional nature of Socket.IO allows for instant updates, crucial for providing a seamless user experience in modern iOS apps. It's useful for building a swift socket io chat app.
Choosing the Right Socket.IO Client for iOS
While there are options for using raw WebSockets or other networking libraries,
Socket.IO-Client-Swift is the most popular and well-maintained Swift client for Socket.IO. It offers a clean and easy-to-use API, handles reconnection logic automatically, and supports various features of the Socket.IO protocol. This tutorial will focus on using Socket.IO-Client-Swift for building our real-time iOS application.Installing Socket.IO-Client-Swift
There are several ways to install the
Socket.IO-Client-Swift library into your iOS project. You can use Swift Package Manager (SPM), CocoaPods, or Carthage. Here’s how to do it with each dependency manager:Using Swift Package Manager (SPM)
Swift Package Manager is Apple's official dependency manager. To add
Socket.IO-Client-Swift to your project using SPM, follow these steps:- In Xcode, go to
File->Swift Packages->Add Package Dependency...\ - Enter the repository URL:
https://github.com/socketio/socket.io-client-swift - Choose the version you want to use and click
Add Package.
1// Example Package.swift integration (not typically needed for Xcode managed SPM)
2// swift-tools-version:5.3
3
4import PackageDescription
5
6let package = Package(
7    name: "YourProject",
8    dependencies: [
9        .package(url: "https://github.com/socketio/socket.io-client-swift", from: "16.0.0")
10    ],
11    targets: [
12        .target(
13            name: "YourProject",
14            dependencies: ["SocketIO"])
15    ]
16)
17
Using CocoaPods
CocoaPods is a popular dependency manager for iOS projects. To install
Socket.IO-Client-Swift using CocoaPods, follow these steps:- Create a
Podfilein your project directory if you don't have one already:bash touch Podfile - Add the following line to your
Podfile:
1pod 'Socket.IO-Client-Swift', '~> 16.0'
2- Run
pod installin your terminal:1pod install 2 - Open the
.xcworkspacefile that CocoaPods generates.
Using Carthage
Carthage is another dependency manager for iOS projects. To install
Socket.IO-Client-Swift using Carthage, follow these steps:- Create a
Cartfilein your project directory if you don't have one already:
1touch Cartfile
2- Add the following line to your
Cartfile:
1github "socketio/socket.io-client-swift" ~> 16.0
2- Run
carthage updatein your terminal:
1carthage update --platform iOS
2- Follow the Carthage instructions to link the built framework to your project.
Building a Simple Chat Application with Socket.IO
Now that you have installed
Socket.IO-Client-Swift, let's build a simple chat application to demonstrate its usage. This will cover the fundamental aspects of using Socket.IO in an iOS environment. The goal is to integrate Socket io in ios project.Setting up the Server-Side
First, you'll need a Socket.IO server to connect to. For this example, we'll use a simple Node.js server. Here's a basic server setup:
1const io = require('socket.io')(3000, {
2  cors: { origin: "*" }
3});
4
5io.on('connection', socket => {
6  console.log('User connected');
7
8  socket.on('send-message', message => {
9    socket.broadcast.emit('receive-message', message)
10  })
11
12  socket.on('disconnect', () => {
13    console.log('User disconnected');
14  });
15});
16
This server listens for connections on port 3000 and broadcasts any received messages to all connected clients. The
cors configuration allows connections from any origin, which is suitable for development but should be restricted in a production environment.Creating the iOS UI
Create a simple UI in your iOS app with a
UITextField for entering messages, a UIButton for sending messages, and a UITextView for displaying the chat log. You can use Storyboards or programmatically create the UI elements. Connect the UI elements to your ViewController using @IBOutlets and @IBActions.1import UIKit
2
3class ViewController: UIViewController {
4
5 @IBOutlet weak var messageTextField: UITextField!
6 @IBOutlet weak var chatTextView: UITextView!
7
8 @IBAction func sendButtonTapped(_ sender: UIButton) {
9 // Send message logic will go here
10 }
11
12 override func viewDidLoad() {
13 super.viewDidLoad()
14 // Socket connection and setup will go here
15 }
16}
17Connecting to the Socket.IO Server
Import the
SocketIO framework in your ViewController and create a SocketManager and SocketIOClient instance. Connect to the server in the viewDidLoad method.1import SocketIO
2
3class ViewController: UIViewController {
4
5 let manager = SocketManager(socketURL: URL(string: "http://localhost:3000")!, config: [.log(true), .compress])
6 var socket: SocketIOClient!
7
8 @IBOutlet weak var messageTextField: UITextField!
9 @IBOutlet weak var chatTextView: UITextView!
10
11 @IBAction func sendButtonTapped(_ sender: UIButton) {
12 // Send message logic will go here
13 }
14
15 override func viewDidLoad() {
16 super.viewDidLoad()
17
18 socket = manager.defaultSocket
19
20 socket.on(clientEvent: .connect) {data, ack in
21 print("socket connected")
22 }
23
24 socket.connect()
25 }
26}
27This code initializes the
SocketManager with the server URL (replace http://localhost:3000 with your server's address) and retrieves the default socket. It then connects to the server and prints "socket connected" to the console when the connection is established.Sending and Receiving Messages
Implement the
sendButtonTapped action to send messages to the server. The server then broadcasts the message to all connected clients. To send a message, emit an event to the server with the message text as data.1@IBAction func sendButtonTapped(_ sender: UIButton) {
2 guard let message = messageTextField.text, !message.isEmpty else { return }
3 socket.emit("send-message", message)
4 messageTextField.text = ""
5}
6To receive messages, listen for the
receive-message event on the socket. When a message is received, append it to the chatTextView.1override func viewDidLoad() {
2 super.viewDidLoad()
3
4 socket = manager.defaultSocket
5
6 socket.on(clientEvent: .connect) {data, ack in
7 print("socket connected")
8 }
9
10 socket.on("receive-message") {data, ack in
11 if let message = data[0] as? String {
12 self.chatTextView.text += "
13" + message
14 }
15 }
16
17 socket.connect()
18}
19Handling Disconnections and Reconnections
Socket.IO handles disconnections and reconnections automatically. However, it's good practice to listen for the
disconnect and reconnect events to update the UI accordingly. For example, you could display a message indicating that the connection has been lost or re-established.1socket.on(clientEvent: .disconnect) {data, ack in
2 print("socket disconnected")
3}
4
5socket.on(clientEvent: .reconnect) {data, ack in
6 print("socket reconnected")
7}
8Advanced Socket.IO Techniques for iOS
Beyond the basics, Socket.IO offers several advanced features for building more complex real-time applications. These include namespaces, rooms, and broadcasting.
Working with Namespaces
Namespaces allow you to multiplex a single TCP connection for different applications or features. To connect to a namespace, use the
socket(forNamespace:) method of the SocketManager.1let chatSocket = manager.socket(forNamespace: "/chat")
2
3chatSocket.on(clientEvent: .connect) {data, ack in
4 print("Connected to chat namespace")
5}
6
7chatSocket.connect()
8Utilizing Rooms for Group Communication
Rooms allow you to group clients together and send messages to specific groups. On the server-side, clients can join and leave rooms. The iOS client doesn't directly "join" rooms; instead, the server manages the room membership based on events it receives from the client. To join a room, emit an event to the server indicating the room you want to join.
1// To join a room, emit an event to the server
2socket.emit("join-room", "room123")
3
4//To leave a room, emit an event to the server
5socket.emit("leave-room", "room123")
6
On the server, you would handle these events:
1io.on('connection', socket => {
2  socket.on('join-room', room => {
3    socket.join(room);
4  });
5
6  socket.on('leave-room', room => {
7    socket.leave(room);
8  });
9
10  socket.on('send-message', (message, room) => {
11    io.to(room).emit('receive-message', message); // Send to specific room
12  });
13});
14
Broadcasting Messages
Broadcasting allows you to send messages to all connected clients except for the sender. This is useful for sending system-wide announcements or notifications. The server handles the actual broadcasting logic.
1socket.emit("broadcast-message", "Hello everyone!")
2
Server-side implementation:
1socket.on('broadcast-message', message => {
2  socket.broadcast.emit('receive-message', message);
3});
4
Implementing Efficient Error Handling
Proper error handling is essential for robust real-time applications. Listen for error events on the socket and handle them appropriately. You can also implement custom error handling logic based on the application's needs.
1socket.on(clientEvent: .error) {data, ack in
2    print("Socket error: \(data)")
3}
4
Optimizing Socket.IO Performance in Your iOS App
Optimizing Socket.IO performance is crucial for ensuring a smooth and responsive user experience. Here are some techniques to consider:
Reducing Network Overhead
Use compression to reduce the amount of data transmitted over the network.
Socket.IO-Client-Swift supports compression out of the box. Enable compression during SocketManager initialization.Handling Large Datasets
Avoid sending large datasets over Socket.IO. If you need to transmit large amounts of data, consider using alternative methods such as HTTP file uploads or data streaming. Break up large messages into smaller chunks.
Implementing Background Tasks for Persistent Connections
To maintain a persistent Socket.IO connection in the background, you can use background tasks. However, be mindful of battery consumption and follow Apple's guidelines for background execution.
Monitoring Battery Consumption
Monitor your app's battery consumption to ensure that Socket.IO usage is not draining the battery excessively. Use Xcode's Instruments tool to profile your app and identify potential battery drains.
Security Considerations for Socket.IO in iOS
Security is paramount when building real-time applications. Here are some important security considerations for using Socket.IO in iOS:
Transport Layer Security (TLS/SSL)
Always use TLS/SSL to encrypt the communication between the client and the server. This prevents eavesdropping and ensures the integrity of the data. Ensure your Socket.IO server is configured to use HTTPS.
Authentication and Authorization
Implement authentication and authorization mechanisms to protect your Socket.IO endpoints. Verify the identity of the client and ensure that they have the necessary permissions to access the requested resources. Use tokens or other secure authentication methods. This is particularly important for an ios socket io chat app.
Further Resources:
Socket.IO Documentation
: "Learn more about the capabilities of Socket.IO."Swift Package Manager Documentation
: "Dive deeper into using Swift Package Manager for dependency management."CocoaPods Documentation
: "Explore CocoaPods for managing dependencies in your iOS projects."
Want to level-up your learning? Subscribe now
Subscribe to our newsletter for more tech based insights
FAQ