


WebTorrent is a JavaScript torrent client that runs the BitTorrent protocol over WebRTC data channels, enabling peer-to-peer file sharing entirely inside the browser without plugins or server-side downloads. It replaces the TCP and UDP transport of traditional torrent clients with encrypted, browser-native WebRTC connections, using WebSocket trackers for signaling. If you are building decentralized file sharing, media streaming, or offline-first web apps, WebTorrent plus WebRTC is the standard path, and managed RTC platforms like VideoSDK can complement it for real-time communication features.
A browser can now download a multi-gigabyte file from dozens of strangers around the world, without a single line of server-side download code. That is not a browser demo from a lab; it is WebTorrent, running the BitTorrent protocol over WebRTC data channels since its release by Feross Aboukhadijeh in 2013, and still actively maintained as of 2026.
For developers, this matters because it changes what a web page can be. Instead of a thin client fetching everything from an origin server, a page can become a full peer in a swarm, exchanging data directly with other browsers and Node.js peers. The cost is complexity: WebRTC transport behaves differently from TCP, browser peers cannot speak raw UDP, and signaling needs a different mechanism than the trackers traditional torrent clients use.
This article walks through how WebTorrent maps BitTorrent onto WebRTC, how peers discover each other, where performance and security trade-offs sit, and the pitfalls that bite teams in production. By the end, you will understand the full architecture of a WebTorrent WebRTC session and when to choose it over a conventional client.
What Is WebTorrent?
WebTorrent is defined as a JavaScript implementation of the BitTorrent protocol that runs both in Node.js and in the browser. Its dual-runtime nature is the key design decision: the same client logic works server-side, where it can use standard TCP and UDP sockets, and client-side, where it must use WebRTC data channels because browsers do not expose raw sockets.
This means a WebTorrent swarm can be hybrid. Node.js peers act as bridges, seeding files over both transports, while browser peers connect over WebRTC. The protocol layer, the BitTorrent wire messages for handshakes, piece requests, and have-statements, stays identical across both runtimes. Only the transport differs.
How WebTorrent Uses WebRTC for Peer Transport
WebTorrent works by replacing the TCP transport of traditional BitTorrent with WebRTC data channels when peers are browsers. A WebRTC data channel is a direct, encrypted pipe between two peers, established through the browser's real-time communication stack. WebTorrent layers the BitTorrent wire protocol on top of that pipe, so peers exchange the same handshake, bitfield, and request messages a desktop client would send over TCP.
Establishing that pipe involves three WebRTC mechanisms. First, signaling: the two peers must exchange session descriptions, encoded in the Session Description Protocol (SDP), which describe what media or data each side wants. Second, ICE negotiation: the Interactive Connectivity Establishment framework gathers candidate network addresses and tests which path actually connects the peers. Third, STUN and TURN servers: STUN lets a peer discover its public-facing address behind a NAT, while TURN relays traffic as a last resort when direct connection fails.
The following diagram shows the overall flow for a browser peer joining a swarm:
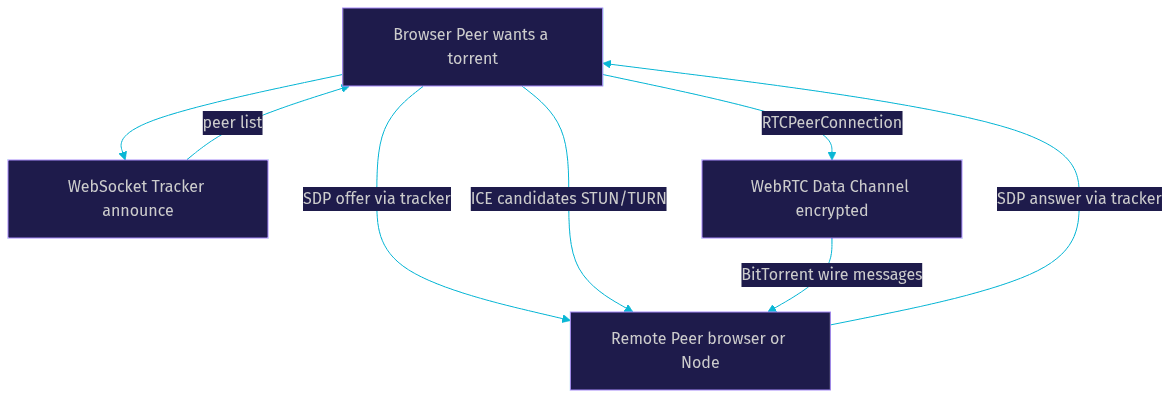
Once the data channel opens, the tracker steps out of the data path. All piece transfer happens peer-to-peer, which is the entire point.
WebRTC Data Channels vs Traditional Torrent Transport
Traditional torrent clients rely on TCP, which guarantees ordered, reliable delivery, or on the UDP-based micro-transport protocol (uTP) for congestion-aware transfers. WebRTC data channels can be configured as reliable and ordered, which WebTorrent uses, so delivery semantics roughly match TCP. The differences are in the edges: WebRTC adds per-message framing, encryption is mandatory rather than optional, and browser peers depend on ICE and TURN for connectivity, adding connection setup latency that TCP peers do not experience.
The bigger constraint is reachability. A browser peer cannot accept inbound connections the way a seeded TCP socket can, so every WebRTC connection must be initiated through signaling. This shapes the whole discovery architecture described next.
Browser Compatibility and WebRTC Support Detection
WebRTC data channels are supported in every major modern browser as of 2026: Chrome, Edge, Firefox, Safari, Opera, and Chromium-based mobile browsers. The practical gaps are older enterprise browsers, some webviews inside native apps, and environments where WebRTC is deliberately blocked by policy or network equipment.
WebTorrent ships a built-in support flag that reports whether the current runtime can use WebRTC, so an app can check capability before attempting a connection. The recommended pattern is graceful degradation: if WebRTC is unavailable, fall back to an HTTP fetch from a server-side seeder, a CDN-hosted copy of the file, or a hybrid Node.js peer that serves the content over plain HTTP. Designing the fallback path up front is far cheaper than discovering in production that a segment of your users cannot connect.
Core Architecture of a WebTorrent WebRTC Session
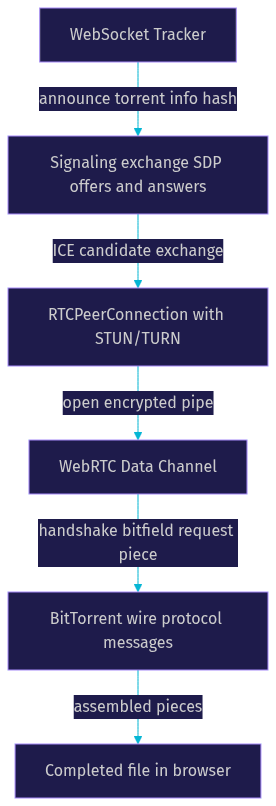
A WebTorrent session in the browser is a pipeline of five cooperating components: the tracker, the signaling exchange, the RTCPeerConnection, the data channel, and the BitTorrent wire protocol running on top. Each stage has a distinct failure mode, so understanding the sequence matters when debugging.
The vertical flow looks like this:
Tracker Communication
Because browsers cannot contact the UDP trackers that conventional clients use, WebTorrent introduced WebSocket trackers. The browser peer connects to a tracker server over WebSocket and announces the info hash of the torrent it wants. The tracker responds with a list of peers currently in the swarm, and then relays the SDP offers and answers between peers who want to connect. The tracker is a matchmaker and message relay during setup only; it never touches file data.
ICE Negotiation and NAT Traversal
Once two peers have each other's SDP, ICE gathers candidate addresses, including local addresses, public addresses discovered via STUN, and relay addresses on a TURN server. ICE then tests candidate pairs in priority order until one connects. Most home and office NATs are traversed directly via STUN; symmetric or strict corporate NATs often require TURN, which means relayed traffic and added latency. Budgeting for a TURN server is a production consideration most WebTorrent deployments initially skip.
Peer Discovery Mechanisms in WebTorrent
Peer discovery is where WebTorrent diverges most visibly from desktop clients. Traditional BitTorrent finds peers through three channels: centralized trackers, the distributed hash table (DHT), and local service discovery (LSD). Browser peers face a constraint here: WebRTC connections require signaling, and the standard DHT speaks raw UDP, which browsers cannot do.
In practice, browser peers rely on WebSocket trackers as the primary discovery mechanism. Node.js peers in a hybrid swarm can additionally participate in the DHT and act as bridges, announcing WebRTC-capable peers into the wider network. The WebTorrent plugin ecosystem extends this further: community plugins such as Rondevu provide alternative signaling channels, and custom discovery plugins let you attach peers from your own infrastructure, for example a list of known seeders embedded in your app.
The result is a layered discovery model: WebSocket trackers for the open web, hybrid Node peers for DHT reach, and plugins for controlled deployments. When you control both ends, such as in an enterprise file-distribution app, custom discovery is often the most reliable option.
Performance Considerations for WebTorrent Swarms
Performance in a WebRTC-based swarm is dominated by three factors: connection setup latency, per-peer throughput, and piece selection strategy.
Connection setup is the first cost. ICE negotiation, STUN round trips, and in the worst case TURN allocation can add hundreds of milliseconds to seconds before the first byte flows, versus a near-immediate TCP handshake for desktop peers. For large swarms this setup cost amortizes well; for small, short-lived transfers it dominates.
Throughput per WebRTC peer is generally competitive with TCP for moderate file sizes, but browsers impose constraints: tab throttling when backgrounded, memory limits on buffered pieces, and no control over socket-level congestion behavior. Network-adaptive behavior exists inside WebRTC's transport, but you cannot tune it the way a native client tunes uTP.
Piece selection is a strategic choice. Traditional clients use rarest-first to maximize swarm health. Streaming use cases, such as playing video while it downloads, need sequential selection so the beginning of the file arrives first. WebTorrent supports both, and picking the wrong one for your use case is a common source of poor perceived performance. For media streaming, sequential with a small buffer window is the standard approach.
Security and Privacy Aspects
Every WebRTC data channel is encrypted end-to-end using the standard WebRTC security stack, specifically DTLS with SRTP-derived keying, so piece data in transit is protected by default. This is stronger than plain BitTorrent over TCP, where encryption is optional and often absent.
The privacy picture is more nuanced. Participating in a swarm exposes your IP address to other peers, exactly as with any torrent client, and WebRTC can leak local IP candidates via ICE unless the browser's privacy settings mask them. Token-based authentication, supported by WebTorrent's tracker protocol, lets you restrict who can announce into a private swarm, which matters for controlled deployments.
For sensitive content, the honest assessment is this: WebTorrent encrypts transport well, but it does not anonymize participants. If peer IP exposure is a problem, WebTorrent alone is not the answer.
Practical Use Cases for WebTorrent WebRTC
The flagship use case is browser-based media streaming. Instant.io, the reference WebTorrent web app, demonstrates seeding and downloading files directly in the page, and the same pattern powers video playback while the file is still downloading, using sequential piece selection.
Beyond media, teams use WebTorrent for collaborative file distribution in tools where users already have the file and bandwidth, decentralized web apps that want to reduce origin server load, and offline-first progressive web apps where previously visited content can be re-fetched from peers when the network is poor. CDN fallback patterns are common in production: serve from peers when available, fall back to origin or CDN when the swarm is thin. Some teams also pair WebTorrent-style data channels with real-time communication platforms like VideoSDK's interactive live streaming when an app needs both bulk file transfer and live interaction.
Common Pitfalls and How to Avoid Them
Most WebTorrent production failures cluster into four categories.
Missing WebRTC support is the first: users behind restrictive proxies, old webviews, or policy-blocked networks simply cannot connect. Detect support early and route those users to an HTTP fallback rather than showing an error.
NAT blockage is second. Symmetric NATs and strict corporate firewalls frequently defeat direct ICE connectivity, and without a TURN server the connection silently fails. Deploying TURN, and monitoring what fraction of your connections end up relayed, is a production requirement, not an optimization.
Tracker downtime is third. If your only WebSocket tracker goes offline, browser peers cannot discover each other at all. Run redundant trackers, or use custom discovery plugins that embed known seeder addresses directly in your app.
Large file handling is fourth. Browsers hold downloaded pieces in memory before assembly, so multi-gigabyte torrents can exhaust a mobile tab. Stream pieces to IndexedDB or process them incrementally rather than buffering the whole file, and test on low-memory devices before shipping.
Future Trends and Extensions
The WebTorrent ecosystem is extending along three lines as of 2026. Signaling plugins like Rondevu point toward more flexible, decentralized discovery beyond WebSocket trackers. WebRTC-based mesh networks are being explored for fully serverless data distribution, where the only infrastructure is the initial signaling handshake. And the intersection with AI is growing: WebRTC-enabled AI agents, such as those built on VideoSDK's open-source Agent SDK, use the same data channel transport for real-time voice and multimodal interaction, and hybrid architectures that combine bulk P2P file transfer with live agent communication are an emerging pattern worth watching.
Definitions Glossary
WebTorrent: A JavaScript BitTorrent client that runs in both Node.js and browsers, using WebRTC data channels as the transport when peers are browser-based.
WebRTC Data Channel: An encrypted, peer-to-peer message pipe between two browsers or runtimes, configurable for reliable ordered delivery, used by WebTorrent to carry BitTorrent wire messages.
WebSocket Tracker: A signaling server that browser peers announce to, which returns peer lists and relays SDP offers and answers during WebRTC connection setup.
ICE (Interactive Connectivity Establishment): The WebRTC framework that gathers and tests candidate network addresses to find a working path between two peers, including through NATs.
STUN/TURN: STUN lets a peer discover its public address behind a NAT; TURN relays traffic through a server when direct connection fails. Both are essential infrastructure for WebTorrent in restrictive networks.
Hybrid Peer: A Node.js WebTorrent peer that speaks both TCP/UDP and WebRTC, bridging browser peers into traditional BitTorrent swarms.
Key Takeaways
- WebTorrent runs the standard BitTorrent wire protocol over WebRTC data channels, so browsers become full swarm peers without plugins or server-side downloads.
- WebSocket trackers handle discovery and signaling because browser peers cannot use UDP-based DHT or trackers directly; hybrid Node.js peers bridge the two worlds.
- ICE, STUN, and TURN are mandatory production infrastructure, and a significant share of real-world connections will need TURN relaying.
- Performance hinges on piece selection strategy: sequential for streaming, rarest-first for swarm health, with connection setup latency as the fixed overhead.
- WebRTC data channels are encrypted by default, but swarm participation still exposes peer IP addresses, so WebTorrent is not an anonymity tool.
Conclusion
WebTorrent WebRTC remains the most compelling way to bring peer-to-peer file sharing into the browser: standards-based transport, mandatory encryption, and a dual-runtime design that bridges cleanly into traditional swarms. The trade-offs are real, from TURN infrastructure to memory limits on large files, but for media streaming, decentralized apps, and offline-first experiences, it is a proven pattern with a decade of production use. Start with the official WebTorrent documentation on GitHub and the WebRTC specification from the W3C, and if your app also needs live video, audio, or AI-driven interaction alongside bulk transfer, explore VideoSDK's real-time communication SDKs. What are you building with WebTorrent? Drop a comment, I'd love to hear what kind of peer-to-peer use case you're working on.
Step 5: Implement Participant View
In this section, we'll enhance our WebTorrent WebRTC application by implementing a participant view. This feature will allow users to see and manage multiple video streams from different participants. We'll create the necessary HTML, CSS, and JavaScript to handle real-time updates and display connected participants.
Displaying Participants
HTML and CSS for Participant Views
First, let's update the
index.html file to include a section for displaying participant videos. We'll also update the CSS to style the participant view.Update your
index.html:HTML
1<!-- public/index.html -->
2
3<!DOCTYPE html>
4<html lang="en">
5<head>
6  <meta charset="UTF-8">
7  <meta name="viewport" content="width=device-width, initial-scale=1.0">
8  <title>WebTorrent WebRTC App</title>
9  <link rel="stylesheet" href="styles.css">
10</head>
11<body>
12  <div class="container">
13    <h1>WebTorrent WebRTC Video Streaming</h1>
14
15    <div id="joinScreen">
16      <h2>Join a Room</h2>
17      <form id="joinForm">
18        <input type="text" id="roomInput" placeholder="Enter Room Name" required>
19        <button type="submit">Join</button>
20      </form>
21    </div>
22
23    <div id="videoScreen" style="display: none;">
24      <div class="video-container">
25        <video id="videoPlayer" controls></video>
26      </div>
27      <div class="controls">
28        <button id="playPauseBtn">Play</button>
29        <button id="fullScreenBtn">Fullscreen</button>
30        <input type="range" id="volumeControl" min="0" max="1" step="0.1" value="1">
31      </div>
32      <div class="participants">
33        <h2>Participants</h2>
34        <ul id="participantsList"></ul>
35        <div id="participantVideos"></div>
36      </div>
37    </div>
38  </div>
39  <script src="app.js"></script>
40</body>
41</html>
Add the following styles to your
styles.css file to style the participant videos:CSS
1/* public/styles.css */
2
3/* Existing code... */
4
5.participants {
6  text-align: center;
7}
8
9.participants ul {
10  list-style: none;
11  padding: 0;
12}
13
14.participants li {
15  padding: 5px 0;
16}
17
18#participantVideos {
19  display: flex;
20  flex-wrap: wrap;
21  justify-content: center;
22  gap: 10px;
23  margin-top: 20px;
24}
25
26.participant-video {
27  width: 200px;
28  height: 150px;
29  background: #000;
30  border-radius: 8px;
31  overflow: hidden;
32}
33
34.participant-video video {
35  width: 100%;
36  height: 100%;
37}
These styles ensure that the participant videos are displayed in a grid layout, making it easy to see all connected participants.
JavaScript for Real-Time Updates
Now, let's update the
app.js file to handle real-time updates and display participant videos.JavaScript
1// public/app.js
2
3// Existing code...
4
5const participantVideos = document.getElementById('participantVideos');
6
7// Function to add a participant video
8function addParticipantVideo(peerId) {
9  const participantVideoContainer = document.createElement('div');
10  participantVideoContainer.className = 'participant-video';
11  participantVideoContainer.id = `video-${peerId}`;
12
13  const videoElement = document.createElement('video');
14  videoElement.autoplay = true;
15  videoElement.controls = true;
16  participantVideoContainer.appendChild(videoElement);
17
18  participantVideos.appendChild(participantVideoContainer);
19
20  return videoElement;
21}
22
23// Example function to simulate adding participant videos
24function simulateParticipants() {
25  const peers = ['Peer 1', 'Peer 2', 'Peer 3'];
26  peers.forEach((peer, index) => {
27    const videoElement = addParticipantVideo(peer);
28    // For demonstration, we'll use the same video source for all participants
29    videoElement.src = 'https://www.w3schools.com/html/mov_bbb.mp4';
30  });
31}
32
33// Call simulateParticipants for demonstration purposes
34simulateParticipants();
35
36// Function to join a room
37function joinRoom(roomName) {
38  joinScreen.style.display = 'none';
39  videoScreen.style.display = 'block';
40  console.log(`Joined room: ${roomName}`);
41
42  // Add the torrent and stream the video
43  client.add(torrentId, (torrent) => {
44    const file = torrent.files.find(file => file.name.endsWith('.mp4'));
45    file.renderTo(videoPlayer);
46
47    playPauseBtn.addEventListener('click', () => {
48      if (videoPlayer.paused) {
49        videoPlayer.play();
50        playPauseBtn.textContent = 'Pause';
51      } else {
52        videoPlayer.pause();
53        playPauseBtn.textContent = 'Play';
54      }
55    });
56
57    fullScreenBtn.addEventListener('click', () => {
58      if (!document.fullscreenElement) {
59        if (videoPlayer.requestFullscreen) {
60          videoPlayer.requestFullscreen();
61        } else if (videoPlayer.mozRequestFullScreen) { /* Firefox */
62          videoPlayer.mozRequestFullScreen();
63        } else if (videoPlayer.webkitRequestFullscreen) { /* Chrome, Safari & Opera */
64          videoPlayer.webkitRequestFullscreen();
65        } else if (videoPlayer.msRequestFullscreen) { /* IE/Edge */
66          videoPlayer.msRequestFullscreen();
67        }
68      } else {
69        if (document.exitFullscreen) {
70          document.exitFullscreen();
71        } else if (document.mozCancelFullScreen) { /* Firefox */
72          document.mozCancelFullScreen();
73        } else if (document.webkitExitFullscreen) { /* Chrome, Safari & Opera */
74          document.webkitExitFullscreen();
75        } else if (document.msExitFullscreen) { /* IE/Edge */
76          document.msExitFullscreen();
77        }
78      }
79    });
80  });
81
82  // Handle participants (for demonstration purposes)
83  const peers = ['Peer 1', 'Peer 2', 'Peer 3'];
84  peers.forEach(peer => {
85    const li = document.createElement('li');
86    li.textContent = peer;
87    participantsList.appendChild(li);
88  });
89}
90
91// Function to handle new participant joining
92function handleNewParticipant(peerId) {
93  const videoElement = addParticipantVideo(peerId);
94  // Assume we get a stream from the peer
95  // For demonstration, we'll use a sample video source
96  videoElement.src = 'https://www.w3schools.com/html/mov_bbb.mp4';
97}
98
99// Example usage of handleNewParticipant
100handleNewParticipant('Peer 4');
This script adds a function
addParticipantVideo to create and display a new video element for each participant. The simulateParticipants function is a placeholder to demonstrate adding participant videos. The joinRoom function handles joining a room and initializes the WebTorrent client. The handleNewParticipant function simulates adding a new participant video.By implementing these changes, you now have a participant view that displays videos for all connected participants. This enhances the collaborative aspect of your WebTorrent WebRTC application by allowing users to see and manage multiple video streams in real-time.
In the next section, we will focus on running and testing the complete application to ensure everything works as expected.
Step 6: Run Your Code Now
In this section, we'll focus on running and testing your complete WebTorrent WebRTC application to ensure everything works as expected. We'll cover local testing, debugging common issues, and best practices for deploying your application.
Testing the Application
Before deploying your application, it's essential to test it locally to ensure all functionalities work correctly. Follow these steps to run your application:
Start the Node.js Server
Ensure you are in your project directory and start the Node.js server using the following command:
bash
1 node index.jsYou should see a message indicating that the server is running on port 3000:
bash
1 Server running on port 3000Open the Application in Your Browser
Open your browser and navigate to
http://localhost:3000. You should see the join screen where you can enter a room name.Join a Room
Enter a room name and click the "Join" button. This action should switch to the video screen, start streaming the video, and display the participant view.
Debugging Common Issues
Here are some common issues you might encounter and how to resolve them:
Server Not Starting
- Ensure you have Node.js and npm installed.
- Check for syntax errors in your
index.jsor other JavaScript files. - Ensure all necessary dependencies are installed by running
npm install.
Video Not Streaming
- Verify the torrent file or magnet link is correct and accessible.
- Check for errors in the browser console and server logs.
- Ensure your HTML and JavaScript files are correctly linked.
Participants Not Displaying
- Ensure the participant view is correctly implemented and styled.
- Check for errors in the JavaScript logic handling participant connections.
- Simulate participants correctly by calling the
simulateParticipantsfunction.
Deploying the Application
Deployment Options for Node.js Applications
Once you've tested your application locally, you can deploy it to a live environment. Here are some common deployment options for Node.js applications:
Heroku
- Install the Heroku CLI and log in.
- Create a new Heroku app and deploy your code using Git.
- Configure environment variables and scale your application.
Vercel
- Sign up for a Vercel account and link your Git repository.
- Deploy your Node.js application with automatic builds and deployments.
- Configure custom domains and environment variables.
DigitalOcean
- Create a Droplet (virtual private server) and configure your server environment.
- Deploy your Node.js application manually or using a CI/CD pipeline.
- Manage your server and scale resources as needed.
Best Practices for Production Deployment
- Security: Ensure your application is secure by implementing HTTPS, sanitizing user inputs, and using secure storage for sensitive data.
- Performance: Optimize your application for performance by using a CDN for static assets, enabling caching, and monitoring server load.
- Scalability: Design your application to scale by using microservices, load balancing, and containerization (e.g., Docker).
Conclusion
In this comprehensive guide, we've explored the process of creating a video streaming application using WebTorrent and WebRTC with JS/Node.js. We've covered everything from setting up the development environment and installing the necessary libraries to implementing essential features like video controls and participant views. By leveraging the strengths of both WebTorrent and WebRTC, you can build a robust, decentralized video streaming application that is efficient, scalable, and resilient.
Free $20 Balance for AI Voice Agents & Video Calls
FAQ